Piston rings-fitting
RING END GAP
Before reinstalling used rings or installing new rings, the ring clearances must be checked.
(1) Wipe the cylinder bore clean.
(2) Insert the ring in the cylinder bore.
NOTE: The ring gap measurement must be made with the ring positioned at least 12mm (0.50 inch.) from bottom of cylinder bore.
(3) Using a piston, to ensure that the ring is squared in the cylinder bore, slide the ring downward into the cylinder.
(4) Using a feeler gauge check the ring end gap (Fig. 20). Replace any rings not within specification.
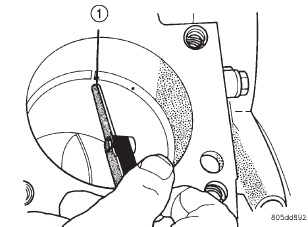 Fig. 20 Ring End Gap Measurement-Typical
1 - FEELER GAUGE
PISTON RING SIDE CLEARANCE
NOTE: Make sure the piston ring grooves are clean and free of nicks and burrs.
(5) Measure the ring side clearance as shown (Fig.
21) make sure the feeler gauge fits snugly between the ring land and the ring. Replace any ring not within specification.
(6) Rotate the ring around the piston, the ring must rotate in the groove with out binding.
EARLY BUILD
(7) The No. 1 and No. 2 piston rings have a different cross section. Ensure No. 2 ring is installed with manufacturers I.D. mark (Dot) facing up, towards top of the piston.
LATE BUILD
The No. 1 and No. 2 piston rings have a different cross section. Ensure No. 2 ring is installed with manufacturers I.D. mark (Dot) facing up, towards top of the piston. On late build engines the piston top ring groove and crown are not anodized therefore, the No. 1 piston ring is coated with an anti-friction coating. Care must be used to ensure that when installing piston rings on late build engines that the correct No. 1 piston ring be installed, failure to use the correct piston ring can cause severe damage to the piston and/or cylinder block.
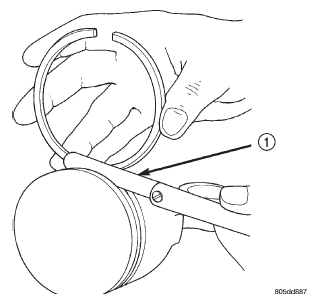 Fig. 21 Measuring Piston Ring Side Clearance
1 - FEELER GAUGE
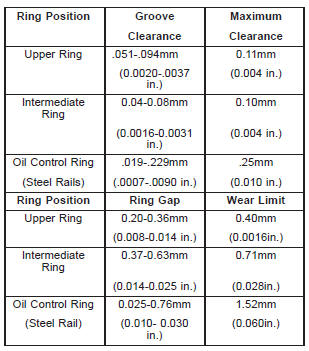
PISTON RING SPECIFICATION CHART
NOTE: Piston rings are installed in the following order:
- Oil ring expander.
- Upper oil ring side rail.
- Lower oil ring side rail.
- No. 2 Intermediate piston ring.
- No. 1 Upper piston ring.
(8) Install the oil ring expander.
(9) Install upper side rail (Fig. 22) by placing one end between the piston ring groove and the expander ring. Hold end firmly and press down the portion to be installed until side rail is in position. Repeat this step for the lower side rail.
(10) Install No. 2 intermediate piston ring using a piston ring installer (Fig. 23).
(11) Install No. 1 upper piston ring using a piston ring installer (Fig. 23).
(12) Position piston ring end gaps as shown in (Fig. 24). It is important that expander ring gap is at least 45 from the side rail gaps, but not on the piston pin center or on the thrust direction.
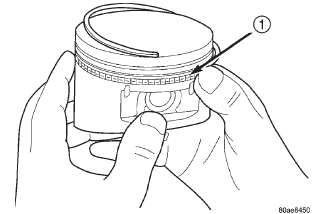 Fig. 22 Side Rail-Installation
1 - SIDE RAIL END
Dodge Durango (DN) 1998-2003 Service Manual
- Lubrication and Maintenance
- Suspension
- Differential and Driveline
- Brakes
- Cooling System
- Battery
- Starting Systems
- Charging System
- Ignition System
- Instrument Panel Systems
- Audio Systems
- Horn Systems
- Speed Control System
- Turn Signal and Hazard Warning Systems
- Wiper and Washer Systems
- Lamps
- Passive Restraint Systems
- Electrically Heated Systems
- Power Distribution System
- Power Lock Systems
- Vehicle Theft/Security Systems
- Power Seat System
- Power Window Systems
- Power Mirror Systems
- Chime/Buzzer Warning Systems
- Overhead Console Systems
- Engine
- Exhaust System
- Frame and Bumpers
- Fuel System
- Steering
- Transmission and Transfer Case
- Tires and Wheels
- Body
- Heating and Air Conditioning
- Emission Control Systems
- Introduction
Categories
