Engine oil
WARNING: NEW OR USED ENGINE OIL CAN BE IRRITATING TO THE SKIN. AVOID PROLONGED OR REPEATED SKIN CONTACT WITH ENGINE OIL.
CONTAMINANTS IN USED ENGINE OIL, CAUSED BY INTERNAL COMBUSTION, CAN BE HAZARDOUS TO YOUR HEALTH. THOROUGHLY WASH EXPOSED SKIN WITH SOAP AND WATER. DO NOT WASH SKIN WITH GASOLINE, DIESEL FUEL, THINNER, OR SOLVENTS, HEALTH PROBLEMS CAN RESULT. DO NOT POLLUTE, DISPOSE OF USED ENGINE OIL PROPERLY.
ENGINE OIL SPECIFICATION
CAUTION: Do not use non-detergent or straight mineral oil when adding or changing crankcase lubricant. Engine failure can result.
API SERVICE GRADE CERTIFIED
Use an engine oil that is API Service Grade Certified.
MOPARt provides engine oils that conform to this service grade.
SAE VISCOSITY
An SAE viscosity grade is used to specify the viscosity of engine oil. Use only engine oils with multiple viscosities such as 5W-30 or 10W-30 in the 4.7L engines. These are specified with a dual SAE viscosity grade which indicates the cold-to-hot temperature viscosity range. Select an engine oil that is best suited to your particular temperature range and variation (Fig. 4).
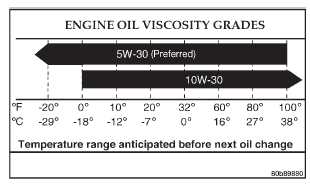 Fig. 4 Temperature/Engine Oil Viscosity-4.7L Engine
ENERGY CONSERVING OIL
An Energy Conserving type oil is recommended for gasoline engines. The designation of ENERGY CONSERVING is located on the label of an engine oil container.
CONTAINER IDENTIFICATION
Standard engine oil identification notations have been adopted to aid in the proper selection of engine oil. The identifying notations are located on the label of engine oil plastic bottles and the top of engine oil cans (Fig. 5).
 Fig. 5 Engine Oil Container Standard Notations
OIL LEVEL INDICATOR (DIPSTICK)
The engine oil level indicator is located at the right rear of the engine on the 4.7L engines. (Fig. 6).
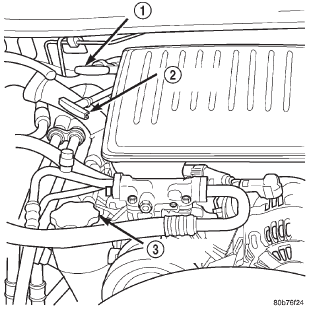 Fig. 6 Engine Oil Dipstick 4.7L Engine
1 - TRANSMISSION DIPSTICK
2 - ENGINE OIL DIPSTICK
3 - ENGINE OIL FILL CAP
CRANKCASE OIL LEVEL INSPECTION
CAUTION: Do not overfill crankcase with engine oil, pressure loss or oil foaming can result.
Inspect engine oil level approximately every 800 kilometers (500 miles). Unless the engine has exhibited loss of oil pressure, run the engine for about five minutes before checking oil level. Checking engine oil level on a cold engine is not accurate.
To ensure proper lubrication of an engine, the engine oil must be maintained at an acceptable level.
The acceptable levels are indicated between the ADD and SAFE marks on the engine oil dipstick.
(1) Position vehicle on level surface.
(2) With engine OFF, allow approximately ten minutes for oil to settle to bottom of crankcase, remove engine oil dipstick.
(3) Wipe dipstick clean.
(4) Install dipstick and verify it is seated in the tube.
(5) Remove dipstick, with handle held above the tip, take oil level reading.
(6) Add oil only if level is below the ADD mark on dipstick.
ENGINE OIL CHANGE
Change engine oil at mileage and time intervals described in Maintenance Schedules.
Run engine until achieving normal operating temperature.
(1) Position the vehicle on a level surface and turn engine off.
(2) Hoist and support vehicle on safety stands.
(3) Remove oil fill cap.
(4) Place a suitable drain pan under crankcase drain.
(5) Remove drain plug from crankcase and allow oil to drain into pan. Inspect drain plug threads for stretching or other damage. Replace drain plug if damaged.
(6) Install drain plug in crankcase.
(7) Lower vehicle and fill crankcase with specified type and amount of engine oil described in this section.
(8) Install oil fill cap.
(9) Start engine and inspect for leaks.
(10) Stop engine and inspect oil level.
ENGINE OIL FILTER CHANGE
FILTER SPECIFICATION
All engines are equipped with a high quality fullflow, disposable type oil filter. DaimlerChrysler Corporation recommends a Mopar or equivalent oil filter be used.
OIL FILTER REMOVAL
(1) Position a drain pan under the oil filter.
(2) Using a suitable oil filter wrench loosen filter.
(3) Rotate the oil filter counterclockwise (Fig. 7) to remove it from the cylinder block oil filter boss.
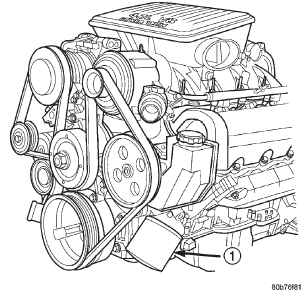 Fig. 7 Oil Filter-4.7L Engine
1 - ENGINE OIL FILTER
(4) When filter separates from cylinder block oil filter boss, tip gasket end upward to minimize oil spill. Remove filter from vehicle.
(5) With a wiping cloth, clean the gasket sealing surface of oil and grime.
OIL FILTER INSTALLATION
(1) Lightly lubricate oil filter gasket with engine oil.
(2) Thread filter onto adapter nipple. When gasket makes contact with sealing surface, (Fig. 8) hand tighten filter one full turn, do not over tighten.
(3) Add oil, verify crankcase oil level and start engine. Inspect for oil leaks.
USED ENGINE OIL DISPOSAL
Care should be exercised when disposing used engine oil after it has been drained from a vehicle engine. Refer to the WARNING at beginning of this section.
Dodge Durango (DN) 1998-2003 Service Manual
- Lubrication and Maintenance
- Suspension
- Differential and Driveline
- Brakes
- Cooling System
- Battery
- Starting Systems
- Charging System
- Ignition System
- Instrument Panel Systems
- Audio Systems
- Horn Systems
- Speed Control System
- Turn Signal and Hazard Warning Systems
- Wiper and Washer Systems
- Lamps
- Passive Restraint Systems
- Electrically Heated Systems
- Power Distribution System
- Power Lock Systems
- Vehicle Theft/Security Systems
- Power Seat System
- Power Window Systems
- Power Mirror Systems
- Chime/Buzzer Warning Systems
- Overhead Console Systems
- Engine
- Exhaust System
- Frame and Bumpers
- Fuel System
- Steering
- Transmission and Transfer Case
- Tires and Wheels
- Body
- Heating and Air Conditioning
- Emission Control Systems
- Introduction
Categories
