Diagnosis and testing
(1) With engine idling, remove the PCV valve from
cylinder head (valve) cover. If the valve is not
plugged, a hissing noise will be heard as air passes
through the valve. Also, a strong vacuum should be
felt at the valve inlet (Fig. 15).
1 - PCV VALVE GROMMET 2 - PCV HOSE 3 - PCV VALVE 4 - VACUUM MUST BE FELT AGAINST FINGER 5 - ENGINE VALVE COVER (2) Return the PCV valve into the valve cover.
Remove the fitting and air hose at the opposite valve
cover. Loosely hold a piece of stiff paper, such as a
parts tag, over the opening (rubber grommet) at the
valve cover (Fig. 16).
(3) The paper should be drawn against the opening
in the valve cover with noticeable force. This will be
after allowing approximately one minute for crankcase
pressure to reduce.
(4) Turn engine off and remove PCV valve from
valve cover. The valve should rattle when shaken
(Fig. 17).
1 - STIFF PAPER PLACED OVER RUBBER GROMMET 2 - RUBBER GROMMET 3 - VALVE COVER 4 - FITTING REMOVED FROM VALVE COVER 5 - AIR TUBE
1 - PCV VALVE GROMMET 2 - PCV VALVE 3 - PCV VALVE MUST RATTLE WHEN SHAKEN (5) Replace the PCV valve and retest the system if
it does not operate as described in the preceding
tests. Do not attempt to clean the old PCV valve.
(6) If the paper is not held against the opening in
valve cover after new valve is installed, the PCV
valve hose may be restricted and must be replaced.
The passage in the intake manifold must also be
checked and cleaned.
(7) To clean the intake manifold fitting, turn a 1/4
inch drill (by hand) through the fitting to dislodge
any solid particles. Blow out the fitting with shop air.
If necessary, use a smaller drill to avoid removing
any metal from the fitting. (1) Disconnect PCV line/hose (Fig. 18) by disconnecting
rubber connecting hose at PCV valve fitting.
(2) Remove PCV valve at oil filler tube by rotating
PCV valve downward until locating tabs have been
freed at cam lock (Fig. 18). After tabs have cleared,
pull valve straight out from filler tube. To prevent
damage to PCV valve locating tabs, valve must
be pointed downward for removal. Do not force
valve from oil filler tube.
(3) After valve is removed, check condition of valve
o-ring (Fig. 18). Also, PCV valve should rattle when
shaken.
(4) Reconnect PCV valve to its connecting line/
hose.
(5) Start engine and bring to idle speed.
(6) If valve is not plugged, a hissing noise will be
heard as air passes through valve. Also, a strong vacuum
should be felt with a finger placed at valve
inlet.
(7) If vacuum is not felt at valve inlet, check line/
hose for kinks or for obstruction. If necessary, clean
out intake manifold fitting at rear of manifold. Do
this by turning a 1/4 inch drill (by hand) through the
fitting to dislodge any solid particles. Blow out the
fitting with shop air. If necessary, use a smaller drill
to avoid removing any metal from the fitting.
(8) Do not attempt to clean the old PCV
valve.
(9) Return PCV valve back to oil filler tube by
placing valve locating tabs (Fig. 18) into cam lock.
Press PCV valve in and rotate valve upward. A slight
click will be felt when tabs have engaged cam lock.
Valve should be pointed towards rear of vehicle.
(10) Connect PCV line/hose and connecting rubber
hose to PCV valve.
(11) Disconnect rubber hose from fresh air fitting
at left side of air cleaner resonator box (Fig. 19).
Start engine and bring to idle speed. Hold a piece of
stiff paper (such as a parts tag) loosely over the
opening of the disconnected rubber hose.
(12) The paper should be drawn against the hose
opening with noticeable force. This will be after
allowing approximately one minute for crankcase
pressure to reduce.
(13) If vacuum is not present, disconnect each PCV
system hose at top of each breather (Fig. 19). Check
for obstructions or restrictions.
(14) If vacuum is still not present, remove each
PCV system breather (Fig. 19) from each cylinder
head. Check for obstructions or restrictions. If plugged, replace breather.
Tighten breather to 12
N*m (106 in. lbs.) torque. Do not attempt to clean
breather
(15) If vacuum is still not present, disconnect each
PCV system hose at each fitting and check for
obstructions or restrictions.
1 - O-RING 2 - LOCATING TABS 3 - CAM LOCK 4 - OIL FILLER TUBE 5 - PCV LINE/HOSE 6 - PCV VALVE VACUUM SCHEMATICS A vacuum schematic for emission related items can
be found on the Vehicle Emission Control Information
(VECI) label. For label location, refer to Vehicle
Emission Control Information (VECI) Label. Refer to the appropriate Powertrain Diagnostic
Procedures service manual for LDP testing procedures.
1 - FRESH AIR FITTING 2 - CONNECTING TUBES/HOSES 3 - CRANKCASE BREATHERS (2) 4 - RUBBER HOSE 5 - AIR CLEANER RESONATORPcv valve test-3.9/5.2/5.9L engine
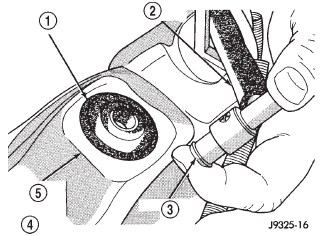 Fig. 15 Vacuum Check at PCV Valve-Typical
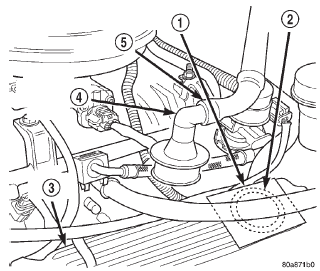 Fig. 16 Vacuum Check at Valve Cover Opening
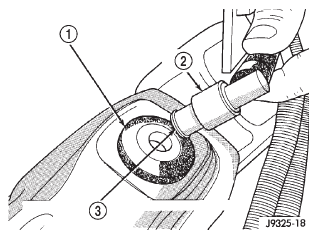 Fig. 17 Shake PCV Valve-Typical
Pcv valve/pcv system test-4.7L v-8 engine
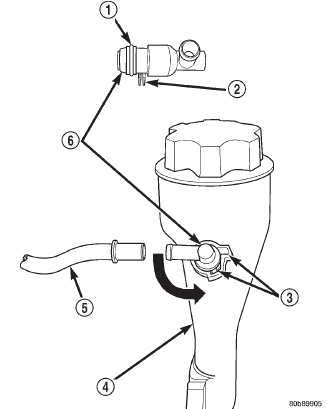 Fig. 18 PCV Valve/Oil Filler Tube-4.7L V-8 Engine
Leak detection pump (ldp)
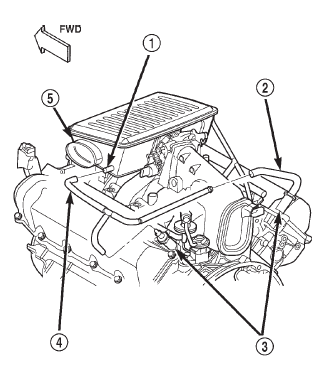 Fig. 19 PCV Breathers/Tubes/Hoses-4.7L V-8 Engine
Dodge Durango (DN) 1998-2003 Service Manual
- Lubrication and Maintenance
- Suspension
- Differential and Driveline
- Brakes
- Cooling System
- Battery
- Starting Systems
- Charging System
- Ignition System
- Instrument Panel Systems
- Audio Systems
- Horn Systems
- Speed Control System
- Turn Signal and Hazard Warning Systems
- Wiper and Washer Systems
- Lamps
- Passive Restraint Systems
- Electrically Heated Systems
- Power Distribution System
- Power Lock Systems
- Vehicle Theft/Security Systems
- Power Seat System
- Power Window Systems
- Power Mirror Systems
- Chime/Buzzer Warning Systems
- Overhead Console Systems
- Engine
- Exhaust System
- Frame and Bumpers
- Fuel System
- Steering
- Transmission and Transfer Case
- Tires and Wheels
- Body
- Heating and Air Conditioning
- Emission Control Systems
- Introduction
