Adjustments
Clockspring centering
The clockspring is designed to wind and unwind when the steering wheel is rotated, but is only designed to rotate the same number of turns (about five complete rotations) as the steering wheel can be turned from stop to stop. Centering the clockspring indexes the clockspring tape to other steering components so that it can operate within its designed travel limits. The rotor of a centered clockspring can be rotated two and one-half turns in either direction from the centered position, without damaging the clockspring tape.
However, if the clockspring is removed for service or if the steering column is disconnected from the steering gear, the clockspring tape can change position relative to the other steering components. The clockspring must then be re-centered following completion of the service or the clockspring tape may be damaged.
Service replacement clocksprings are shipped precentered and with a piece of tape covering the depressed auto-locking tabs. This tape should not be removed until the clockspring has been installed on the steering column. If the tape is removed before the clockspring is installed on a steering column, the clockspring centering procedure must be performed.
WARNING: THE AIRBAG SYSTEM IS A SENSITIVE, COMPLEX ELECTROMECHANICAL UNIT. BEFORE ATTEMPTING TO DIAGNOSE OR SERVICE ANY AIRBAG SYSTEM OR RELATED STEERING WHEEL, STEERING COLUMN, OR INSTRUMENT PANEL COMPONENTS YOU MUST FIRST DISCONNECT AND ISOLATE THE BATTERY NEGATIVE (GROUND) CABLE. THEN WAIT TWO MINUTES FOR THE SYSTEM CAPACITOR TO DISCHARGE BEFORE FURTHER SYSTEM SERVICE. THIS IS THE ONLY SURE WAY TO DISABLE THE AIRBAG SYSTEM. FAILURE TO DO THIS COULD RESULT IN ACCIDENTAL AIRBAG DEPLOYMENT AND POSSIBLE PERSONAL INJURY.
NOTE: Before starting this procedure, be certain to turn the steering wheel until the front wheels are in the straight-ahead position.
(1) Place the front wheels in the straight-ahead position.
(2) Remove the clockspring from the steering column.
Refer to Clockspring in the Removal and Installation section of this group for the procedures.
(3) Depress the two plastic clockspring auto-locking tabs (Fig. 15).
(4) Keeping the auto-locking tabs depressed, rotate the clockspring hub clockwise to the end of its travel.
Do not apply excessive torque.
(5) From the end of the clockwise travel, rotate the hub about two and one-half turns counterclockwise, then release the auto-locking tabs. The clockspring horn wire harness should end up at the top, and the airbag, optional speed control and optional remote radio wire harnesses at the bottom.
(6) The front wheels should still be in the straightahead position. Install the clockspring onto the steering column. Refer to Clockspring in the Removal and Installation section of this group for the procedures.
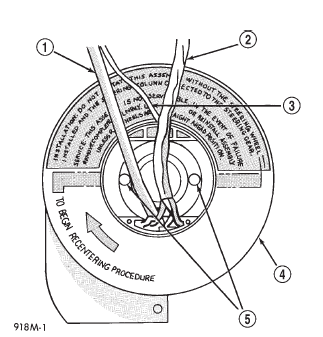 Fig. 15 Clockspring Auto-Locking Tabs
1 - AIRBAG MODULE WIRE
2 - SPEED CONTROL WIRING
3 - HORN WIRE
4 - CLOCKSPRING ASSEMBLY
5 - AUTO-LOCKING TABS
Special tools
Passive restraint systems
 Puller C-3428-B
Dodge Durango (DN) 1998-2003 Service Manual
- Lubrication and Maintenance
- Suspension
- Differential and Driveline
- Brakes
- Cooling System
- Battery
- Starting Systems
- Charging System
- Ignition System
- Instrument Panel Systems
- Audio Systems
- Horn Systems
- Speed Control System
- Turn Signal and Hazard Warning Systems
- Wiper and Washer Systems
- Lamps
- Passive Restraint Systems
- Electrically Heated Systems
- Power Distribution System
- Power Lock Systems
- Vehicle Theft/Security Systems
- Power Seat System
- Power Window Systems
- Power Mirror Systems
- Chime/Buzzer Warning Systems
- Overhead Console Systems
- Engine
- Exhaust System
- Frame and Bumpers
- Fuel System
- Steering
- Transmission and Transfer Case
- Tires and Wheels
- Body
- Heating and Air Conditioning
- Emission Control Systems
- Introduction
Categories
