Underbody refrigerant line
The underbody refrigerant lines are used only on models with the optional rear overhead A/C unit.
Both the underbody suction line and the underbody liquid line are available for separate service replacement, and may be removed from the vehicle independently for service.
Any kinks or sharp bends in the refrigerant plumbing will reduce the capacity of the entire air conditioning system. Kinks and sharp bends reduce the flow of refrigerant in the system. High pressures are produced in the refrigerant system when the air conditioning compressor is operating. Extreme care must be exercised to make sure that each of the refrigerant system connections is pressure-tight and leak free.
WARNING: REVIEW THE WARNINGS AND CAUTIONS IN THE GENERAL INFORMATION SECTION NEAR THE FRONT OF THIS GROUP BEFORE PERFORMING THE FOLLOWING OPERATION.
REMOVAL
(1) Disconnect and isolate the battery negative cable.
(2) Recover the refrigerant from the refrigerant system. See Refrigerant Recovery in the Service Procedures section of this group.
(3) From the engine compartment, disconnect the underbody liquid line refrigerant line coupler at the liquid line extension and the underbody suction line refrigerant line coupler at the suction line jumper (Fig. 87). See Refrigerant Line Coupler in the Removal and Installation section of this group for the procedures. Install plugs in, or tape over all of the opened refrigerant line fittings.
(4) Raise and support the vehicle.
(5) From under the vehicle, disconnect the underbody liquid line refrigerant line coupler at the B-pillar liquid line and the underbody suction line refrigerant line coupler at the B-pillar suction line.
See Refrigerant Line Coupler in the Removal and Installation section of this group for the procedures.
Install plugs in, or tape over all of the opened refrigerant line fittings.
(6) Remove the screws that secure the three underbody refrigerant line clamps to the underbody.
(7) Remove the underbody refrigerant line unit from the vehicle.
INSTALLATION
1) From under the vehicle, position the underbody refrigerant line unit to the underbody and secure the refrigerant line clamps with the mounting screws in three places. Tighten the mounting screws to 2.2 N*m (20 in. lbs.).
(2) Remove the tape or plugs from the refrigerant line fittings at the rear of the underbody liquid and suction lines and at the B-pillar liquid and suction lines. Connect the underbody refrigerant lines to the B-pillar refrigerant lines. See Refrigerant Line Coupler in the Removal and Installation section of this group for the procedures.
(3) Lower the vehicle.
(4) From the engine compartment, remove the tape or plugs from the refrigerant line fittings at the front of the underbody liquid and suction lines and at the liquid line extension and the suction line jumper.
Connect the underbody refrigerant lines to the engine compartment refrigerant lines. See Refrigerant Line Coupler in the Removal and Installation section of this group for the procedures.
(5) Connect the battery negative cable.
(6) Evacuate the refrigerant system. See Refrigerant System Evacuate in the Service Procedures section of this group.
(7) Charge the refrigerant system. See Refrigerant System Charge in the Service Procedures section of this group.
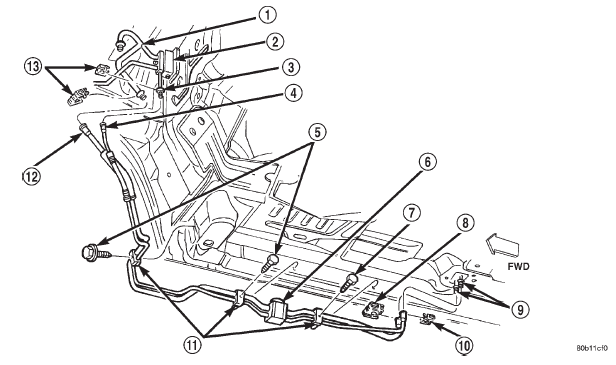
 Fig. 87 Underbody Refrigerant Line Remove/Install
1 - SUCTION LINE JUMPER
2 - FRONT EXPANSION VALVE
3 - LIQUID LINE EXTENSION
4 - UNDERBODY LIQUID LINE
5 - SCREWS
6 - REAR EXPANSION VALVE
7 - SCREW
8 - CLIP
9 - B-PILLAR REFRIGERANT LINES
10 - CLIP
11 - CLAMPS
12 - UNDERBODY SUCTION LINE
13 - CLIPS
Dodge Durango (DN) 1998-2003 Service Manual
- Lubrication and Maintenance
- Suspension
- Differential and Driveline
- Brakes
- Cooling System
- Battery
- Starting Systems
- Charging System
- Ignition System
- Instrument Panel Systems
- Audio Systems
- Horn Systems
- Speed Control System
- Turn Signal and Hazard Warning Systems
- Wiper and Washer Systems
- Lamps
- Passive Restraint Systems
- Electrically Heated Systems
- Power Distribution System
- Power Lock Systems
- Vehicle Theft/Security Systems
- Power Seat System
- Power Window Systems
- Power Mirror Systems
- Chime/Buzzer Warning Systems
- Overhead Console Systems
- Engine
- Exhaust System
- Frame and Bumpers
- Fuel System
- Steering
- Transmission and Transfer Case
- Tires and Wheels
- Body
- Heating and Air Conditioning
- Emission Control Systems
- Introduction
