Removal and installation
REMOVAL (1) Raise and support vehicle.
(2) Remove the upper shock absorber nut, retainer
and grommet (Fig. 4).
(3) Remove the lower bolt and remove the shock
absorber. INSTALLATION NOTE: Upper shock nut must be replaced or use
Mopar Lock 'N Seal or LoctiteT 242 on existing nut. (1) Install the lower retainer (lower retainer is
stamped with a L) and grommet on the shock
absorber stud. Insert the shock absorber through the
frame bracket hole.
(2) Install the lower bolt and tighten the bolt to
108 N*m (80 ft. lbs.).
(3) Install the upper grommet, retainer (upper
retainer is stamped with a U) and new nut or use
Mopar Lock 'N Seal or Loctitet 242 on existing nut,
on the shock absorber stud. Tighten nut to 26 N*m
(19 ft. lbs.).
1 - NUT 2 - RETAINER 3 - GROMMET 4 - SHOCK CAUTION: The left and right side torsion bars are
NOT interchangeable. The bars are identified and
stamped R or L, for right or left. The bars do not
have a front or rear end and can be installed with
either end facing forward. REMOVAL (1) Raise and support the vehicle with the front
suspension hanging.
(2) Turn the adjustment bolt counterclockwise to
release spring load (Fig. 5). NOTE: Count and record the number of turns for
installation reference. 3) Remove the adjustment bolt from swivel.
(4) Remove torsion bar and anchor. Remove anchor
from torsion bar.
(5) Remove all foreign material from torsion bar
mounting in anchor and suspension arm.
(6) Inspect adjustment bolt, bearing and swivel for
damage. INSTALLATION (1) Insert torsion bar ends into anchor and suspension
arm. (2) Position anchor and bearing in frame crossmember.
Install adjustment bolt through bearing,
anchor and into the swivel.
(3) Turn adjustment bolt clockwise the recorded
amount of turns.
(4) Lower vehicle and adjust the front suspension
height. Refer to Suspension Height service procedure. REMOVAL (1) Raise and support vehicle.
(2) Remove wheel and tire assembly.
(3) Remove brake caliper, rotor, shield and ABS
wheel speed sensor if equipped. Refer to Group 5
Brakes.
(4) Remove front driveshaft, refer to Group 3 Differential
and Driveline.
(5) Remove tie rod end cotter pin and nut. Separate
the tie rod from the knuckle with Remover
MB-991113 (Fig. 6).
(6) Support the lower suspension arm with a
hydraulic jack and raise the jack to unload the
rebound bumper.
(7) Remove the upper ball joint cotter pin and nut.
Separate the ball joint from the knuckle with
Remover MB-991113 (Fig. 7). CAUTION: When installing Remover MB-991113 to
separate the ball joint, be careful not to damage the
ball joint seal. (8) Remove the lower ball joint cotter pin and nut.
Separate the ball joint from the knuckle with
Remover C-4150A (Fig. 8) and remove the knuckle.
(9) Remove the hub/bearing from the steering
knuckle.
1 - STEERING KNUCKLE 2 - REMOVER 3 - TIE ROD END
1 - UPPER BALL STUD 2 - REMOVER INSTALLATION (1) Install the hub/bearing to the steering knuckle
and tighten the bolts to 166 N*m (123 ft. lbs.). NOTE: When installing hub/bearing with ABS
brakes, position the speed sensor opening towards
the front of the vehicle. (2) Install the knuckle onto the upper and lower
ball joint.
1 - REMOVER 2 - LOWER BALL STUD CAUTION: The ball joint stud tapers must be
CLEAN and DRY before installing the knuckle.
Clean the stud tapers with mineral spirits to remove
dirt and grease. (3) Install the upper and lower ball joint nuts.
Tighten the upper ball joint nut to 81 N*m (60 ft.
lbs.) and the lower ball joint nut to 183 N*m (135 ft.
lbs.) then install cotter pins. Grease the lower ball
joint.
(4) Remove the hydraulic jack from the lower suspension
arm.
(5) Install the tie rod end and tighten the nut to
88 N*m (65 ft. lbs.). Install the cotter pin.
(6) Install the front driveshaft, refer to Group 3
Differential and Driveline.
(7) Install the ABS wheel speed sensor if equipped
and brake shield, rotor and caliper. Refer to Group 5
Brakes.
(8) Install the wheel and tire assembly.
(9) Remove support and lower the vehicle. REMOVAL (1) Raise and support the vehicle.
(2) Remove the wheel and tire assembly.
(3) Remove front driveshaft, refer to Group 3 Differential
& Driveline.
(4) Remove torsion bar.
(5) Remove shock absorber lower bolt.
(6) Remove stabilizer bar.
(7) Remove the cotter pin and nut from lower ball
joint. Separate ball joint from the steering knuckle
with Remover C-4150A (Fig. 9).
(8) Remove suspension arm pivot bolts and suspension
arm from frame rail brackets (Fig. 10). (9) Inspect lower ball joint seal and replace if damaged.
Pry off old seal with screw driver if necessary.
1 - REMOVER 2 - LOWER BALL STUD
1 - PIVOT BOLTS 2 - LOWER SUSPENSION ARM INSTALLATION (1) Install new lower ball joint seal by tapping on
around the seal flange lightly with a hammer.
(2) Position the lower suspension arm at the frame
rail brackets. Install the pivot bolts and nuts.
Tighten the nuts finger-tight.
(3) Insert the ball joint into steering knuckle.
Install and tighten the retaining nut to 183 N*m (135
ft. lbs.) and install a new cotter pin. CAUTION: The ball joint stud taper must be CLEAN
and DRY before installing the knuckle. Clean the
stud taper with mineral spirits to remove dirt and
grease. (4) Install the torsion bar.
(5) Install shock absorber lower bolt and tighten to
108 N*m (80 ft. lbs.).
(6) Install the front driveshaft. Refer to Group 3
Differential & Driveline.
(7) Install the wheel and tire assembly.
(8) Remove support and lower the vehicle.
(9) Install the stabilizer bar.
(10) Tighten the lower suspension front pivot nut
to 108 N*m (80 ft. lbs.). Tighten rear pivot bolt to 190
N*m (140 ft. lbs.).
(11) Adjust the front suspension height. REMOVAL (1) Raise and support vehicle.
(2) Remove wheel and tire assembly.
(3) Remove brake hose brackets from suspension
arm, refer to Group 5 Brakes.
(4) Position hydraulic jack under lower suspension
arm and raise jack to unload rebound bumper.
(5) Remove shock absorber.
(6) Remove the cotter pin and nut from upper ball
joint.
(7) Separate upper ball joint from the steering
knuckle with Remover MB-991113 (Fig. 11). CAUTION: When installing Remover MB-991113 to
separate the ball joint, be careful not to damage the
ball joint seal. (8) Remove suspension arm pivot bar bolts and
remove suspension arm (Fig. 12).
1 - UPPER BALL STUD 2 - REMOVER
1 - PIVOT BAR BOLT 2 - UPPER SUSPENSION ARM INSTALLATION (1) Position suspension arm pivot bar on mounting
bracket. Install bolts and tighten (temporarily) to 136
N*m (100 ft. lbs.).
(2) Insert ball joint in steering knuckle and
tighten ball joint nut to 81 N*m (60 ft. lbs.) then
install a new cotter pin.
(3) Install shock absorber. NOTE: Upper shock nut must be replaced or use
Mopar Lock 'N Seal or LoctiteT 242 on existing nut. (4) Remove hydraulic jack.
(5) Attach brake hose brackets to suspension arm,
refer to Group 5 Brakes.
(6) Tighten upper suspension arm pivot bolts to
204 N*m (150 ft. lbs.).
(7) Install the wheel and tire assembly.
(8) Remove support and lower vehicle.
(9) Align front suspension. NOTE: To service the stabilizer bar the vehicle
must be on a drive on hoist. The vehicle suspension
must be at curb height for stabilizer bar installation. REMOVAL (1) Remove the stabilizer bar retainer bolts from
the lower suspension arms (Fig. 13) and remove the
retainers.
(2) Remove the stabilizer bar retainer nuts, bolts
and retainers from the frame crossmember (Fig. 13)
and remove the bar.
(3) If necessary, remove the bushings from the stabilizer
bar.
1 - LOWER SUSPENSION ARM 2 - FLAG NUT 3 - STABILIZER BAR 4 - RETAINER INSTALLATION (1) If removed, install the bushings on the stabilizer
bar.
(2) Position the stabilizer bar on the frame crossmember
brackets and install the retainers and nuts
and bolts finger-tight (Fig. 13). NOTE: Check the alignment of the bar to ensure
there is no interference with the either frame rail or
chassis component. Spacing should be equal on
both sides. (3) Install the stabilizer bar to the lower suspension
arm.
(4) Install the retainers and bolts to the lower suspension
arm and tighten to 34 N*m (25 ft. lbs.).
(5) Tighten the frame retainer nuts to 190 N*m
(140 ft. lbs.).
(6) Tighten the frame retainer bolts to 108 N*m
(80 ft. lbs.). REMOVAL (1) Raise and support vehicle.
(2) Remove wheel and tire assembly.
(3) Remove axle nut.
(4) Remove ABS wheel speed sensor if equipped,
refer to Group 5 Brakes.
(5) Remove the brake caliper and rotor, refer to
Group 5 Brakes.
(6) Remove hub/bearing mounting bolts from the
steering knuckle (Fig. 14). (7) Slid hub/bearing out of the steering knuckle
and off the axle.
1 - HUB BEARING 2 - STEERING KNUCKLE INSTALLATION (1) Install the hub/bearing into the steering
knuckle and tighten the bolts to 166 N*m (123 ft.
lbs.).
(2) Install the brake rotor and caliper.
(3) Install ABS wheel speed sensor if equipped.
(4) Install axle nut and tighten to 235 N*m (173 ft.
lbs.) and install cotter pin.
(5) Install wheel and tire assembly.
(6) Remove support and lower vehicle. REMOVAL (1) Raise and support vehicle.
(2) Remove wheel and tire assembly.
(3) Remove brake caliper and rotor, refer to Group
5 Brakes for procedure.
(4) Remove stud from hub with Remover C-4150A
(Fig. 15). INSTALLATION (1) Install new stud into hub flange.
(2) Install three washers onto stud, then install
lug nut with the flat side of the nut against the
washers.
(3) Tighten lug nut until the stud is pulled into
the hub flange. Verify that the stud is properly
seated into the flange.
(4) Remove lug nut and washers.
(5) Install the brake rotor and caliper, refer to
Group 5 Brakes for procedure.
(6) Install wheel and tire assembly, use new lug
nut on stud or studs that were replaced.
(7) Remove support and lower vehicle.
1 - REMOVER 2 - WHEEL STUDShock absorber
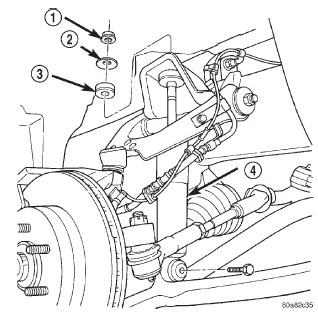 Fig. 4 Shock Absorber
Torsion bar
Steering knuckle
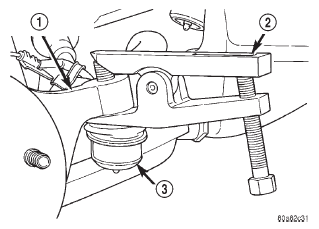 Fig. 6 Tie Rod End
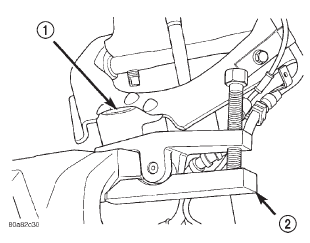 Fig. 7 Upper Ball Joint
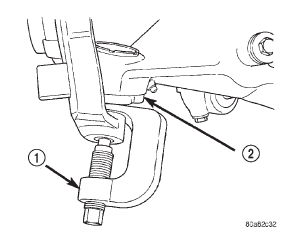 Fig. 8 Lower Ball Joint
Lower suspension arm
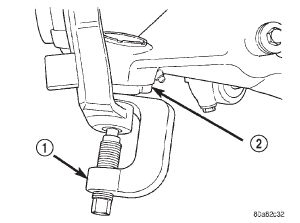 Fig. 9 Lower Ball Joint
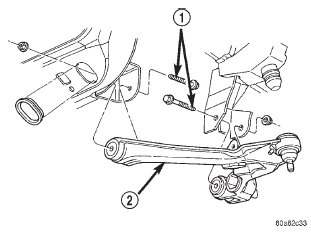 Fig. 10 Lower Suspension Arm
Upper suspension arm
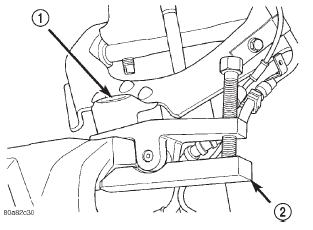 Fig. 11 Separate Upper Ball Joint
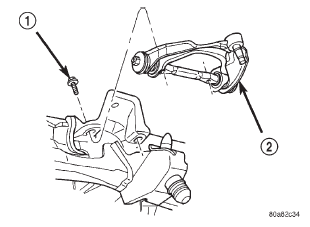 Fig. 12 Upper Suspension Arm
Stabilizer bar
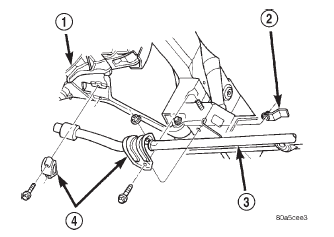 Fig. 13 Stabilizer Bar
Hub/bearing
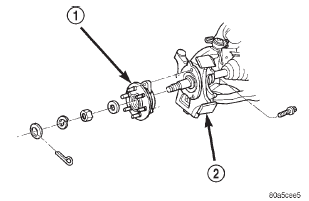 Fig. 14 Hub/Bearing
Wheel mounting studs
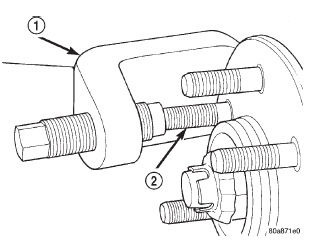 Fig. 15 Wheel Stud Removal
Dodge Durango (DN) 1998-2003 Service Manual
- Lubrication and Maintenance
- Suspension
- Differential and Driveline
- Brakes
- Cooling System
- Battery
- Starting Systems
- Charging System
- Ignition System
- Instrument Panel Systems
- Audio Systems
- Horn Systems
- Speed Control System
- Turn Signal and Hazard Warning Systems
- Wiper and Washer Systems
- Lamps
- Passive Restraint Systems
- Electrically Heated Systems
- Power Distribution System
- Power Lock Systems
- Vehicle Theft/Security Systems
- Power Seat System
- Power Window Systems
- Power Mirror Systems
- Chime/Buzzer Warning Systems
- Overhead Console Systems
- Engine
- Exhaust System
- Frame and Bumpers
- Fuel System
- Steering
- Transmission and Transfer Case
- Tires and Wheels
- Body
- Heating and Air Conditioning
- Emission Control Systems
- Introduction
Categories
