Removal and installation
REMOVAL (1) Open hood.
(2) Remove the bolts attaching headlamp to the
inner fender panel (Fig. 1).
(3) Grasp the headlamp and firmly pull the headlamp
to disengage it from the panel.
(4) Disengage the connector from the headlamp
bulb.
(5) Separate bulb from headlamp.
(6) Remove the bulb sockets from the front park/
turn signal/side marker lamps
(7) Separate headlamp module from vehicle.
1 - FENDER 2 - SEAL 3 - INNER FENDER INSTALLATION CAUTION: Do not touch the bulb glass with fingers
or other oily surfaces. Reduced bulb life will result. (1) Install bulb sockets for the front park/turn signal/
side marker lamps
(2) Engage the connector to the headlamp bulb.
(3) Position headlamp in inner fender panel and
firmly push headlamp inward to lock into place.
(4) Install the bolts attaching headlamp to the
panel. The fog lamps are serviced from the rearward side
of the front bumper. REMOVAL (1) Disengage fog lamp harness connector. (2) Remove the bolts attaching the fog lamp to the
bumper (Fig. 2).
(3) Separate fog lamp from bumper.
1 - FOG LAMP 2 - FRONT BUMPER INSTALLATION (1) Position fog lamp in bumper.
(2) Install the bolts attaching the fog lamp to the
bumper.
(3) Connect fog lamp harness connector.
(4) Check for proper operation and beam alignment. REMOVAL (1) Remove torx screw attaching park lamp to
headlamp module (Fig. 3).
(2) Pull the park and turn signal lamp outward
and separate from headlamp module.
(3) Remove park and turn signal sockets from back
of lamp (Fig. 4).
(4) Remove side marker socket from back of lamp.
(5) Separate park and turn signal lamp from vehicle. INSTALLATION (1) Install side marker socket in back of lamp.
(2) Install park and turn signal sockets in back of
lamp.
(3) Using the guides on the bottom and side of the
headlamp module, align the park and turn signal
lamp under headlamp module.
(4) Slide the park and turn signal lamp inward
under headlamp module. Push firmly until the lamp
is seated.
1 - HEADLAMP 2 - HIDDEN SCREW 3 - PARK LAMP
1 - SIDE MARKER LAMP BULB 2 - PARK/TURN SIGNAL LAMP BULB (5) Install screw attaching park lamp to headlamp
module. REMOVAL (1) Remove liftgate trim panel.
(2) Remove CHMSL lamp mounting screws (Fig.
5).
(3) Remove CHMSL lamp.
(4) Turn bulb sockets 1/4 turn counterclockwise.
(5) Separate socket from lamp.
1 - LIFTGATE 2 - CHMSL 3 - LIFTGATE TRIM INSTALLATION (1) Position socket in lamp.
(2) Turn bulb sockets 1/4 turn clockwise.
(3) Position CHMSL lamp in place and install
mounting screws.
(4) Install liftgate trim panel. REMOVAL (1) Using a small flatblade, carefully pry the outward
edge of the liftgate/cargo lamp from trim panel.
(2) Release the locking tab on the lamp harness
connector and disconnect the harness connector from
the lamp.
(3) Separate the lamp from the liftgate (Fig. 6). INSTALLATION (1) Connect the harness connector to the lamp.
(2) Position the lamp in the liftgate and press
inward to secure. REMOVAL (1) Release liftgate latch and open liftgate.
(2) Remove screws attaching tail, brake, turn signal
and back-up lamp to liftgate opening (Fig. 7).
(3) Separate inner end of lamp from quarter panel.
(4) Disengage hook holding outer end of lamp to
quarter panel opening.
(5) Separate lamp from quarter panel.
(6) Disengage positive lock on wire connector (Fig.
8).
1 - LIFTGATE 2 - LIFTGATE LAMP (7) Depress lock tab on the side of the body harness
connector.
(8) Disengage wire connector from tail lamp circuit
board.
(9) Separate tail lamp from vehicle.
1 - CONNECTOR 2 - GROMMET 3 - TAIL LAMP INSTALLATION (1) Place tail lamp in position on vehicle.
(2) Engage wire connector into tail lamp circuit
board.
(3) Engage positive lock on wire connector.
(4) Place lamp in position in position on quarter
panel.
(5) Engage hook to hold outer end of lamp to quarter
panel opening.
1 - TAIL, STOP AND TURN SIGNAL LAMP 2 - WIRE CONNECTOR 3 - POSITIVE LOCK (6) Position inner end of lamp into quarter panel.
(7) Install screws attaching tail, stop, turn signal
and back-up lamp to liftgate opening. REMOVAL (1) Remove screws attaching license plate lamp to
rear bumper.
(2) Remove bulb socket from lamp.
(3) Separate lamp from bumper. INSTALLATION (1) Install bulb socket in lamp.
(2) Position lamp at bumper.
(3) Install screws attaching license plate lamp to
rear bumper. REMOVAL (1) Disconnect the wire harness connector from the
lamp.
(2) Remove lamp lens.
(3) Remove bulb.
(4) Remove screw attaching underhood lamp to the
inner hood panel (Fig. 9).
(5) Separate underhood lamp from vehicle.
1 - HOOD 2 - UNDERHOOD LAMP INSTALLATION (1) Install bulb.
(2) Install lamp lens.
(3) Position the underhood lamp on the hood inner
panel.
(4) Install the attaching screw through the lamp
and into the hood panel (Fig. 9). Tighten the screw
securely.
(5) Fold lamp housing over and firmly press onto
base to snap into place.
(6) Connect the wire harness connector to the
lamp. REMOVAL (1) Using a small flat blade, pry the left side (driver's
side) of the dome lamp lens downward from
dome lamp.
(2) Allow the lens to hang down, this will disengage
the right side of the lamp (passenger's side)
from the headliner.
(3) Pull the right side of the lamp down and slide
the lamp to the right.
(4) Separate the lamp from the headliner.
(5) Disengage dome lamp wire connector from body
wire harness.
(6) Separate dome lamp from vehicle (Fig. 10) and
(Fig. 11).
1 - DOME LAMP 2 - HEADLINER
1 - HEADLINER 2 - DOME LAMP INSTALLATION (1) Position dome lamp at headliner.
(2) Connect dome lamp wire connector to body
wire harness.
(3) Position the left side of the lamp in the headliner
opening and slide lamp to the left.
(4) Push the right side of the lamp in the headliner
opening and push the lamp lens up into the
lamp to secure. REMOVAL 1) Using a small flat blade, pry the center rearward
edge of the dome/reading lamp lens downward
from lamp (Fig. 12). (2) Allow the lens to hang down this will disengage
the forward edge of the lamp from the headliner.
(3) Pull the forward edge of the lamp down and
slide the lamp forward.
(4) Separate the lamp from the headliner.
(5) Disengage lamp wire connector from body wire
harness.
(6) Separate lamp from vehicle (Fig. 13).
1 - FLAT BLADE 2 - LENS
1 - HEADLINER 2 - DOME/READING LAMP INSTALLATION (1) Position lamp at headliner.
(2) Connect lamp wire connector to body wire harness.
(3) Position the rearward edge of the lamp in the
headliner opening and slide lamp rearward.
(4) Push the forward edge of the lamp in the headliner
opening and push the lamp lens up into the
lamp to secure. REMOVAL (1) Remove overhead console.
(2) Remove screws attaching reading lamp to overhead
console (Fig. 14).
(3) Disconnect reading lamp harness connector.
(4) Separate lamp from vehicle.
1 - DISPLAY MODULE 2 - LAMP 3 - SCREW 4 - SWITCHES 5 - SCREW 6 - LAMP 7 - SCREWS 8 - TERMINALS INSTALLATION (1) Position lamp in vehicle.
(2) Connect reading lamp harness connector.
(3) Install screws attaching reading lamp to overhead
console.
(4) Install overhead console.Headlamp
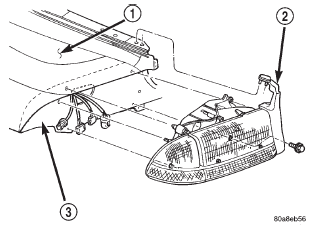 Fig. 1 Headlamp
Fog lamp
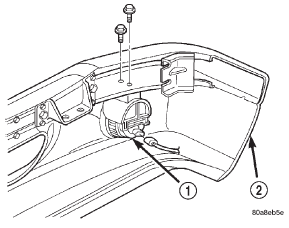 Fig. 2 Fog Lamp
Park, turn signal and side marker lamp
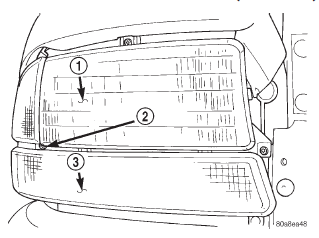 Fig. 3 Park Lamp Screw
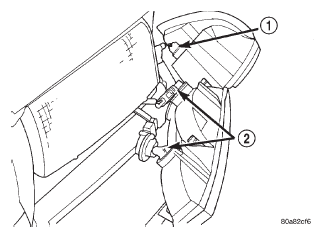 Fig. 4 Park, Turn Signal And Side Marker Lamp
Center high mounted stop lamp (chmsl)
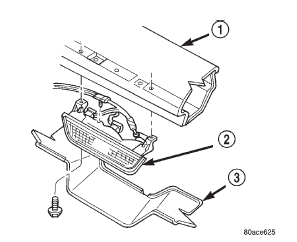 Fig. 5 Center High Mounted Stop Lamp
Liftgate/cargo lamp
Tail, brake, turn signal and back-up lamp
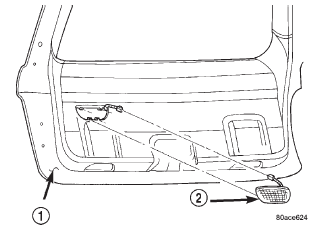 Fig. 6 Liftgate/Cargo Lamp
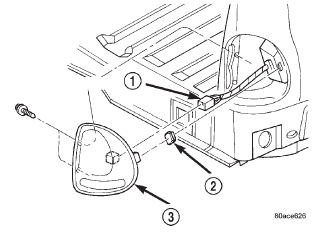 Fig. 7 Tail, Brake, Turn Signal and Back-up Lamp
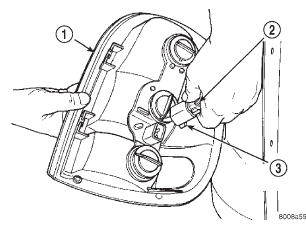 Fig. 8 Tail Lamp Connector
License plate lamp
Underhood lamp
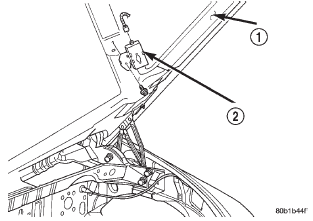 Fig. 9 Underhood Lamp Removal
Dome lamp
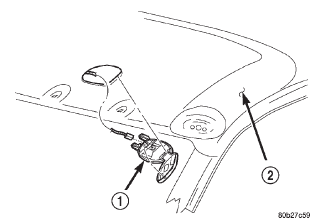 Fig. 10 Front Dome Lamp
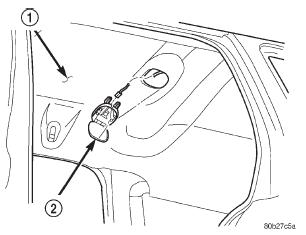 Fig. 11 Rear Dome Lamp
2Nd seat dome/reading lamp
 Fig. 12 Lamp Lens
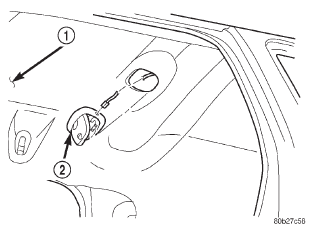 Fig. 13 Dome/Reading Lamp
Overhead console reading lamp
 Fig. 14 Overhead Console Reading Lamp
Dodge Durango (DN) 1998-2003 Service Manual
- Lubrication and Maintenance
- Suspension
- Differential and Driveline
- Brakes
- Cooling System
- Battery
- Starting Systems
- Charging System
- Ignition System
- Instrument Panel Systems
- Audio Systems
- Horn Systems
- Speed Control System
- Turn Signal and Hazard Warning Systems
- Wiper and Washer Systems
- Lamps
- Passive Restraint Systems
- Electrically Heated Systems
- Power Distribution System
- Power Lock Systems
- Vehicle Theft/Security Systems
- Power Seat System
- Power Window Systems
- Power Mirror Systems
- Chime/Buzzer Warning Systems
- Overhead Console Systems
- Engine
- Exhaust System
- Frame and Bumpers
- Fuel System
- Steering
- Transmission and Transfer Case
- Tires and Wheels
- Body
- Heating and Air Conditioning
- Emission Control Systems
- Introduction
Categories
