Instrument cluster components
Some of the components for the instrument cluster used in this vehicle are serviced individually. The serviced components include: the incandescent instrument cluster indicator lamp and illumination lamp bulbs (including the integral bulb holders), the cluster lens and hood unit, the instrument cluster housing rear cover, and the instrument cluster housing (including the trip odometer reset knob, the cluster mask, the gauges and the instrument cluster electronic circuit board). Following are the service procedures for the instrument cluster components.
WARNING: ON VEHICLES EQUIPPED WITH AIRBAGS, REFER TO GROUP 8M - PASSIVE RESTRAINT SYSTEMS BEFORE ATTEMPTING ANY STEERING WHEEL, STEERING COLUMN, OR INSTRUMENT PANEL COMPONENT DIAGNOSIS OR SERVICE. FAILURE TO TAKE THE PROPER PRECAUTIONS COULD RESULT IN ACCIDENTAL AIRBAG DEPLOYMENT AND POSSIBLE PERSONAL INJURY.
REMOVAL
CLUSTER BULB
This procedure applies to each of the incandescent cluster illumination lamp or indicator lamp bulb and bulb holder units. However, the illumination lamps and the indicator lamps use different bulb and bulb holder unit sizes. They must never be interchanged.
Be certain that any bulb and bulb holder unit removed from the cluster electronic circuit board is reinstalled in the correct position. Always use the correct bulb size and type for replacement. An incorrect bulb size or type may overheat and cause damage to the instrument cluster, the electronic circuit board and/or the gauges.
(1) Disconnect and isolate the battery negative cable.
(2) Remove the instrument cluster from the instrument panel. Refer to Instrument Cluster in the Removal and Installation section of this group for the procedures.
(3) Turn the bulb holder counterclockwise about sixty degrees on the cluster electronic circuit board.
(4) Pull the bulb and bulb holder unit straight back to remove it from the bulb mounting hole in the cluster electronic circuit board (Fig. 4).
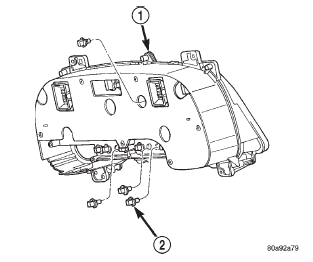 Fig. 4 Cluster Bulb Remove/Install
1 - INSTRUMENT CLUSTER
2 - BULB AND HOLDER
CLUSTER LENS AND HOOD
(1) Disconnect and isolate the battery negative cable.
(2) Remove the instrument cluster from the instrument panel. Refer to Instrument Cluster in the Removal and Installation section of this group for the procedures.
(3) Remove the seven screws that secure the lens and hood unit to the cluster housing (Fig. 5).
(4) Gently pull the lens and hood unit away from the cluster housing.
CAUTION: Do not touch the face of the gauge mask or the back of the cluster lens with your finger. It will leave a permanent finger print.
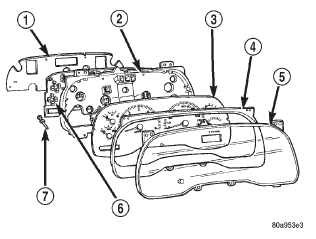 Fig. 5 Instrument Cluster Components
1 - COVER
2 - HOUSING
3 - MASK AND GAUGES
4 - HOOD
5 - LENS
6 - CIRCUIT BOARD
7 - ODOMETER RESET BUTTON
CLUSTER HOUSING REAR COVER
(1) Disconnect and isolate the battery negative cable.
(2) Remove the instrument cluster from the instrument panel. Refer to Instrument Cluster in the Removal and Installation section of this group for the procedures.
(3) Remove the six screws that secure the rear cover to the back of the cluster housing (Fig. 6).
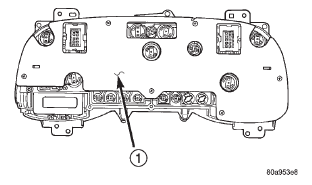 Fig. 6 Cluster Housing Rear Cover Remove/Install
1 - REAR CLUSTER HOUSING COVER
(4) Remove the rear cover from the back of the cluster housing.
CLUSTER HOUSING
(1) Disconnect and isolate the battery negative cable.
(2) Remove the instrument cluster from the instrument panel. Refer to Instrument Cluster in the Removal and Installation section of this group for the procedures.
(3) Remove all of the incandescent illumination lamp and indicator lamp bulb and bulb holder units from the cluster electronic circuit board. Refer to Instrument Cluster Components - Cluster Bulbs in the Removal and Installation section of this group for the procedures.
(4) Remove the lens and hood unit from the cluster housing. Refer to Instrument Cluster Components - Cluster Lens and Hood in the Removal and Installation section of this group for the procedures.
(5) Remove the rear cover from the cluster housing.
Refer to Instrument Cluster Components - Cluster Housing Rear Cover in the Removal and Installation section of this group for the procedures.
INSTALLATION
CLUSTER BULB
This procedure applies to each of the incandescent cluster illumination lamp or indicator lamp bulb and bulb holder units. However, the illumination lamps and the indicator lamps use different bulb and bulb holder unit sizes. They must never be interchanged.
Be certain that any bulb and bulb holder unit removed from the cluster electronic circuit board is reinstalled in the correct position.
CAUTION: Always use the correct bulb size and type for replacement. An incorrect bulb size or type may overheat and cause damage to the instrument cluster, the electronic circuit board and/or the gauges.
(1) Insert the bulb and bulb holder unit straight into the correct bulb mounting hole in the cluster electronic circuit board.
(2) With the bulb holder fully seated against the cluster electronic circuit board, turn the bulb holder clockwise about sixty degrees to lock it into place.
(3) Install the instrument cluster onto the instrument panel. Refer to Instrument Cluster in the Removal and Installation section of this group for the procedures.
(4) Reconnect the battery negative cable.
CLUSTER LENS AND HOOD
(1) Align the lens and hood unit with the cluster housing.
(2) Press firmly and evenly on the lens and hood unit to install it onto the cluster housing.
(3) Install and tighten the seven screws that secure the lens and hood unit to the cluster housing.
Tighten the screws to 2.2 N*m (20 in. lbs.).
(4) Install the instrument cluster onto the instrument panel. Refer to Instrument Cluster in the Removal and Installation section of this group for the procedures.
(5) Reconnect the battery negative cable.
CLUSTER HOUSING REAR COVER
(1) Position the rear cover to the back of the cluster housing.
(2) Install and tighten the six screws that secure the rear cover to the back of the cluster housing.
Tighten the screws to 2.2 N*m (20 in. lbs.).
(3) Install the instrument cluster onto the instrument panel. Refer to Instrument Cluster in the Removal and Installation section of this group for the procedures.
(4) Reconnect the battery negative cable.
CLUSTER HOUSING
(1) Install the rear cover onto the cluster housing.
Refer to Instrument Cluster Components - Cluster Housing Rear Cover in the Removal and Installation section of this group for the procedures.
(2) Install the lens and hood unit onto the cluster housing. Refer to Instrument Cluster Components - Cluster Lens and Hood in the Removal and Installation section of this group for the procedures.
(3) Install all of the incandescent illumination lamp and indicator lamp bulb and bulb holder units onto the cluster electronic circuit board. Refer to Instrument Cluster Components - Cluster Bulbs in the Removal and Installation section of this group for the procedures.
(4) Install the instrument cluster onto the instrument panel. Refer to Instrument Cluster in the Removal and Installation section of this group for the procedures.
(5) Reconnect the battery negative cable.
Dodge Durango (DN) 1998-2003 Service Manual
- Lubrication and Maintenance
- Suspension
- Differential and Driveline
- Brakes
- Cooling System
- Battery
- Starting Systems
- Charging System
- Ignition System
- Instrument Panel Systems
- Audio Systems
- Horn Systems
- Speed Control System
- Turn Signal and Hazard Warning Systems
- Wiper and Washer Systems
- Lamps
- Passive Restraint Systems
- Electrically Heated Systems
- Power Distribution System
- Power Lock Systems
- Vehicle Theft/Security Systems
- Power Seat System
- Power Window Systems
- Power Mirror Systems
- Chime/Buzzer Warning Systems
- Overhead Console Systems
- Engine
- Exhaust System
- Frame and Bumpers
- Fuel System
- Steering
- Transmission and Transfer Case
- Tires and Wheels
- Body
- Heating and Air Conditioning
- Emission Control Systems
- Introduction
Categories
