Combination valve. Master cylinder
REMOVAL (1) Disconnect wire from the pressure differential
switch.
(2) Disconnect rear brake lines from combination
valve.
(3) Remove the bolt from the combination valve
and remove the valve. INSTALLATION (1) Install the combination valve to the bracket
and tighten the mounting bolt to 20-27 N*m (15-20 ft.
lbs.). If vehicle is equipped with ABS brakes tighten
the bolt to 10-13 N*m (7-10 ft. lbs.).
(2) Install the brake lines to the combination
valve.
(3) Tighten the brake line to 19 N*m (170 in. lbs.).
(4) Connect the wire to the pressure differential
switch.
(5) Bleed brakes system. REMOVAL (1) Remove brake lines from the master cylinder
(Fig. 17).
(2) Remove mounting nuts from the master cylinder
(Fig. 17).
(3) Remove master cylinder.
1 - MOUNTING NUT 2 - MOUNTING NUT 3 - BRAKE LINES 4 - MASTER CYLINDER INSTALLATION NOTE: If master cylinder is replaced bleed cylinder
before installation. (1) Install master cylinder on booster mounting
studs.
(2) Install mounting nuts and tighten to 18 N*m
(160 in. lbs.)
(3) Install brake lines and tighten to 19 N*m (170
in. lbs.)
(4) Fill and bleed base brake system.Combination valve
Master cylinder
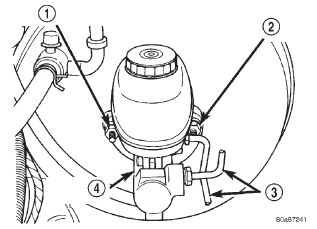 Fig. 17 Master Cylinder
Dodge Durango (DN) 1998-2003 Service Manual
- Lubrication and Maintenance
- Suspension
- Differential and Driveline
- Brakes
- Cooling System
- Battery
- Starting Systems
- Charging System
- Ignition System
- Instrument Panel Systems
- Audio Systems
- Horn Systems
- Speed Control System
- Turn Signal and Hazard Warning Systems
- Wiper and Washer Systems
- Lamps
- Passive Restraint Systems
- Electrically Heated Systems
- Power Distribution System
- Power Lock Systems
- Vehicle Theft/Security Systems
- Power Seat System
- Power Window Systems
- Power Mirror Systems
- Chime/Buzzer Warning Systems
- Overhead Console Systems
- Engine
- Exhaust System
- Frame and Bumpers
- Fuel System
- Steering
- Transmission and Transfer Case
- Tires and Wheels
- Body
- Heating and Air Conditioning
- Emission Control Systems
- Introduction
Categories
