Center armrest/console inertia latch cover. Center seat cushion/cover
REMOVAL 1) Move the drivers seat position to full forward
with seat back full forward.
(2) Place center arm rest in the down position.
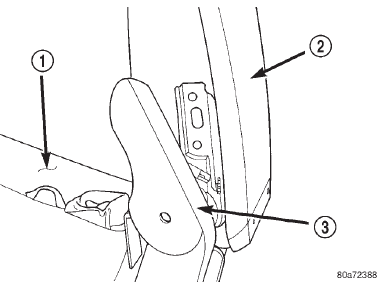
(3) Remove the screw securing the cover to the
inertia latch (Fig. 5).
(4) Remove the upper and lower inertia latch covers.
1 - SEAT CUSHION 2 - SEAT BACK/CONSOLE LID 3 - HINGE COVER INSTALLATION (1) Install the upper latch cover onto the upper
latch inertia arm. Ensure the check strap loops
under the stud on the side of the lower stanchion/
post.
(2) Install the lower latch cover onto the inertia
latch upper arm working it around the latch bracket.
(3) Align the lower latch cover, the upper latch
cover, and the latch bracket to the screw hole on the
arm.
(4) Secure the cover with the screw and tighten to
4.15N*m (37 in. lbs.).
(5) Cycle the armrest through a full range of travel
and check for freedom of movement. Adjust the latch
covers as necessary. REMOVAL (1) Remove the bucket seats.
(2) Separate the center seat from the bucket seats.
(3) Remove the armrest/seat back.
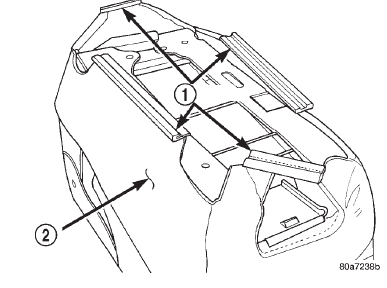
(4) Disengage the J-straps from the cushion frame
(Fig. 6).
(5) Separate the cushion/cover from the frame.
1 - J-STRAPS 2 - CENTER SEAT CUSHION COVER INSTALLATION (1) Position the cushion/cover on the frame.
(2) Engage the J-straps from the cushion frame.
(3) Install the armrest/seat back.
(4) Attach the center seat to the bucket seats.
(5) Install the bucket seats.Center armrest/console inertia latch cover
 Fig. 5 Armrest/Console Inertia Latch Cover
Center seat cushion/cover
 Fig. 6 Center Seat Cushion/Cover
Dodge Durango (DN) 1998-2003 Service Manual
- Lubrication and Maintenance
- Suspension
- Differential and Driveline
- Brakes
- Cooling System
- Battery
- Starting Systems
- Charging System
- Ignition System
- Instrument Panel Systems
- Audio Systems
- Horn Systems
- Speed Control System
- Turn Signal and Hazard Warning Systems
- Wiper and Washer Systems
- Lamps
- Passive Restraint Systems
- Electrically Heated Systems
- Power Distribution System
- Power Lock Systems
- Vehicle Theft/Security Systems
- Power Seat System
- Power Window Systems
- Power Mirror Systems
- Chime/Buzzer Warning Systems
- Overhead Console Systems
- Engine
- Exhaust System
- Frame and Bumpers
- Fuel System
- Steering
- Transmission and Transfer Case
- Tires and Wheels
- Body
- Heating and Air Conditioning
- Emission Control Systems
- Introduction
