B-pillar trim. C-pillar trim
REMOVAL The upper B-pillar trim is attached to the B-pillar
with spring clip retainers. The lower B-pillar trim is
attached with screws and spring clip retainers. (Fig.
82).
(1) Remove front seat belt turning loop cover and
turning loop.
(2) Grasp upper B-pillar trim and pull outward to
release spring clip retainers.
(3) Remove door sill trim front and rear.
(4) Remove lower B-pillar trim screws.
(5) Grasp lower B-pillar trim and pull outward to
release spring clip retainers.
(6) Route shoulder belt through access slot in
lower B-pillar trim.
(7) Separate lower B-pillar trim from vehicle. INSTALLATION (1) Position lower B-pillar trim on vehicle.
(2) Route shoulder belt through access slot in
lower B-pillar trim.
(3) Press lower B-pillar trim inward to engage
spring clip retainers.
(4) Position upper B-pillar trim on vehicle.
(5) Press upper B-pillar trim inward to engage
spring clip retainers.
(6) Install B-pillar trim screws.
(7) Install door sill trim front and rear.
(8) Install front seat belt turning loop, and torque
bolt to 39N*m (29 ft. lbs.). Install turning loop cover.
1 - TURNING LOOP 2 - ADJUSTER 3 - UPPER B-PILLAR TRIM 4 - B-PILLAR 5 - ANTI-RATTLE CUP 6 - ANCHOR BOLT 7 - LOWER B-PILLAR TRIM 8 - RETRACTOR REMOVAL (1) Remove cover and bolt attaching 2nd row seat
belt turning loop to C-pillar.
(2) Grasp C-pillar trim and pull outward to disengage
spring clips.
(3) Separate C-pillar trim from C-pillar (Fig. 83). INSTALLATION (1) Position C-pillar trim on C-pillar (Fig. 83).
(2) Align Spring clips and press into place.
(3) Install bolt attaching 2nd row seat belt turning
loop to C-pillar. Tighten bolt to 39 N*m (29 ft. lbs.)
torque. Install turning loop cover.B-pillar trim
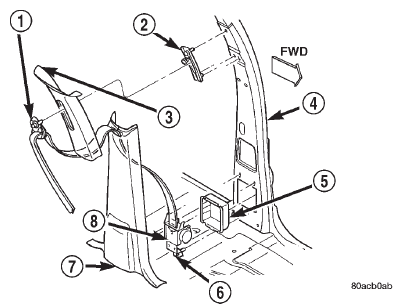 Fig. 82 B-Pillar Trim
C-pillar trim
Dodge Durango (DN) 1998-2003 Service Manual
- Lubrication and Maintenance
- Suspension
- Differential and Driveline
- Brakes
- Cooling System
- Battery
- Starting Systems
- Charging System
- Ignition System
- Instrument Panel Systems
- Audio Systems
- Horn Systems
- Speed Control System
- Turn Signal and Hazard Warning Systems
- Wiper and Washer Systems
- Lamps
- Passive Restraint Systems
- Electrically Heated Systems
- Power Distribution System
- Power Lock Systems
- Vehicle Theft/Security Systems
- Power Seat System
- Power Window Systems
- Power Mirror Systems
- Chime/Buzzer Warning Systems
- Overhead Console Systems
- Engine
- Exhaust System
- Frame and Bumpers
- Fuel System
- Steering
- Transmission and Transfer Case
- Tires and Wheels
- Body
- Heating and Air Conditioning
- Emission Control Systems
- Introduction
Categories
