Dodge Durango (WD) 2011-2026 Owners Manual » What to do in emergencies » Jacking and tire changing »
Jacking Instructions
WARNING!
Carefully follow these tire changing warnings to
help prevent personal injury or damage to your
vehicle:
|
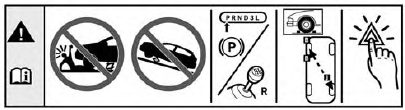 Jack Warning Label
| CAUTION! Do not attempt to raise the vehicle by jacking on locations other than those indicated in the Jacking Instructions for this vehicle. |
- Loosen (but do not remove) the wheel lug nuts by turning them to the left, one turn, while the wheel is still on the ground.
- Assemble the jack and jacking tools.
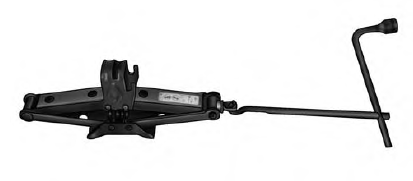 Jack And Tool Assembly
- For the front tire, place the jack on the body flange just behind the front tire. Do not raise the vehicle until you are sure the jack is fully engaged.
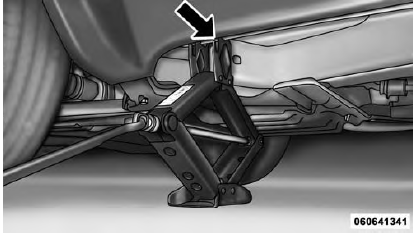 Front Jack Location
- For a rear tire, place the jack in the slot on the rear tie-down bracket, just forward of the rear tire. Do not raise the vehicle until you are sure the jack is fully engaged.
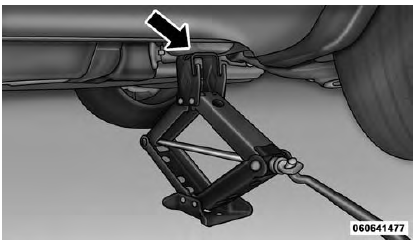 Rear Jacking Location
- Raise the vehicle by turning the jack screw clockwise.Raise the vehicle just enough to remove the flat tire.
| WARNING! Raising the vehicle higher than necessary can make the vehicle less stable. It could slip off the jack and hurt someone near it. Raise the vehicle only enough to remove the tire. |
- Remove the lug nuts and wheel.
- Install the spare wheel/tire on the vehicle and install the lug nuts with the cone-shaped end toward the wheel. Lightly tighten the nuts.
| CAUTION! Be sure to mount the spare tire with the valve stem facing outward. The vehicle could be damaged if the spare tire is mounted incorrectly. |
 Mounting Spare Tire
| WARNING! To avoid the risk of forcing the vehicle off the jack, do not fully tighten the lug nuts until the vehicle has been lowered. Failure to follow this warning may result in serious injury. |
- Lower the vehicle by turning the jack screw counterclockwise, and remove the jack and wheel blocks.
- Finish tightening the lug nuts. Push down on the wrench while at the end of the handle for increased leverage. Tighten the lug nuts in a star pattern until each nut has been tightened twice. Refer to Torque Specifications in this section for proper lug nut torque.If in doubt about the correct tightness, have them checked with a torque wrench by your authorized dealer or at a service station.
- Push out the small center cap using the jack tool from inside the aluminum road wheel and position the wheel behind the rear bumper with the "beauty side" facing rearward.
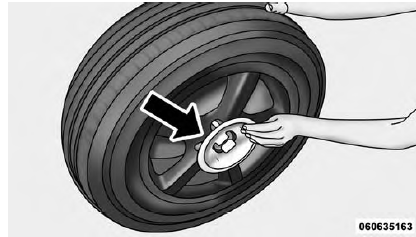 "Beauty Side"
NOTE: The plastic plate will prevent the road wheel from being scratched when sliding it under the vehicle.
- Insert the two long tubes on the plastic protective plate in the lug holes of the road wheel. Push the end of the winch's cable, spring, steel sleeve and stamped cone shape wheel plate though the road wheel and protective plate.
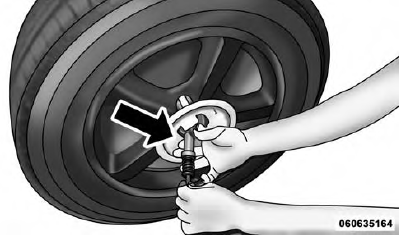 Installing Winch
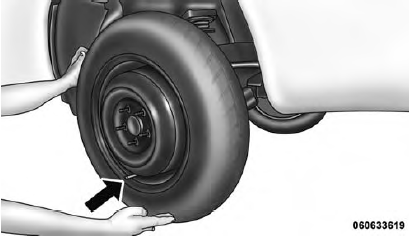
- Slide the road wheel on the ground using the protective plate until it is directly under the winch and between the rear bumper and exhaust system heat shields. Raise the tire by turning the lug wrench on the winch extension clockwise until it clicks/ratchets three times to make sure the cable is tight.
 Road Wheel Installed In Spare Location
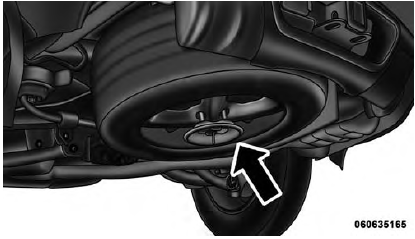
NOTE: Double check to ensure the tire is snug against the underbody of the vehicle. Damage to the winch cable may result if the vehicle is driven with the tire loose.
| WARNING! Do not use power tools to winch the tire up or down. Impact-type tools may damage the winch mechanism. |
- Lower the jack to the fully closed position. Return the tools to the proper positions in the tool bag. Fold the flap on the tool bag under the tools and roll the tools in the bag underneath the others. Use the Velcro straps to secure the tool bag to the jack with the lug wrench on the forward side of the jack. Expand the jack on the bracket by turning the thumb screw clockwise until it is tight to prevent rattles.
- Reinstall the plastic plug into the floor of the cargo area. Roll up and store the Jack, Tool Kit and Tire Changing Instructions. Reinstall the cover for the jack in the rear storage bin.
- Have the aluminum road wheel and tire repaired as soon as possible and properly secure the spare tire, jack and tool kit.
| WARNING! A loose tire or jack thrown forward in a collision or hard stop could endanger the occupants of the vehicle. Always stow the jack parts and the spare tire in the places provided. |
Dodge Durango (WD) 2011-2026 Owners Manual
Categories

© 2017-2024 Copyright www.dodurango.net