Front park brake cable. Rear park brake cables
REMOVAL (1) Raise and support the vehicle.
(2) Loosen the cable adjuster nut (Fig. 35).
(3) Pull cable through the body mount.
(4) Remove support and lower vehicle.
(5) Remove left kick panel.
(6) Fold left front edge of floor covering rearward
and remove cable grommet from floor pan.
(7) Engage parking brake pedal and remove cable
from park brake pedal assembly.
(8) Pull the cable through the floor pan.
(9) Remove cable from vehicle.
1 - RIGHT REAR CABLE 2 - LEFT REAR CABLE 3 - ADJUSTMENT NUT 4 - TENSIONER 5 - FRONT CABLE 6 - BODY MOUNT INSTALLATION (1) Insert front cable through floor pan and install
grommet.
(2) Insert cable retainer into hole at bottom of
pedal assembly bracket and connect cable end.
(3) Install kick panel.
(4) Raise and support vehicle.
(5) Insert the cable through the body mount. (6) Connect the cable to the tensioner.
(7) Perform parking brake adjustment procedure.
(8) Remove support and lower vehicle. REMOVAL (1) Raise and support the vehicle.
(2) Remove the rear wheel and tire assemblies.
(3) Loosen tensioner adjuster nut.
(4) Remove the right cable from the tensioner and
pull the cable housing through the left cable connector
(Fig. 36).
1 - CABLE BRACKET 2 - RIGHT CABLE 3 - LEFT CABLE 4 - TENSIONER CONNECTOR (5) Remove the left cable connector.
(6) Pull both cables through the cable bracket.
(7) Remove the right cable mounting retainers
from the stabilzer bar retainers (Fig. 37) and remove
the cable from the differential housing (Fig. 38).
(8) Remove the brake drums.
(9) Disconnect each cable from park brake lever.
(10) Compress tabs on each cable housing retainer
at the brake support plate.
(11) Remove the cables from the brake support
plates. INSTALLATION (1) Push each cable housing through the brake
support plate hole until cable housing retainer tabs
lock into place. NOTE: Pull on the cable housing to ensure it is
lock into place.
1 - RIGHT CABLE 2 - STABILIZER BAR RETAINER
1 - CABLE RETAINER 2 - RIGHT CABLE 3 - DIFFERENTIAL HOUSING (2) Pull back on the end of the cable. Then push
the cable in to engage the cable in the park brake
lever. NOTE: Pull on the cable end to ensure it is
attached it the park brake lever. (3) Install the brake drums.
(4) Install right cable mounting retainers.
(5) Push the cables housing through the cable
bracket
(6) Install the left cable onto the cable connector.
(7) Push the right cable housing through the left
cable connector and connect the cable to the tensioner.
(8) Install the wheel and tire assemblies. (9) Perform park brake adjustment procedure.
(10) Remove support and lower the vehicle.Front park brake cable
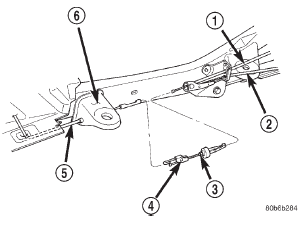 Fig. 35 Cable Tensioner
Rear park brake cables
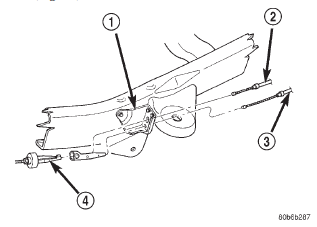 Fig. 36 Cable Connectors
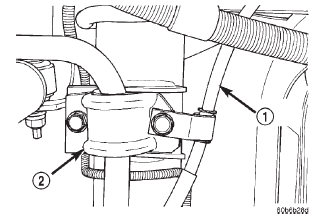 Fig. 37 Stabilzer Bar Retainer
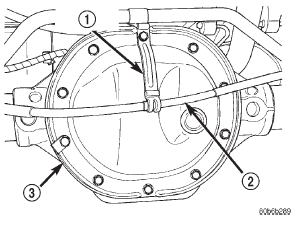 Fig. 38 Cable Retainers
Dodge Durango (DN) 1998-2003 Service Manual
- Lubrication and Maintenance
- Suspension
- Differential and Driveline
- Brakes
- Cooling System
- Battery
- Starting Systems
- Charging System
- Ignition System
- Instrument Panel Systems
- Audio Systems
- Horn Systems
- Speed Control System
- Turn Signal and Hazard Warning Systems
- Wiper and Washer Systems
- Lamps
- Passive Restraint Systems
- Electrically Heated Systems
- Power Distribution System
- Power Lock Systems
- Vehicle Theft/Security Systems
- Power Seat System
- Power Window Systems
- Power Mirror Systems
- Chime/Buzzer Warning Systems
- Overhead Console Systems
- Engine
- Exhaust System
- Frame and Bumpers
- Fuel System
- Steering
- Transmission and Transfer Case
- Tires and Wheels
- Body
- Heating and Air Conditioning
- Emission Control Systems
- Introduction
Categories
