Removal and installation
NOTE: If the CAB needs to be replaced, the rear
axle type and tire revolutions per mile must be programed
into the new CAB. For axle type refer to
Group 3 Differential and Driveline. For tire revolutions
per mile refer to Group 22 Tire and Wheels. To
program the CAB refer to the Chassis Diagnostic
Manual. REMOVAL (1) Push the CAB harness connector lock to
release the lock and remove the connector (Fig. 7)
from the controller.
(2) Remove the RWAL valve harness connector
from the controller.
(3) Remove the controller mounting screws and
remove the controller from the mounting bracket
(Fig. 7). INSTALLATION (1) Position the controller on the bracket.
(2) Install the mounting screws and tighten to 6
N*m (53 in. lbs).
(3) Install the RWAL valve harness connector into
the controller.
(4) Install the CAB harness connector into the controller
and push down on the connector lock.
1 - CAB CONNECTOR LOCK 2 - RWAL CONNECTOR 3 - MOUNTING SCREWS REMOVAL (1) Remove RWAL valve harness connector from
the RWAL controller.
(2) Remove the brake lines from the valve.
(3) Remove the valve mounting bolt (Fig. 8) and
remove the valve from the bracket.
1 - RWAL VALVE 2 - MOUNTING BOLT 3 - BRAKE LINES INSTALLATION (1) Position the valve on the bracket and install
the mounting bolt. Tighten the mounting bolt to
20-27 N*m (15-20 ft. lbs.).
(2) Install the brake lines and tighten to 19 N*m
(170 in. lbs.).
(3) Install the RWAL valve harness connector into
the RWAL controller.
(4) Bleed base brake system. REMOVAL (1) Raise vehicle on hoist.
(2) Remove brake line mounting nut and remove
the brake line from the sensor stud.
(3) Remove mounting stud from the sensor and
shield (Fig. 9).
1 - DIFFERENTIAL HOUSING 2 - WHEEL SPEED SENSOR (4) Remove sensor and shield from differential
housing.
(5) Disconnect sensor wire harness and remove
sensor. INSTALLATION (1) Connect harness to sensor. Be sure seal is
securely in place between sensor and wiring
connector.
(2) Install O-ring on sensor (if removed).
(3) Insert sensor in differential housing.
(4) Install sensor shield.
(5) Install the sensor mounting stud and tighten to
24 N*m (200 in. lbs.).
(6) Install the brake line on the sensor stud and
install the nut.
(7) Lower vehicle. Exciter ring The exciter ring is mounted on the differential
case. If the ring is damaged refer to Group 3 Differential
and Driveline for service procedures. Specifications Torque chart DESCRIPTION TORQUE Controller Mounting Screws . . . . . . . . . . 6 N*m (53 in. lbs.) RWAL Valve Mounting Bolt . . . . . . . 20-27 N*m (15-20 ft. lbs.) Brake Line Fittings . . . . . . . 19 N*m (170 in. lbs.) Wheel Speed Sensor Mounting Bolt . . . . . . . . . . . 24 N*m (200 in. lbs.)Controller
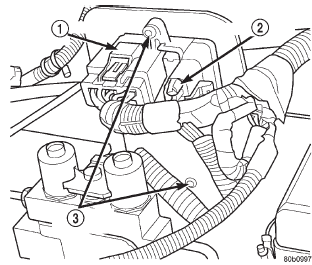 Fig. 7 RWAL Controller
Rwal valve
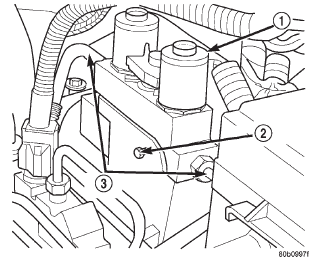 Fig. 8 RWAL Valve
Rear wheel speed sensor
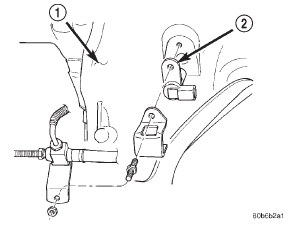 Fig. 9 Rear Speed Sensor Mounting
Dodge Durango (DN) 1998-2003 Service Manual
- Lubrication and Maintenance
- Suspension
- Differential and Driveline
- Brakes
- Cooling System
- Battery
- Starting Systems
- Charging System
- Ignition System
- Instrument Panel Systems
- Audio Systems
- Horn Systems
- Speed Control System
- Turn Signal and Hazard Warning Systems
- Wiper and Washer Systems
- Lamps
- Passive Restraint Systems
- Electrically Heated Systems
- Power Distribution System
- Power Lock Systems
- Vehicle Theft/Security Systems
- Power Seat System
- Power Window Systems
- Power Mirror Systems
- Chime/Buzzer Warning Systems
- Overhead Console Systems
- Engine
- Exhaust System
- Frame and Bumpers
- Fuel System
- Steering
- Transmission and Transfer Case
- Tires and Wheels
- Body
- Heating and Air Conditioning
- Emission Control Systems
- Introduction
Categories
