Radiator cap-pressure testing. Coolant-low level aeration
Remove cap from radiator. Be sure that sealing
surfaces are clean. Moisten rubber gasket with water
and install cap on pressure tester 7700 or an equivalent
(Fig. 24).
1 - PRESSURE CAP 2 - TYPICAL COOLING SYSTEM PRESSURE TESTER Operate tester pump to bring pressure to 117 kPa
(17 psi) on gauge. If pressure cap fails to hold pressure
of at least 110 kPa (16 psi) replace cap. Refer to
following CAUTION.
The pressure cap may test properly while positioned
on tool 7700 (or equivalent). It may not hold
pressure or vacuum when installed on radiator. If so,
inspect radiator filler neck and cap's top gasket for
damage. Also inspect for dirt or distortion that may
prevent cap from sealing properly. CAUTION: Radiator pressure testing tools are very
sensitive to small air leaks, which will not cause
cooling system problems. A pressure cap that does
not have a history of coolant loss should not be
replaced just because it leaks slowly when tested
with this tool. Add water to tool. Turn tool upside
down and recheck pressure cap to confirm that cap
needs replacement. If the coolant level in the radiator drops below the
top of the radiator core tubes, air will enter the system.
Low coolant level can cause the thermostat pellet
to be suspended in air instead of coolant. This will
cause the thermostat to open later, which in turn
causes higher coolant temperature. Air trapped in
cooling system also reduces the amount of coolant
circulating in the heater core. This may result in low
heat output.Radiator cap-pressure testing
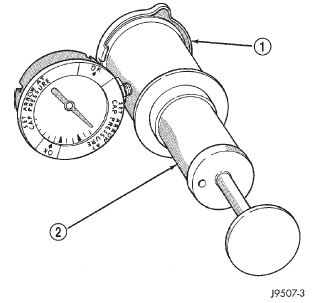 Fig. 24 Pressure Testing Radiator Cap-Typical
Coolant-low level aeration
Dodge Durango (DN) 1998-2003 Service Manual
- Lubrication and Maintenance
- Suspension
- Differential and Driveline
- Brakes
- Cooling System
- Battery
- Starting Systems
- Charging System
- Ignition System
- Instrument Panel Systems
- Audio Systems
- Horn Systems
- Speed Control System
- Turn Signal and Hazard Warning Systems
- Wiper and Washer Systems
- Lamps
- Passive Restraint Systems
- Electrically Heated Systems
- Power Distribution System
- Power Lock Systems
- Vehicle Theft/Security Systems
- Power Seat System
- Power Window Systems
- Power Mirror Systems
- Chime/Buzzer Warning Systems
- Overhead Console Systems
- Engine
- Exhaust System
- Frame and Bumpers
- Fuel System
- Steering
- Transmission and Transfer Case
- Tires and Wheels
- Body
- Heating and Air Conditioning
- Emission Control Systems
- Introduction
Categories
