Rack & pinion steering gear
Rack & pinion steering gear DESCRIPTION A rack and pinion steering gears (Fig. 1) is made
up of two main components, the pinon shaft and the
rack. The gear cannot be adjusted or internally serviced.
If a malfunction or a fluid leak occurs, the gear
must be replaced as an assembly. If a boot seal
becomes damaged, the steering gear must be
removed to replace the boot seal.
1 - TIE ROD 2 - TIE ROD 3 - TIE ROD END 4 - BOOTS 5 - TIE ROD END OPERATION The steering column shaft is attached to the gear
pinion. The rotation of the pinion moves the gear
rack from side-to-side. This lateral action of the rack
pushes and pulls the tie rods to change the direction
of the front wheels. REMOVAL (1) Raise and support the vehicle.
(2) Remove the nut from the tie rod end.
(3) Separate the tie rod end from the steering
knuckle with Puller C-3894-A.
(4) Loosen the jam nut (Fig. 2) and unthread the
tie rod end.
1 - JAM NUT 2 - TIE ROD 3 - TIE ROD END INSTALLATION (1) Thread the tie rod end onto the tie rod.
(2) Clean the tie rod end stud and knuckle taper.
(3) Install the tie rod end stud into the steering
knuckle and tighten the nut to 108 N*m (80 ft. lbs.).
(4) Tighten the jam nut to 75 N*m (55 ft. lbs.). NOTE: Do not twist boot while tighten the jam nut. (5) Remove support and lower vehicle.
(6) Adjust the wheel toe position, Refer to Group 2
Suspension. REMOVAL (1) Raise and support the vehicle.
(2) Remove the nuts from the tie rod ends.
(3) Separate tie rod ends from the knuckles with
Puller C-3894-A (Fig. 3).
1 - TOOL C-3894-A 2 - BALL STUD 3 - SEAL 4 - TIE-ROD END 5 - LOCKNUT (4) Remove the power steering lines from the gear.
(5) Remove the lower coupler bolt and slide the
coupler off the gear (Fig. 4).
(6) Remove the mounting bolts from the gear to
the front crossmember and remove the gear (Fig. 5). INSTALLATION NOTE: Before installing gear inspect bushings and
replace if worn or damaged. (1) Install gear on front crossmember and tighten
mounting bolts to 258 N*m (190 ft. lbs.).
(2) Slide shaft coupler onto gear. Install new bolt
and tighten to 49 N*m (36 ft. lbs.).
(3) Clean tie rod end studs and knuckle tapers.
1 - COUPLER 2 - LOWER SHAFT 3 - TOE PLATE 4 - STEERING COLUMN 5 - UPPER SHAFT 6 - RACK AND PINION STEERING GEAR
1 - RACK AND PINION STEERING GEAR 2 - BUSHING (4) Install tie rod ends into the steering knuckles
and tighten the nuts to 108 N*m (80 ft. lbs.).
(5) Install power steering lines to steering gear.
(6) Remove support and lower vehicle.
(7) Fill system with fluid and perform Power
Steering Pump Initial Operation.
(8) Adjust the toe position. Refer to Group 2 Suspension. REMOVAL (1) Raise and support the vehicle. (2) Remove the splash shield from under the front
end to gain access to the gear.
(3) Remove the nuts from the tie rod ends.
(4) Separate tie rod ends from the knuckles with
Puller C-3894-A (Fig. 6).
1 - TOOL C-3894-A 2 - BALL STUD 3 - SEAL 4 - TIE-ROD END 5 - LOCK NUT (5) Remove the power steering lines from the gear.
(6) Remove the lower coupler bolt and slide the
coupler off the gear (Fig. 7).
(7) Remove the mounting bolts (Fig. 8) from the
gear to the front crossmember. Slide the gear to the
right side of the vehicle. Then tilt the left end of the
gear down and remove the gear. INSTALLATION NOTE: Before installing gear inspect bushings and
replace if worn or damaged. (1) Install gear on front crossmember and tighten
mounting bolts to 230 N*m (170 ft. lbs.).
(2) Slide shaft coupler onto gear. Install new bolt
and tighten to 49 N*m (36 ft. lbs.).
(3) Clean tie rod end studs and knuckle tapers.
1 - COUPLER 2 - LOWER SHAFT 3 - TOE PLATE 4 - STEERING COLUMN 5 - UPPER SHAFT 6 - RACK AND PINION STEERING GEAR
1 - MOUNTING BOLT 2 - RACK AND PINION STEERING GEAR (4) Install tie rod ends into the steering knuckles
and tighten the nuts to 88 N*m (65 ft. lbs.).
(5) Install power steering lines to steering gear.
(6) Install the splash shield.
(7) Remove support and lower vehicle.
(8) Fill system with fluid and perform Power
Steering Pump Initial Operation.
(9) Adjust the toe position. Refer to Group 2 Suspension. Boot seal REMOVAL (1) Remove steering gear.
(2) Loosen the jam nut then remove the tie rod
end and jam nut.
(3) Remove the outer clamp from the rubber boot
(Fig. 9).
(4) Remove the boot inner clamp.
(5) On 4x2 vehicles mark the breather tube location
on steering gear before removing the rubber boot
(Fig. 9).
1 - CIRCLE "A" 2 - MARK BREATHER TUBE LOCATION 3 - BOOT 4 - SNORKEL CLAMP 5 - BOOT CLAMP (OUTER) 6 - JAM NUT 7 - USE LUBE HERE 8 - BOOT CLAMP (INNER) 9 - BOOT SEAL 10 - BREATHER TUBE 11 - BREATHER TUBE INSTALLATION (1) Lubricate the boot outer groove (tie rod) with
silicone type lubricant. Ensure that the boot is not
twisted.
(2) On 4x2 vehicles align the breather tube with
the reference mark on the steering gear.
(3) Position and align the new boot over the housing.
(4) Install inner clamp on the rubber boot.
(5) Install the snorkel clamp on 4x2 vehicles.
(6) Install outer clamp on the inner tie rod.
(7) Install the jam nut and the tie rod end.
(8) Install steering gear. Specifications Torque chart DESCRIPTION TORQUE Rack and Pinion Steering Gear Gear to Frame Bolts . . . . . . 258 N*m (190 ft. lbs.) Intermediate Shaft Bolt . . . . . 49 N*m (36 ft. lbs.) Tie Rod End Knuckle Nut . . . . . . . . . . . . 108 N*m (80 ft. lbs.) Jam Nut . . . . . . . . . . . . . . . . 75 N*m (55 ft. lbs.) Lines Pressure Line . . . . . . . . . . . . . 35 N*m (25 ft. lbs.) Return Line . . . . . . . . . . . . . . 35 N*m (25 ft. lbs.) Special tools Rack & pinion steering gear
Description and operation
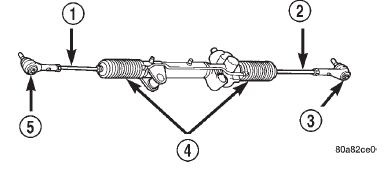 Fig. 1 Rack & Pinion Steering Gear
Removal and installation
Tie rod end
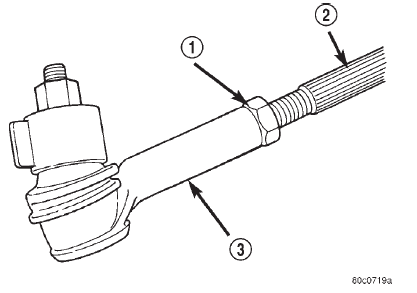 Fig. 2 Tie Rod End
Rack & pinion steering gear - 4x2
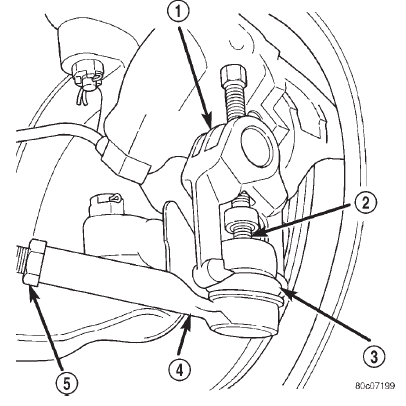 Fig. 3 Tie Rod End Puller
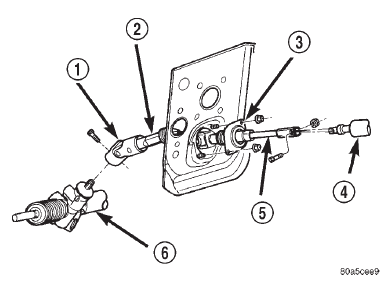 Fig. 4 Gear Coupler
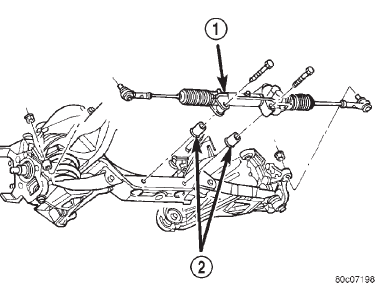 Fig. 5 Rack & Pinion Steering Gear - 4x2
Rack & pinion steering gear - 4x4
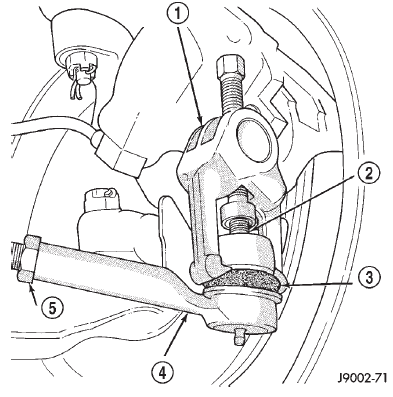 Fig. 6 Tie Rod End Puller
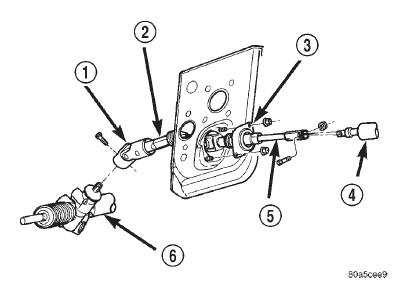 Fig. 7 Gear Coupler
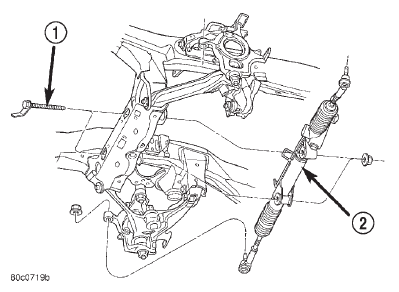 Fig. 8 Rack & Pinion Steering Gear - 4x4
Disassembly and assembly
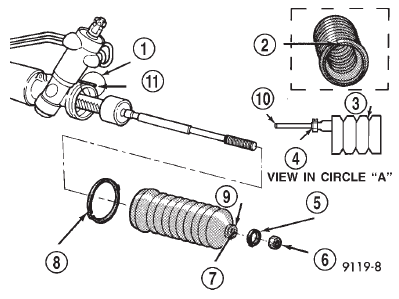 Fig. 9 Boot Seal - 4x2
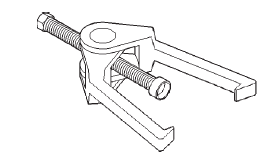 Puller C-3894-A
Dodge Durango (DN) 1998-2003 Service Manual
- Lubrication and Maintenance
- Suspension
- Differential and Driveline
- Brakes
- Cooling System
- Battery
- Starting Systems
- Charging System
- Ignition System
- Instrument Panel Systems
- Audio Systems
- Horn Systems
- Speed Control System
- Turn Signal and Hazard Warning Systems
- Wiper and Washer Systems
- Lamps
- Passive Restraint Systems
- Electrically Heated Systems
- Power Distribution System
- Power Lock Systems
- Vehicle Theft/Security Systems
- Power Seat System
- Power Window Systems
- Power Mirror Systems
- Chime/Buzzer Warning Systems
- Overhead Console Systems
- Engine
- Exhaust System
- Frame and Bumpers
- Fuel System
- Steering
- Transmission and Transfer Case
- Tires and Wheels
- Body
- Heating and Air Conditioning
- Emission Control Systems
- Introduction
Categories
