Disassembly and assembly
REMOVAL (1) Remove reservoir cap and empty fluid into
drain container.
(2) Clamp cylinder body in vise with brass protective
jaws. (3) Remove pins that retain reservoir to master
cylinder. Use hammer and pin punch to remove pins
(Fig. 40).
1 - PIN PUNCH 2 - RESERVOIR 3 - BODY 4 - ROLL PINS (4) Loosen reservoir from grommets with pry tool
(Fig. 41).
1 - PRYTOOL 2 - RESERVOIR 3 - GROMMET 4 - MASTER CYLINDER BODY (5) Remove reservoir by rocking it to one side and
pulling free of grommets (Fig. 42).
(6) Remove old grommets from cylinder body (Fig.
43).
1 - RESERVOIR 2 - GROMMETS
1 - MASTER CYLINDER BODY 2 - GROMMETS INSTALLATION CAUTION: Do not use any type of tool to install the
grommets. Tools may cut, or tear the grommets creating
a leak problem after installation. Install the
grommets using finger pressure only. (1) Lubricate new grommets with clean brake fluid
and Install new grommets in cylinder body (Fig. 44).
Use finger pressure to install and seat grommets.
(2) Start reservoir in grommets. Then rock reservoir
back and forth while pressing downward to seat
it in grommets.
(3) Install pins that retain reservoir to cylinder
body.
(4) Fill and bleed master cylinder on bench before
installation in vehicle. DISASSEMBLY (1) Drain old brake fluid out of caliper into drain
pan.
(2) Remove piston dust boot (Fig. 45). Use screwdriver
to push boot out of groove.
1 - WORK NEW GROMMETS INTO PLACE USING FINGER
PRESSURE ONLY
1 - PISTON BOOT DUST (3) Pad outboard shoe side of caliper interior with
a minimum 1 inch thickness of shop towels (Fig. 46).
Towels will prevent piston damage when piston
comes out of the caliper bore.
(4) Remove caliper piston with short bursts of compressed
air. Apply air pressure through fluid inlet
port of caliper (Fig. 46). CAUTION: Do not blow the piston out of the bore
with sustained air pressure. This could result in a
cracked piston. Use only enough air pressure to
ease the piston out. WARNING: NEVER ATTEMPT TO CATCH THE PISTON
AS IT LEAVES THE BORE. THIS MAY RESULT
IN PERSONAL INJURY.
1 - AIR GUN NOZZLE 2 - FLUID INLET PORT 3 - CALIPER PISTON 4 - PADDING MATERIAL (TO PROTECT PISTON) 5) Remove caliper piston seal with wood pencil or
plastic tool (Fig. 47). Do not use metal tools as they
will scratch piston bore.
(6) Remove caliper slide pin bushings and boots.
(7) Remove caliper bleed screw and cap. ASSEMBLY (1) Lubricate slide pin boots and bushings with
GE, or Dow silicone grease. Then install the boots
and bushings in caliper.
(2) Coat caliper piston bore, piston and new piston
seal with clean brake fluid.
1 - PISTON SEAL 2 - WOOD PENCIL (3) Install new piston seal in caliper bore. Press
seal into groove with finger (Fig. 48). Lubricate seal
and caliper bore with additional, fresh brake fluid
after seal installation.
1 - CALIPER PISTON SEAL
(PRESS SEAL INTO PLACE WITH FINGER) (4) Apply light coat of GE 661, Dow 111 or similar
silicone grease to edge and groove of piston and dust
seal. Grease acts as corrosion protection for these
areas. (5) Slide new seal boot over piston until boot lip
seats in piston groove (Fig. 49).
(6) Push retainer part of boot forward until folds
in boot snap into place (Fig. 50).
1 - CALIPER PISTON 2 - SLIDE DUST BOOT DOWNWARD OVER PISTON
1 - FOLD DUST BOOT UPWARD UNTIL IT "SNAPS" INTO PLACE 2 - CALIPER PISTON (7) Start caliper piston in bore with a twisting
motion. When piston is started in seal, push piston
only part way into bore (Fig. 51). Maintain uniform
pressure on piston to avoid cocking it in bore.
1 - DUST BOOT 2 - CALIPER PISTON (8) Press caliper piston to bottom of bore.
(9) Seat piston dust boot with Installer 8248 and
Handle C-4171 (Fig. 52).
1 - SEAL INSTALLER 2 - DUST BOOT (10) Install caliper bleed screw and bleed screw
cap if removed (Fig. 53).
1 - BLEED SCREW CAP 2 - BLEED SCREW DISASSEMBLY (1) Remove push rods and boots (Fig. 54).
(2) Press pistons, cups and spring and expander
out of cylinder bore.
(3) Remove bleed screw.
1 - SPRING 2 - CYLINDER 3 - PISTON CUP 4 - BOOT 5 - PUSH ROD 6 - PISTON 7 - BLEED SCREW 8 - CUP EXPANDERS ASSEMBLY (1) Lubricate wheel cylinder bore, pistons, piston
cups and spring and expander with clean brake fluid.
(2) Install first piston in cylinder bore. Then
install first cup in bore and against piston. Be sure
lip of piston cup is facing inward (toward
spring and expander) and flat side is against
piston.
(3) Install spring and expander followed by
remaining piston cup and piston.
(4) Install boots on each end of cylinder and insert
push rods in boots.
(5) Install cylinder bleed screw.Master cylinder reservoir
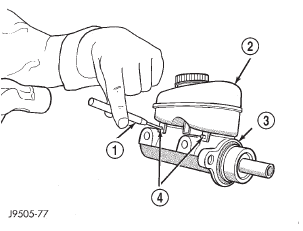 Fig. 40 Reservoir Retaining Pins
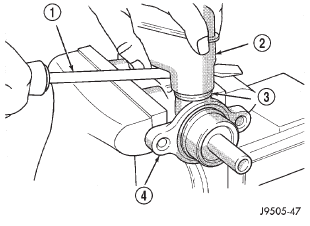 Fig. 41 Loosening Reservoir
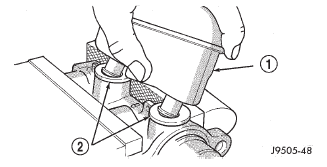 Fig. 42 Reservoir Removal
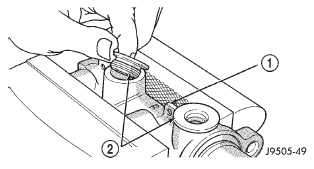 Fig. 43 Grommet Removal
Disc brake caliper
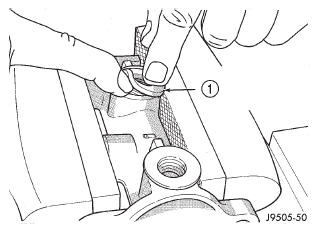 Fig. 44 Grommet Installation
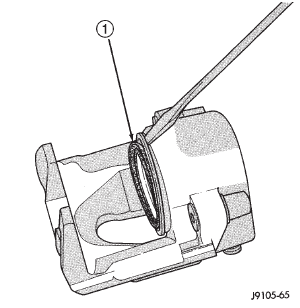 Fig. 45 Piston Dust Boot
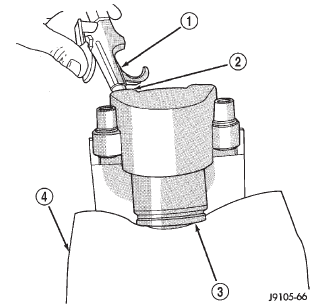 Fig. 46 Caliper Piston
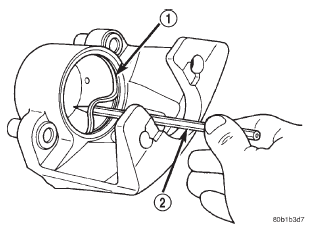 Fig. 47 Caliper Piston Seal
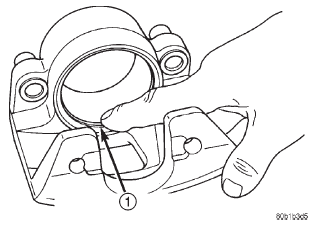 Fig. 48 Caliper Piston Seal
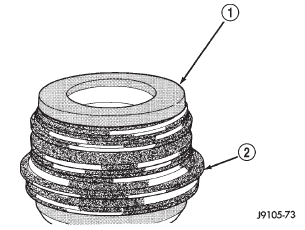 Fig. 49 Sliding Boot Onto Piston
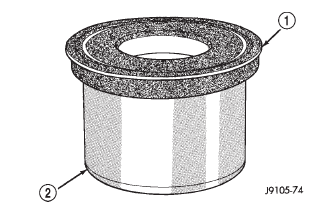 Fig. 50 Snapping Boot Folds Into Place
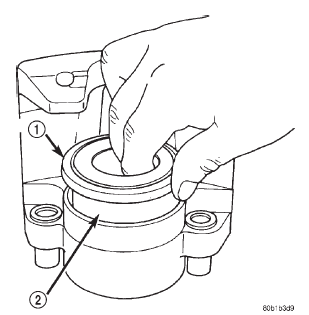 Fig. 51 Installing Caliper Piston And Boot
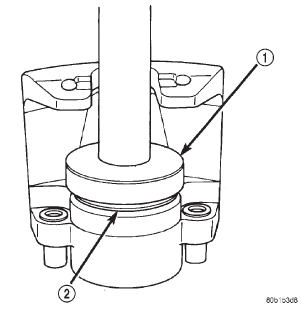 Fig. 52 Seating Piston Dust Boot
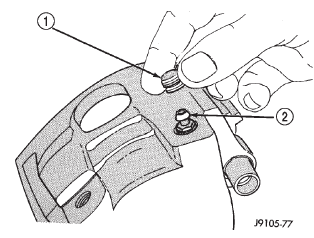 Fig. 53 Installing Caliper Bleed Screw And Cap
Wheel cylinder
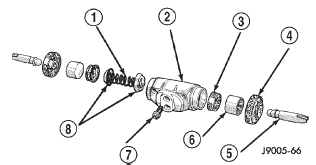 Fig. 54 Wheel Cylinder Components-Typical
Dodge Durango (DN) 1998-2003 Service Manual
- Lubrication and Maintenance
- Suspension
- Differential and Driveline
- Brakes
- Cooling System
- Battery
- Starting Systems
- Charging System
- Ignition System
- Instrument Panel Systems
- Audio Systems
- Horn Systems
- Speed Control System
- Turn Signal and Hazard Warning Systems
- Wiper and Washer Systems
- Lamps
- Passive Restraint Systems
- Electrically Heated Systems
- Power Distribution System
- Power Lock Systems
- Vehicle Theft/Security Systems
- Power Seat System
- Power Window Systems
- Power Mirror Systems
- Chime/Buzzer Warning Systems
- Overhead Console Systems
- Engine
- Exhaust System
- Frame and Bumpers
- Fuel System
- Steering
- Transmission and Transfer Case
- Tires and Wheels
- Body
- Heating and Air Conditioning
- Emission Control Systems
- Introduction
Categories
