 Dodge Durango Owners ManualThings to know before starting your vehicle » Occupant restraint systems
Seat Belt Systems
Seat Belt Systems
Buckle up even though you are an excellent driver, even on short trips. Someone on the road may be a poor driver and could cause a collision that includes you. This can happen far away from home or on your own street.
Research has shown that seat belts save lives, and they can reduce the seriousness of injuries in a collision. Some of the worst injuries happen when people are thrown from the vehicle. Seat belts reduce the possibility of ejection and the risk of injury caused by striking the inside of the vehicle. Everyone in a motor vehicle should be belted at all times.
Driver And Passenger BeltAlert - If Equipped
 BeltAlert is a feature intended
to remind the driver
and outboard front seat passenger (if equipped with
outboard front passenger seat BeltAlert) to buckle
their seat belts. The Belt Alert feature is active whenever
the ignition is placed in the START or ON/RUN
position.
BeltAlert is a feature intended
to remind the driver
and outboard front seat passenger (if equipped with
outboard front passenger seat BeltAlert) to buckle
their seat belts. The Belt Alert feature is active whenever
the ignition is placed in the START or ON/RUN
position.
Initial Indication
If the driver is unbuckled when the ignition is first placed in the START or ON/RUN position, an intermittent chime will signal for a few seconds. If the driver or outboard front seat passenger (if equipped with outboard front passenger seat BeltAlert) is unbuckled when the ignition is first placed in the START or ON/RUN position the Seat Belt Reminder Light will turn on and remain on until both outboard front seat belts are buckled. The outboard front passenger seat BeltAlert is not active when an outboard front passenger seat is unoccupied.
BeltAlert Warning Sequence
The BeltAlert warning sequence is activated when the vehicle is moving above a specified vehicle speed range and the driver or outboard front seat passenger is unbuckled (if equipped with outboard front passenger seat BeltAlert). The BeltAlert warning sequence starts by blinking the Seat Belt Reminder Light and sounding an intermittent chime. Once the BeltAlert warning sequence has completed, the Seat Belt Reminder Light will remain on until the seat belts are buckled. The BeltAlert warning sequence may repeat based on vehicle speed until the driver and occupied outboard front seat passenger seat belts are buckled. The driver should instruct all occupants to buckle their seat belts.
Change Of Status
If the driver or outboard front seat passenger (if equipped with outboard front passenger seat BeltAlert) unbuckles their seat belt while the vehicle is traveling, the BeltAlert warning sequence will begin until the seat belts are buckled again.
The outboard front passenger seat BeltAlert is not active when the outboard front passenger seat is unoccupied.
BeltAlert may be triggered when an animal or other items are placed on the outboard front passenger seat or when the seat is folded flat (if equipped). It is recommended that pets be restrained in the rear seat (if equipped) in pet harnesses or pet carriers that are secured by seat belts, and cargo is properly stowed.
BeltAlert can be activated or deactivated by your authorized dealer. FCA US LLC does not recommend deactivating BeltAlert.
NOTE: If BeltAlert has been deactivated and the driver or outboard front seat passenger (if equipped with outboard front passenger seat BeltAlert) is unbuckled the Seat Belt Reminder Light will turn on and remain on until the driver and outboard front seat passenger seat belts are buckled.
Lap/Shoulder Belts
All seating positions in your vehicle are equipped with lap/shoulder belts.
The seat belt webbing retractor will lock only during very sudden stops or collisions. This feature allows the shoulder part of the seat belt to move freely with you under normal conditions. However, in a collision the seat belt will lock and reduce your risk of striking the inside of the vehicle or being thrown out of the vehicle.
WARNING!
|
Lap/Shoulder Belt Operating Instructions
- Enter the vehicle and close the door. Sit back and adjust the seat.
- The seat belt latch plate is above the back of the front seat, and next to your arm in the rear seat (for vehicles equipped with a rear seat). Grasp the latch plate and pull out the seat belt. Slide the latch plate up the webbing as far as necessary to allow the seat belt to go around your lap.
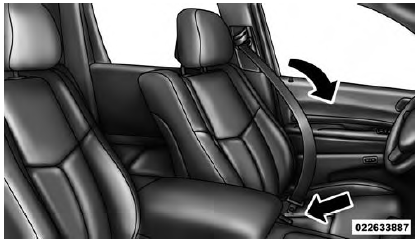 Pulling Out The Latch Plate
- When the seat belt is long enough to fit, insert the latch plate into the buckle until you hear a "click."
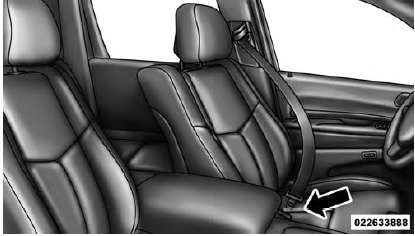 Inserting Latch Plate Into Buckle
- Position the lap belt so that it is snug and lies low across your hips, below your abdomen. To remove slack in the lap belt portion, pull up on the shoulder belt. To loosen the lap belt if it is too tight, tilt the latch plate and pull on the lap belt. A snug seat belt reduces the risk of sliding under the seat belt in a collision.
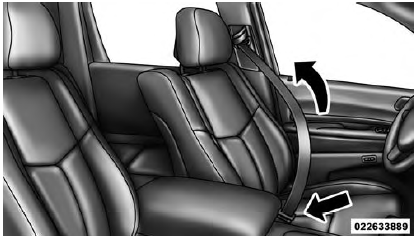 Positioning The Lap Belt
- Position the shoulder belt across the shoulder and chest with minimal, if any slack so that it is comfortable and not resting on your neck. The retractor will withdraw any slack in the shoulder belt.
- To release the seat belt, push the red button on the buckle. The seat belt will automatically retract to its stowed position. If necessary, slide the latch plate down the webbing to allow the seat belt to retract fully.
Lap/Shoulder Belt Untwisting Procedure
Use the following procedure to untwist a twisted lap/ shoulder belt.
- Position the latch plate as close as possible to the anchor point.
- At about 6 to 12 inches (15 to 30 cm) above the latch plate, grasp and twist the seat belt webbing 180 degrees to create a fold that begins immediately above the latch plate.
- Slide the latch plate upward over the folded webbing.The folded webbing must enter the slot at the top of the latch plate.
- Continue to slide the latch plate up until it clears the folded webbing and the seat belt is no longer twisted.
Adjustable Upper Shoulder Belt Anchorage
In the driver and front passenger seats, the top of the shoulder belt can be adjusted upward or downward to position the seat belt away from your neck. Push or squeeze the anchorage button to release the anchorage, and move it up or down to the position that serves you best.
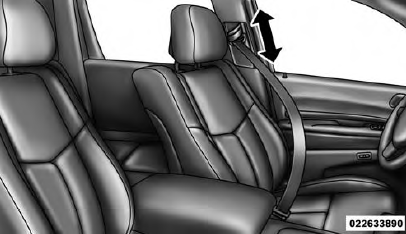 Adjustable Anchorage
As a guide, if you are shorter than average, you will prefer the shoulder belt anchorage in a lower position, and if you are taller than average, you will prefer the shoulder belt anchorage in a higher position. After you release the anchorage button, try to move it up or down to make sure that it is locked in position.
NOTE: The adjustable upper shoulder belt anchorage is equipped with an Easy Up feature. This feature allows the shoulder belt anchorage to be adjusted in the upward position without pushing or squeezing the release button.
To verify the shoulder belt anchorage is latched, pull downward on the shoulder belt anchorage until it is locked into position.
Seat Belt Extender
If a seat belt is not long enough to fit properly, even when the webbing is fully extended and the adjustable upper shoulder belt anchorage (if equipped) is in its lowest position, your authorized dealer can provide you with a Seat Belt Extender. The Seat Belt Extender should be used only if the existing seat belt is not long enough. When the Seat Belt Extender is not required for a different occupant, it must be removed.
WARNING!
|
Seat Belts And Pregnant Women
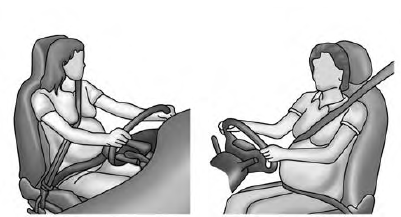 Pregnant Women And Seat Belts
Seat belts must be worn by all occupants including pregnant women: the risk of injury in the event of an accident is reduced for the mother and the unborn child if they are wearing a seat belt.
Position the lap belt snug and low below the abdomen and across the strong bones of the hips. Place the shoulder belt across the chest and away from the neck.
Never place the shoulder belt behind the back or under the arm.
Seat Belt Pretensioner
The front seat belt system is equipped with pretensioning devices that are designed to remove slack from the seat belt in the event of a collision. These devices may improve the performance of the seat belt by removing slack from the seat belt early in a collision. Pretensioners work for all size occupants, including those in child restraints.
NOTE: These devices are not a substitute for proper seat belt placement by the occupant. The seat belt still must be worn snugly and positioned properly.
The pretensioners are triggered by the Occupant Restraint Controller (ORC). Like the air bags, the pretensioners are single use items. A deployed pretensioner or a deployed air bag must be replaced immediately.
Energy Management Feature
This vehicle has a seat belt system with an Energy Management feature in the front seating positions that may help further reduce the risk of injury in the event of a collision. This seat belt system has a retractor assembly that is designed to release webbing in a controlled manner.
Switchable Automatic Locking Retractor (ALR)
The seat belts in the passenger seating positions are equipped with a Switchable Automatic Locking Retractor (ALR) which is used to secure a child restraint system.
For additional information, refer to "Installing Child Restraints Using The Vehicle Seat Belt" under the "Child Restraints" section of this manual. The table below defines the type of feature for each seating position.
 60/40 Second Row (7 passenger)
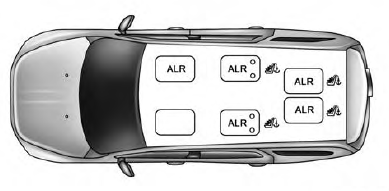 Captain's Chairs Second Row (6 Passenger)
- ALR = Switchable Automatic Locking Retractor
If the passenger seating position is equipped with an ALR and is being used for normal usage, only pull the seat belt webbing out far enough to comfortably wrap around the occupant's mid-section so as to not activate the ALR. If the ALR is activated, you will hear a clicking sound as the seat belt retracts. Allow the webbing to retract completely in this case and then carefully pull out only the amount of webbing necessary to comfortably wrap around the occupant's mid-section. Slide the latch plate into the buckle until you hear a click. In Automatic Locking Mode, the shoulder belt is automatically pre-locked. The seat belt will still retract to remove any slack in the shoulder belt. Use the Automatic Locking Mode anytime a child restraint is installed in a seating position that has a seat belt with this feature.
Children 12 years old and under should always be properly restrained in a vehicle with a rear seat.
WARNING!
|
How To Engage The Automatic Locking Mode
- Buckle the combination lap and shoulder belt.
- Grasp the shoulder portion and pull downward until the entire seat belt is extracted.
- Allow the seat belt to retract. As the seat belt retracts, you will hear a clicking sound. This indicates the seat belt is now in the Automatic Locking Mode.
How To Disengage The Automatic Locking Mode
Unbuckle the combination lap/shoulder belt and allow it to retract completely to disengage the Automatic Locking Mode and activate the vehicle sensitive (emergency) locking mode.
WARNING!
|
Supplemental Active Head Restraints (AHR)
These head restraints are passive, deployable components, and vehicles with this equipment cannot be readily identified by any markings, only through visual inspection of the head restraint. The head restraint will be split in two halves, with the front half being soft foam and trim, the back half being decorative plastic.
How The Active Head Restraints (AHR) Work
The Occupant Restraint Controller (ORC) determines whether the severity, or type of rear impact will require the Active Head Restraints (AHR) to deploy. If a rear impact requires deployment, both the driver and front passenger seat AHRs will be deployed.
When AHRs deploy during a rear impact, the front half of the head restraint extends forward to minimize the gap between the back of the occupant's head and the AHR.
This system is designed to help prevent or reduce the extent of injuries to the driver and front passenger in certain types of rear impacts.
NOTE: The Active Head Restraints (AHR) may or may not deploy in the event of a front or side impact.
However if during a front impact, a secondary rear impact occurs, the AHR may deploy based on the severity and type of the impact.
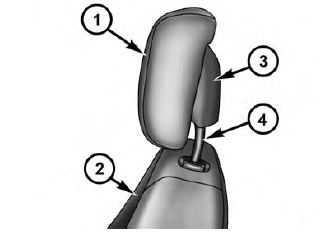 Active Head Restraint (AHR) Components
1 - Head Restraint Front Half (Soft Foam and Trim) 2 - Seatback> 3 - Head Restraint Back Half (Decorative Plastic Rear Cover)> 4 - Head Restraint Guide Tubes
WARNING!
|
NOTE: For more information on properly adjusting and positioning the head restraint, refer to "Adjusting Active Head Restraints" in "Understanding The Features Of Your Vehicle."
Resetting Active Head Restraints (AHR)
If the Active Head Restraints are triggered during a collision, the front half of the head restraint will be extended forward and separated from the rear half of the head restraint (See Image). Do not drive your vehicle after the AHRs have deployed. The head restraint must be reset into the original position to best protect the occupant for all types of collisions. An authorized dealer must reset the AHRs on the driver's and front passenger's seat before driving. Personally attempting to reset the AHRs may result in damage to the AHRs that could impair their function.
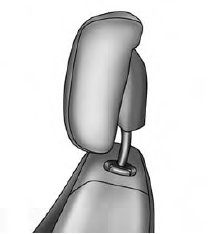 AHR In Reset Position
| WARNING! Deployed AHRs are not able to best protect you in all types of collisions. Have deployed AHRs reset by an authorized dealer immediately. |
Important Safety Precautions
Seat Belt Systems
Supplemental Restraint System (SRS)
Child Restraints
Transporting pets
Dodge Durango Owners Manual
Categories

0.0216