 Dodge Durango Service ManualCooling System » Removal and installation
Radiator
Radiator
REMOVAL
WARNING: DO NOT REMOVE CYLINDER BLOCK DRAIN PLUGS OR LOOSEN RADIATOR DRAINCOCK WITH SYSTEM HOT AND UNDER PRESSURE.
SERIOUS BURNS FROM COOLANT CAN OCCUR.
(1) Disconnect battery negative cable.
(2) Drain cooling system. Refer to Draining and Filling Cooling System in this section.
WARNING: CONSTANT TENSION HOSE CLAMPS ARE USED ON MOST COOLING SYSTEM HOSES.
WHEN REMOVING OR INSTALLING, USE ONLY TOOLS DESIGNED FOR SERVICING THIS TYPE OF CLAMP, SUCH AS SPECIAL CLAMP TOOL (NUMBER 6094) (Fig. 50). SNAP-ON CLAMP TOOL (NUMBER HPC-20) MAY BE USED FOR LARGER CLAMPS.
ALWAYS WEAR SAFETY GLASSES WHEN SERVICING CONSTANT TENSION CLAMPS.
CAUTION: A number or letter is stamped into the tongue of constant tension clamps (Fig. 51). If replacement is necessary, use only an original equipment clamp with matching number or letter.
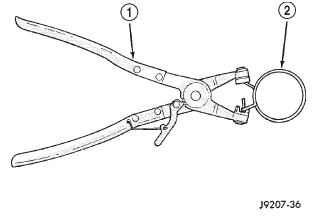 Fig. 50 Hose Clamp Tool-Typical
1 - HOSE CLAMP TOOL 6094
2 - HOSE CLAMP
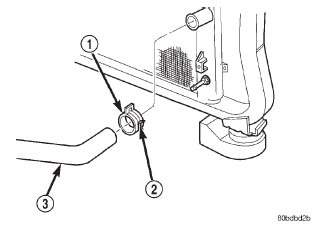 Fig. 51 Clamp Number/Letter Location
1 - CONSTANT TENSION HOSE CLAMP
2 - CLAMP NUMBER/LETTER LOCATION
3 - HOSE
(3) Remove hose clamps (Fig. 50) and hoses from radiator. Disconnect coolant reserve/overflow tank hose and washer bottle electrical connector and hose.
(4) Remove upper fan shroud mounting screws Lift upper fan shroud assembly up and out of engine compartment (Fig. 52).
(5) Remove front grille. Refer to BODY for procedure.
(6) Disconnect transmission oil cooler lines, (if equipped) (Fig. 53).
(7) Disconnect electric cooling fan motor connector.
(8) Remove radiator upper mounting screws (Fig.
54). Lift radiator upward and away from vehicle. Do not allow cooling fins of radiator to contact any other vehicle component. Radiator fin damage could result.
INSTALLATION
The radiator has two isolator pins on bottom of both tanks. These fit into alignment holes in radiator lower support (Fig. 54).
(1) Position isolator pins into alignment holes in radiator lower support.
(2) Install and tighten radiator mounting bolts to 23 N*m (200 in. lbs.) (Fig. 54).
(3) Install the transmission oil cooler lines, (if equipped).
(4) Install front grille.
(5) Connect fan motor electrical connector to harness connector.
(6) Position upper fan shroud onto lower fan shroud and radiator.
(7) Install retaining screws into shroud.
(8) Install radiator hoses. reconnect coolant reserve/overflow tank hose.
(9) Connect battery negative cable.
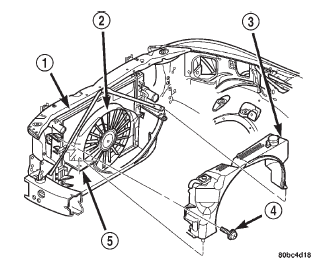 Fig. 52 Radiator Upper Fan Shroud Removal/ Installation-Typical
1 - RADIATOR
2 - ELECTRIC COOLING FAN
3 - UPPER SHROUD AND OVERFLOW BOTTLE
4 - SCREW
5 - LOWER SHROUD
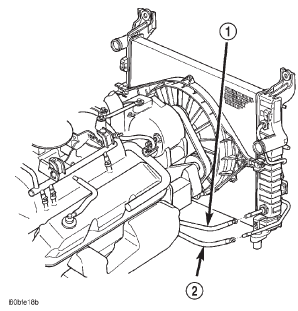 Fig. 53 Transmission Oil Cooler Lines-Automatic Transmission Only
1 - TRANSMISSION COOLER SUPPLY LINE
2 - TRANSMISSION OIL COOLER RETURN LINE
(10) Fill cooling system. Refer to Draining and Filling Cooling System in this section.
(11) Start and warm the engine. Check for leaks.
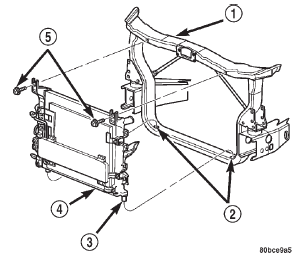 Fig. 54 Radiator Removal/Installation-Typical
1 - CORE SUPPORT
2 - LOWER ISOLATOR MOUNTS
3 - ISOLATOR PINS
4 - RADIATOR ASSEMBLY
5 - SCREWS
Water pump-5.2L/5.9L engines
Water pump 4.7L engines
Water pump bypass hose-5.2L/5.9L engines
Thermostat-5.2L/5.9L engine
Thermostat- 4.7L engine
Radiator
Block heater
Accessory drive belt-5.2L/5.9L engine
Accessory belt replacement-4.7L engine
Automatic belt tensioner-5.2L/5.9L engine
Automatic belt tensioner-4.7L engine
Radiator draincock
Viscous fan drive
Dodge Durango Service Manual
- Lubrication and Maintenance
- Suspension
- Differential and Driveline
- Brakes
- Cooling System
- Battery
- Starting Systems
- Charging System
- Ignition System
- Instrument Panel Systems
- Audio Systems
- Horn Systems
- Speed Control System
- Turn Signal and Hazard Warning Systems
- Wiper and Washer Systems
- Lamps
- Passive Restraint Systems
- Electrically Heated Systems
- Power Distribution System
- Power Lock Systems
- Vehicle Theft/Security Systems
- Power Seat System
- Power Window Systems
- Power Mirror Systems
- Chime/Buzzer Warning Systems
- Overhead Console Systems
- Engine
- Exhaust System
- Frame and Bumpers
- Fuel System
- Steering
- Transmission and Transfer Case
- Tires and Wheels
- Body
- Heating and Air Conditioning
- Emission Control Systems
- Introduction
Categories

0.0144