 Dodge Durango Service ManualFuel System » Fuel delivery system » Service procedures
Quick-connect fittings
Quick-connect fittings
Also refer to Fuel Tubes/Lines/Hoses and Clamps.
Different types of quick-connect fittings are used to attach various fuel system components, lines and tubes. These are: a single-tab type, a two-tab type or a plastic retainer ring type. Safety latch clips are used on certain components/lines. Certain fittings may require use of a special tool for disconnection.
DISCONNECTING
WARNING: THE FUEL SYSTEM IS UNDER A CONSTANT PRESSURE (EVEN WITH ENGINE OFF).
BEFORE SERVICING ANY FUEL SYSTEM HOSE, FITTING OR LINE, FUEL SYSTEM PRESSURE MUST BE RELEASED. REFER TO FUEL SYSTEM PRESSURE RELEASE PROCEDURE.
CAUTION: The interior components (o-rings, spacers) of some types of quick-connect fitting are not serviced separately. If service parts are not available, do not attempt to repair a damaged fitting or fuel line. If repair is necessary, replace complete fuel line assembly.
(1) Perform fuel pressure release procedure. Refer to Fuel Pressure Release Procedure in this group.
(2) Disconnect negative battery cable from battery.
(3) Clean fitting of any foreign material before disassembly.
(4) Single-Tab Type Fitting: This type of fitting is equipped with a single pull tab (Fig. 13). The tab is removable. After tab is removed, quick-connect fitting can be separated from fuel system component.
(a) Press release tab on side of fitting to release pull tab (Fig. 14). If release tab is not pressed prior to releasing pull tab, pull tab will be damaged.
(b) While pressing release tab on side of fitting, use screwdriver to pry up pull tab (Fig. 14).
(c) Raise pull tab until it separates from quickconnect fitting (Fig. 15).
(5) Two-Tab Type Fitting: This type of fitting is equipped with tabs located on both sides of fitting (Fig. 16). The tabs are supplied for disconnecting quick-connect fitting from component being serviced.
 Fig. 13 Single-Tab Type Fitting
1 - PULL TAB
2 - QUICK-CONNECT FITTING
3 - PRESS HERE TO REMOVE PULL TAB
4 - INSERTED TUBE END
(a) To disconnect quick-connect fitting, squeeze plastic retainer tabs (Fig. 16) against sides of quick-connect fitting with your fingers. Tool use is not required for removal and may damage plastic retainer.
(b) Pull fitting from fuel system component being serviced.
(c) The plastic retainer will remain on component being serviced after fitting is disconnected.
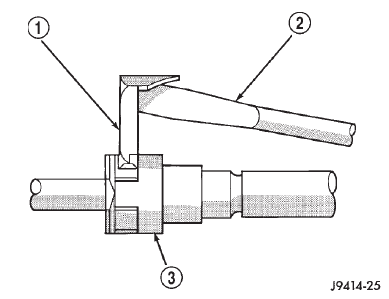 Fig. 14 Disconnecting Single-Tab Type Fitting
1 - PULL TAB
2 - SCREWDRIVER
3 - QUICK-CONNECT FITTING
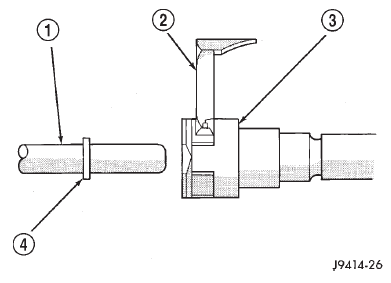 Fig. 15 Removing Pull Tab
1 - FUEL TUBE OR FUEL SYSTEM COMPONENT
2 - PULL TAB
3 - QUICK-CONNECT FITTING
4 - FUEL TUBE STOP
The o-rings and spacer will remain in quick-connect fitting connector body.
(6) Plastic Retainer Ring Type Fitting: This type of fitting can be identified by the use of a fullround plastic retainer ring (Fig. 17) usually black in color.
(a) To release fuel system component from quickconnect fitting, firmly push fitting towards component being serviced while firmly pushing plastic retainer ring into fitting (Fig. 17). With plastic ring depressed, pull fitting from component. The plastic retainer ring must be pressed squarely into fitting body. If this retainer is cocked during removal, it may be difficult to disconnect fitting. Use an open-end wrench on shoulder of plastic retainer ring to aid in disconnection.
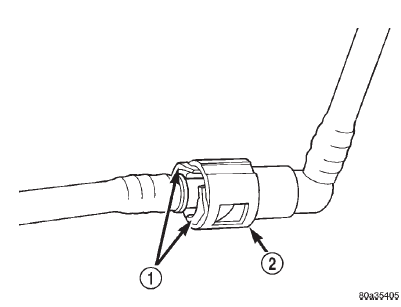 Fig. 16 Typical Two-Tab Type Quick-Connect Fitting
1 - TAB(S)
2 - QUICK-CONNECT FITTING
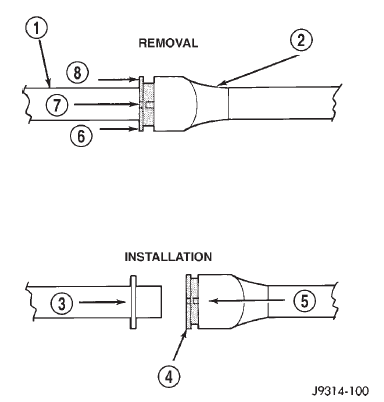 Fig. 17 Plastic Retainer Ring Type Fitting
1 - FUEL TUBE
2 - QUICK CONNECT FITTING
3 - PUSH
4 - PLASTIC RETAINER
5 - PUSH
6 - PUSH
7 - PUSH
8 - PUSH
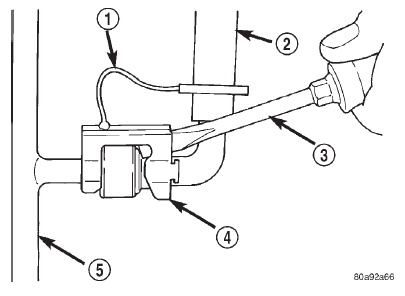 Fig. 18 Latch Clip-Type 1
1 - TETHER STRAP
2 - FUEL LINE
3 - SCREWDRIVER
4 - LATCH CLIP
5 - FUEL RAIL
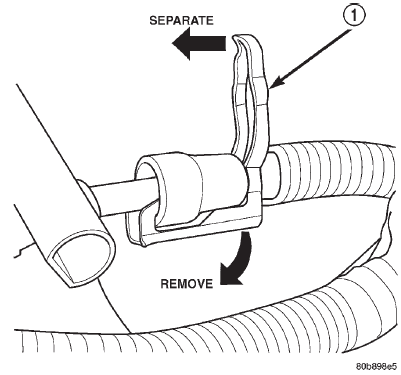 Fig. 19 Latch Clip-Type 2
(b) After disconnection, plastic retainer ring will remain with quick-connect fitting connector body.
(c) Inspect fitting connector body, plastic retainer ring and fuel system component for damage.
Replace as necessary.
(7) Latch Clips: Depending on vehicle model and engine, 2 different types of safety latch clips are used (Fig. 18) or (Fig. 19). Type-1 is tethered to fuel line and type-2 is not. A special tool will be necessary to disconnect fuel line after latch clip is removed. The latch clip may be used on certain fuel line/fuel rail connection, or to join fuel lines together.
(a) Type 1: Pry up on latch clip with a screwdriver (Fig. 18).
(b) Type 2: Separate and unlatch 2 small arms on end of clip (Fig. 19) and swing away from fuel line.
(c) Slide latch clip toward fuel rail while lifting with screwdriver.
(d) Insert special fuel line removal tool (Snap-On number FIH 9055-1 or equivalent) into fuel line (Fig. 20). Use tool to release locking fingers in end of line.
(e) With special tool still inserted, pull fuel line from fuel rail.
(f) After disconnection, locking fingers will remain within quick-connect fitting at end of fuel line.
(8) Disconnect quick-connect fitting from fuel system component being serviced.
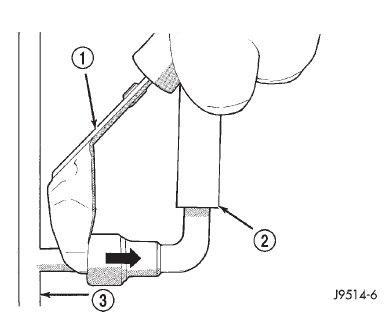 Fig. 20 Fuel Line Disconnection Using Special Tool
1 - SPECIAL FUEL LINE TOOL
2 - FUEL LINE
3 - FUEL RAIL
CONNECTING
(1) Inspect quick-connect fitting body and fuel system component for damage. Replace as necessary.
(2) Prior to connecting quick-connect fitting to component being serviced, check condition of fitting and component. Clean parts with a lint-free cloth.
Lubricate with clean engine oil.
(3) Insert quick-connect fitting into fuel tube or fuel system component until built-on stop on fuel tube or component rests against back of fitting.
(4) Continue pushing until a click is felt.
(5) Single-tab type fitting: Push new tab down until it locks into place in quick-connect fitting.
(6) Verify a locked condition by firmly pulling on fuel tube and fitting (15-30 lbs.).
(7) Latch Clip Equipped: Install latch clip (snaps into position). If latch clip will not fit, this indicates fuel line is not properly installed to fuel rail (or other fuel line). Recheck fuel line connection.
(8) Connect negative cable to battery.
(9) Start engine and check for leaks.
Fuel system pressure release procedure
Quick-connect fittings
Dodge Durango Service Manual
- Lubrication and Maintenance
- Suspension
- Differential and Driveline
- Brakes
- Cooling System
- Battery
- Starting Systems
- Charging System
- Ignition System
- Instrument Panel Systems
- Audio Systems
- Horn Systems
- Speed Control System
- Turn Signal and Hazard Warning Systems
- Wiper and Washer Systems
- Lamps
- Passive Restraint Systems
- Electrically Heated Systems
- Power Distribution System
- Power Lock Systems
- Vehicle Theft/Security Systems
- Power Seat System
- Power Window Systems
- Power Mirror Systems
- Chime/Buzzer Warning Systems
- Overhead Console Systems
- Engine
- Exhaust System
- Frame and Bumpers
- Fuel System
- Steering
- Transmission and Transfer Case
- Tires and Wheels
- Body
- Heating and Air Conditioning
- Emission Control Systems
- Introduction
Categories

0.0097