 Dodge Durango Service ManualDifferential and Driveline » Propeller shafts » Removal and installation
Front propeller shaft
Front propeller shaft
REMOVAL
(1) Shift the transmission and transfer case to their neutral positions. Raise and support vehicle.
Remove skid plate, if equipped.
(2) Using a suitable marker, mark a line across the yoke at the transfer case, the link yoke, and propeller shaft yoke at the rear of the front propeller shaft for installation reference.
(3) Mark a line across the propeller shaft companion yoke and flange at the front axle for installation reference.
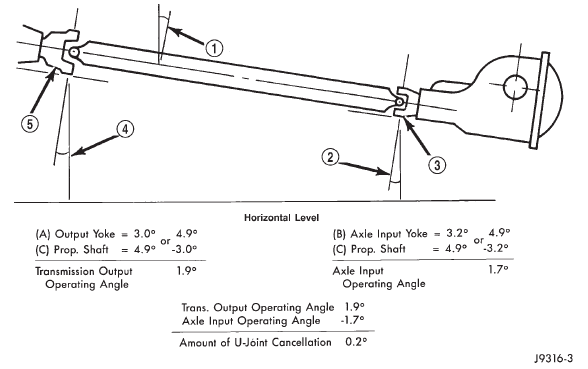 Fig. 14 Universal Joint Angle Example
1 - 4.9 Angle (C)
2 - 3.2 Angle (B)
3 - Input Yoke
4 - 3.0 Angle (A)
5 - Output Yoke
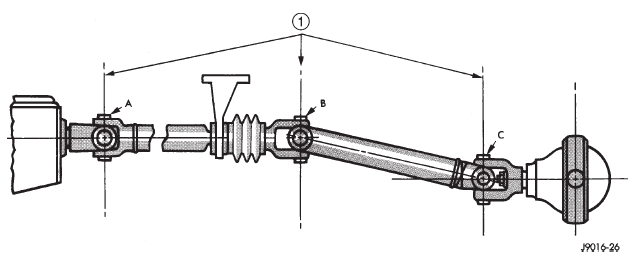 Fig. 15 Universal Joint Angle-Two-Piece Shaft
1 - YOKES MUST BE IN SAME PLANE
(4) Remove the bolts holding the companion yoke to the companion flange (Fig. 16).
(5) Remove the bolts holding the propeller shaft to the transfer case yoke.
(6) Remove the propeller shaft.
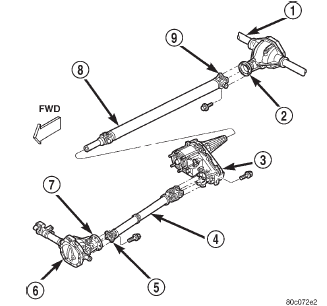 Fig. 16 Front Propeller Shaft
1 - REAR AXLE
2 - COMPANION FLANGE
3 - TRANSFER CASE
4 - FRONT PROPELLER SHAFT
5 - COMPANION YOKE
6 - FRONT AXLE
7 - COMPANION FLANGE
8 - REAR PROPELLER SHAFT
9 - COMPANION YOKE
INSTALLATION
(1) Position front propeller shaft under vehicle with rear universal joint over the transfer case yoke flange.
(2) Place front companion yoke into the axle companion flange.
(3) Align mark on the link yoke and universal joint to the mark on the transfer case yoke flange.
(4) Loosely install bolts to hold universal joint to transfer case yoke.
(5) Align the mark on companion yoke to the mark on the companion flange.
(6) Install bolts to hold the companion yoke to the companion flange. Tighten bolts to 108 N*m (80 ft.
lbs.).
(7) Tighten bolts to hold universal joint to transfer case yoke to 27 N*m (20 ft. lbs.).
(8) Install skid plate, if equipped.
(9) Lower vehicle and road test to verify repair.
Front propeller shaft
Rear propeller shaft
Center bearing
Dodge Durango Service Manual
- Lubrication and Maintenance
- Suspension
- Differential and Driveline
- Brakes
- Cooling System
- Battery
- Starting Systems
- Charging System
- Ignition System
- Instrument Panel Systems
- Audio Systems
- Horn Systems
- Speed Control System
- Turn Signal and Hazard Warning Systems
- Wiper and Washer Systems
- Lamps
- Passive Restraint Systems
- Electrically Heated Systems
- Power Distribution System
- Power Lock Systems
- Vehicle Theft/Security Systems
- Power Seat System
- Power Window Systems
- Power Mirror Systems
- Chime/Buzzer Warning Systems
- Overhead Console Systems
- Engine
- Exhaust System
- Frame and Bumpers
- Fuel System
- Steering
- Transmission and Transfer Case
- Tires and Wheels
- Body
- Heating and Air Conditioning
- Emission Control Systems
- Introduction
Categories

0.0104