 Dodge Durango Service ManualEngine » Removal and installation
Engine mount-rear
Engine mount-rear
REMOVAL
(1) Raise vehicle on hoist.
(2) Using a suitable jack, support transmission.
(3) Remove the nut from the insulator mount through bolt (Manual transmission and 4x2 automatic transmission only) (Fig. 36) (Fig. 37).
(4) Remove the four bolts and washers retaining the mount to the transmission (4x4 automatic transmission only) (Fig. 38).
(5) Raise the transmission enough to remove the through bolt (Manual transmission and 4x2 automatic transmission only) (Fig. 36) (Fig. 37).
(6) Raise the transmission and remove the bolts retaining the mount to the crossmember (4x4 automatic transmission only) (Fig. 38).
(7) Remove the two nuts retaining the isolator to the crossmember (Manual transmission and 4x2 automatic transmission only) (Fig. 36) (Fig. 37).
(8) Remove the bolts (two bolts manual transmission)( three bolts 4x2 automatic transmission) retaining the insulator bracket to the transmission.
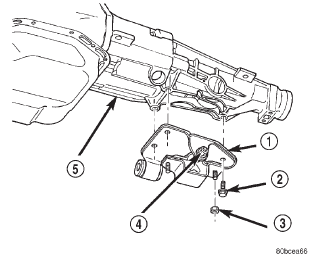 Fig. 36 Engine Rear Mount-4X2 Automatic Transmission
1 - ENGINE REAR MOUNT
2 - BOLT
3 - NUT
4 - THROUGH BOLT NUT
5 - TRANSMISSION
INSTALLATION
(1) Follow the removal procedure in the reverse order.
(2) Tighten the through bolt retaining nut to 102 N*m (75 ft. lbs.).
(3) Tighten the isolator bracket to transmission retaining bolts (Manual transmission and 4x2 automatic transmission only) to 41 N*m (30 ft. lbs.).
(4) Tighten the mount bracket to transmission retaining bolts (4x4 automatic transmission only) to 68 N*m (50 ft. lbs.).
(5) Tighten the isolator mount to crossmember retaining nuts (Manual transmission and 4x2 automatic transmission only) to 28 N*m (250 in. lbs.).
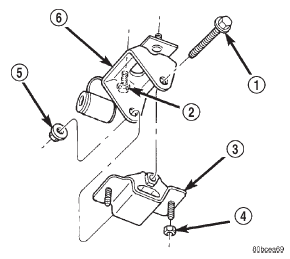 Fig. 37 Engine Rear Mount-4X2 and 4X4 Manual Transmission
1 - THROUGH BOLT
2 - BOLT
3 - INSULATOR SUPPORT
4 - NUT
5 - NUT AND WASHER
6 - INSULATOR BRACKET TO TRANSMISSION
 Fig. 38 Engine Rear Mount-4X4 Automatic Transmission
1 - TRANSMISSION
2 - ENGINE REAR MOUNT
3 - BOLT
(6) Tighten the mount bracket to crossmember retaining bolts (4x4 automatic transmission only) to 28 N*m (250 in. lbs.).
Engine mounts-left and right
Engine mount-rear
Structural cover
Engine assembly
Intake manifold
Exhaust manifolds
Cylinder head cover
Rocker arms
Cylinder heads
Valve springs and seals
Hydraulic lash adjuster
Crankshaft damper
Timing chain cover
Timing chain and sprockets
Idler shaft-timing drive
Camshafts-in vehicle
Crankshaft main bearings
Oil pan 4x2 vehicle
Oil pan 4x4 vehicle
Piston and connecting rod
Crankshaft
Flexplate
Oil pump
Engine oil pressure sending unit
Crankshaft oil seal-front
Crankshaft oil seal-rear
Engine core plugs
Dodge Durango Service Manual
- Lubrication and Maintenance
- Suspension
- Differential and Driveline
- Brakes
- Cooling System
- Battery
- Starting Systems
- Charging System
- Ignition System
- Instrument Panel Systems
- Audio Systems
- Horn Systems
- Speed Control System
- Turn Signal and Hazard Warning Systems
- Wiper and Washer Systems
- Lamps
- Passive Restraint Systems
- Electrically Heated Systems
- Power Distribution System
- Power Lock Systems
- Vehicle Theft/Security Systems
- Power Seat System
- Power Window Systems
- Power Mirror Systems
- Chime/Buzzer Warning Systems
- Overhead Console Systems
- Engine
- Exhaust System
- Frame and Bumpers
- Fuel System
- Steering
- Transmission and Transfer Case
- Tires and Wheels
- Body
- Heating and Air Conditioning
- Emission Control Systems
- Introduction
Categories

0.023