 Dodge Durango Service ManualEngine » Removal and installation
Crankshaft oil seal-front
Crankshaft oil seal-front
REMOVAL
(1) Disconnect negative cable from battery.
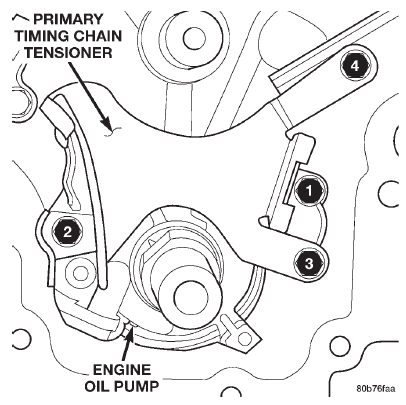 Fig. 124 Oil Pump and Primary Timing Chain Tightening Sequence
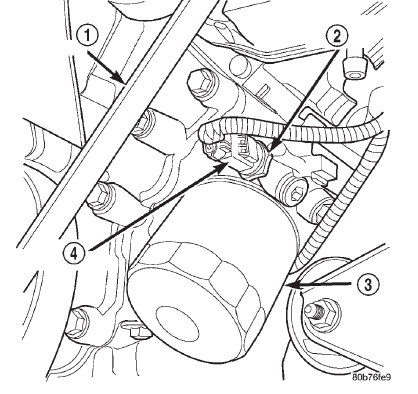 Fig. 125 Oil Pressure Sending Unit
1 - BELT
2 - OIL PRESSURE SENSOR
3 - OIL FILTER
4 - ELEC. CONNECTOR
(2) Remove accessory drive belt refer to Group 7, Cooling System for procedure.
(3) Remove A/C compressor mouning fasteners and set aside.
(4) Drain cooling system. Refer to Group 7, Cooling System for procedure.
(5) Remove upper radiator hose.
(6) Using Special Tools 6958 Spanner with Adapter Pins 8346 loosen fan and viscous assembly from water pump (Fig. 126).
(7) Remove fan and viscous assembly.
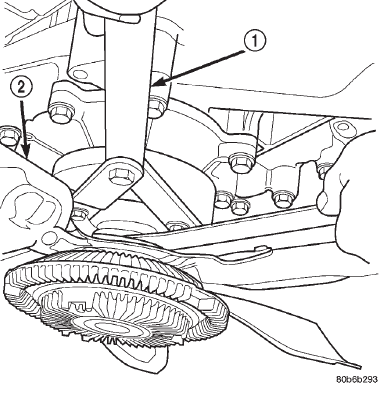 Fig. 126 Fan Assembly-Removal/Installation
1 - SPECIAL TOOL 6958 SPANNER WRENCH WITH ADAPTER PINS 8346
2 - FAN
(8) Disconnect electrical connector for fan mounted inside radiator shroud.
(9) Remove radiator shroud attaching fasteners.
NOTE: Transmission cooler line snaps into shroud lower right hand corner.
(10) Remove radiator shroud.
(11) Remove crankshaft damper bolt.
(12) Remove damper using Special Tools 8513 Insert and 1026 Three Jaw Puller (Fig. 127).
(13) Using Special Tool 8511, remove crankshaft front seal (Fig. 128).
INSTALLATION
CAUTION: To prevent severe damage to the Crankshaft, Damper or Special Tool 8512, thoroughly clean the damper bore and the crankshaft nose before installing Damper.
(1) Using Special Tool 8348 and 8512, install crankshaft front seal (Fig. 129).
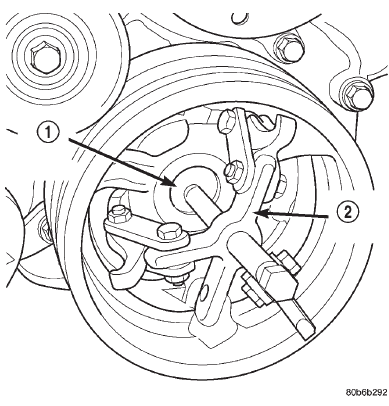 Fig. 127 Crankshaft Damper-Removal
1 - SPECIAL TOOL 8513 INSERT
2 - SPECIAL TOOL 1026
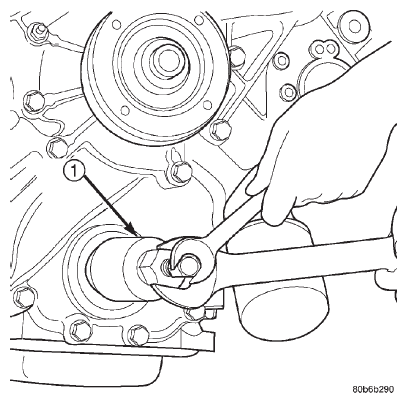 Fig. 128 Crankshaft Front Seal-Removal
1 - SPECIAL TOOL 8511
CAUTION: Special Tool 8512, is assembled in a specific sequence. Failure to assemble this tool in this sequence can result in tool failure and severe damage to either the tool or the crankshaft.
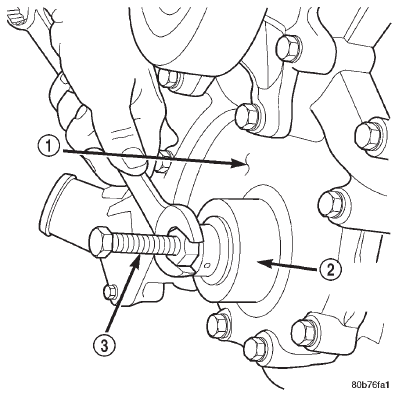 Fig. 129 Crankshaft Front Seal-Installation
1 - TIMING CHAIN COVER
2 - SPECIAL TOOL 8348
3 - SPECIAL TOOL 8512
(2) Assemble Special Tool 8512 as follows, The nut is threaded onto the shaft first. Then the roller bearing is placed onto the threaded rod (The hardened bearing surface of the bearing MUST face the nut).
Then the hardened washer slides onto the threaded rod (Fig. 130). Once assembled coat the threaded rod's threads with Mopart Nickel Anti-Seize or (Loctite No. 771).
(3) Align crankshaft damper slot with key in crankshaft. Slide damper onto crankshaft slightly.
(4) Using Special Tool 8512 press damper onto crankshaft (Fig. 131).
(5) Install then tighten crankshaft damper bolt to 175 N*m (130 ft. lbs.).
(6) Install radiator shroud and tighten fasteners to 11 N*m (95 in. lbs.).
(7) Connect electrical connector for shroud fan.
(8) Install fan and viscous assembly.
(9) Using Special Tools 6958 Spanner with Adapter Pins 8346 tighten fan and viscous assembly to water pump (Fig. 126).
(10) Install upper radiator hose.
(11) Install A/C compressor and tighten fasteners to 54 N*m (40 ft. lbs.).
(12) Install accessory drive belt refer to Group 7, Cooling System for procedure.
(13) Refill cooling system. Refer to Group 7, Cooling System for procedure.
(14) Connect negative cable to battery.
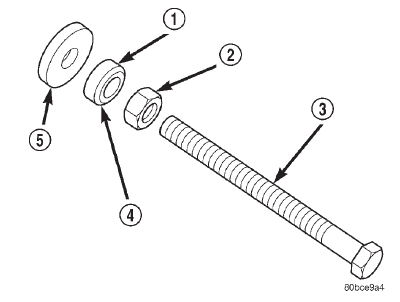 Fig. 130 Proper Assembly Method for Special Tool 8512
1 - BEARING
2 - NUT
3 - THREADED ROD
4 - BEARING HARDENED SURFACE (FACING NUT)
5 - HARDENED WASHER
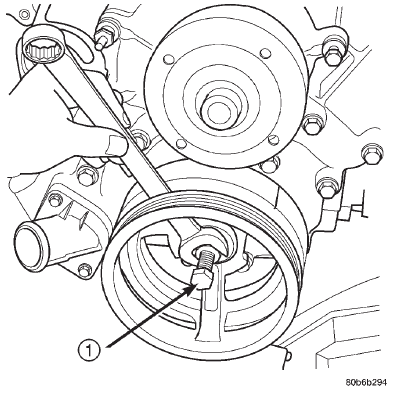 Fig. 131 Crankshaft Damper-Installation
1 - SPECIAL TOOL 8512
Engine mounts-left and right
Engine mount-rear
Structural cover
Engine assembly
Intake manifold
Exhaust manifolds
Cylinder head cover
Rocker arms
Cylinder heads
Valve springs and seals
Hydraulic lash adjuster
Crankshaft damper
Timing chain cover
Timing chain and sprockets
Idler shaft-timing drive
Camshafts-in vehicle
Crankshaft main bearings
Oil pan 4x2 vehicle
Oil pan 4x4 vehicle
Piston and connecting rod
Crankshaft
Flexplate
Oil pump
Engine oil pressure sending unit
Crankshaft oil seal-front
Crankshaft oil seal-rear
Engine core plugs
Dodge Durango Service Manual
- Lubrication and Maintenance
- Suspension
- Differential and Driveline
- Brakes
- Cooling System
- Battery
- Starting Systems
- Charging System
- Ignition System
- Instrument Panel Systems
- Audio Systems
- Horn Systems
- Speed Control System
- Turn Signal and Hazard Warning Systems
- Wiper and Washer Systems
- Lamps
- Passive Restraint Systems
- Electrically Heated Systems
- Power Distribution System
- Power Lock Systems
- Vehicle Theft/Security Systems
- Power Seat System
- Power Window Systems
- Power Mirror Systems
- Chime/Buzzer Warning Systems
- Overhead Console Systems
- Engine
- Exhaust System
- Frame and Bumpers
- Fuel System
- Steering
- Transmission and Transfer Case
- Tires and Wheels
- Body
- Heating and Air Conditioning
- Emission Control Systems
- Introduction
Categories

0.0206