 Dodge Durango Service ManualBody » Stationary glass » Removal and installation
Windshield
Windshield
REMOVAL
(1) Remove rear view mirror.
(2) Remove wipers and cowl grille.
(3) With doors open, remove the weatherstrip from the side windshield moldings.
(4) Remove the screws attaching the side windshield molding to the A-pillars.
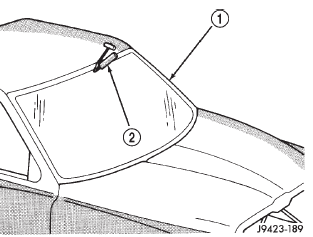
(5) Cut urethane bonding from around windshield using a suitable sharp cold knife (Fig. 1).
(6) Using a long knife, cut urethane bonding from inside the cab at the base of the windshield.
 Fig. 1 Cut Urethane Around Windshield
1 - WINDSHIELD
2 - COLD KNIFE
INSTALLATION
WARNING: Allow the urethane at least 24 hours to cure before returning the vehicle to use.
CAUTION: Roll down the left and right front door glass and open the rear glass slider (if available) before installing windshield to avoid pressurizing the passenger compartment if a door is slammed before urethane is cured. Water leaks can result.
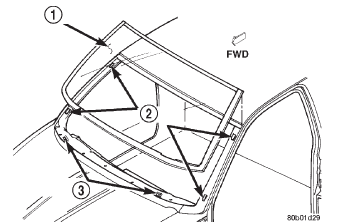
The windshield fence should be cleaned of most of its old urethane bonding material. A small amount of old urethane, approximately 1-2 mm in height, should remain on the fence. Do not grind off or completely remove all old urethane from the fence, the paint finish and bonding strength will be adversely affected. Support spacers located on the cowl at the bottom of the windshield opening (Fig. 2) should be replaced with new parts. Replace any missing or damaged spacers around the perimeter of the windshield opening.
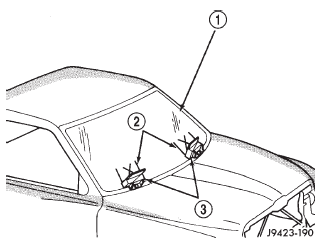
(1) Place replacement windshield into windshield opening and position glass in the center of the opening against the support spacers. Mark the glass at the support spacers with a grease pencil or pieces of masking tape and ink pen to use as a reference for installation. Remove replacement windshield from windshield opening (Fig. 3).
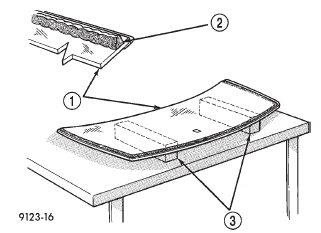
(2) Position the windshield inside up on a suitable work surface with two padded, wood 10 cm by 10 cm by 50 cm (4 in. by 4 in. by 20 in.) blocks, placed parallel 75 cm (2.5 ft.) apart (Fig. 4).
(3) Clean inside of windshield with MOPAR Glass Cleaner and lint-free cloth.
(4) Apply clear glass primer 25 mm (1 in.) wide around perimeter of windshield and wipe with a new clean and dry lint- free cloth.
(5) Apply the header molding to the windshield.
(6) Apply pinchweld primer 15 mm (.75 in.) wide around the windshield fence. Allow at least three minutes drying time.
(7) Apply a 13mm (1/2 in.) high and 10mm (3/8 in.) wide bead of urethane around the perimeter of windshield.
At the bottom, apply the bead 7 mm (1/4 in.) inboard from the glass edge. On the three sides where the molding is on the glass, follow the edge of molding. The urethane bead should be shaped in a triangular cross-section, this can be achieved by notching the tip of the applicator (Fig. 5).
(8) With the aid of a helper, position the windshield over the windshield opening. Align the reference marks at the bottom of the windshield to the support spacers.
(9) Slowly lower windshield glass to the fence opening guiding the lower corners into proper position.
Beginning at the bottom and continuing to the top, push glass onto fence along the A-Pillars. Push windshield inward to the fence at the bottom corners.
(10) Clean excess urethane from exterior with MOPAR Super Clean or equivalent.
(11) Apply 150 mm (6 in.) lengths of 50 mm (2 in.) masking tape spaced 250 mm (10 in.) apart to hold molding in place until urethane cures.
(12) Install new screws attaching the side windshield moldings to the A-pillars.
(13) Install the weatherstrip onto side windshield moldings.
(14) Install cowl grille and wipers.
(15) Install rear view mirror.
(16) After urethane has cured, remove tape strips and water test windshield to verify repair.
 Fig. 2 Support Spacers
1 - WINDSHIELD
2 - SPACERS
3 - SUPPORTS
 Fig. 3 Center Windshield and Mark at Support Spacers
1 - WINDSHIELD
2 - INDEX MARKS
3 - SUPPORT SPACERS
 Fig. 4 Work Surface Set up and Molding Installation
1 - WINDSHIELD AND MOULDINGS
2 - URETHANE BEAD AROUND GLASS 7mm (.3 in.) FROM EDGE
3 - BLOCKS
Windshield
Rear door stationary glass
Quarter window glass
Liftgate backlite
Dodge Durango Service Manual
- Lubrication and Maintenance
- Suspension
- Differential and Driveline
- Brakes
- Cooling System
- Battery
- Starting Systems
- Charging System
- Ignition System
- Instrument Panel Systems
- Audio Systems
- Horn Systems
- Speed Control System
- Turn Signal and Hazard Warning Systems
- Wiper and Washer Systems
- Lamps
- Passive Restraint Systems
- Electrically Heated Systems
- Power Distribution System
- Power Lock Systems
- Vehicle Theft/Security Systems
- Power Seat System
- Power Window Systems
- Power Mirror Systems
- Chime/Buzzer Warning Systems
- Overhead Console Systems
- Engine
- Exhaust System
- Frame and Bumpers
- Fuel System
- Steering
- Transmission and Transfer Case
- Tires and Wheels
- Body
- Heating and Air Conditioning
- Emission Control Systems
- Introduction
Categories
0.0087
