Water pump bypass hose-5.2L/5.9L engines
REMOVAL WITHOUT AIR CONDITIONING
(1) Partially drain cooling system. Refer to COOLING SYSTEM-DRAINING and FILLING in this Section.
Do not waste reusable coolant. If solution is clean, drain coolant into a clean container for reuse.
WARNING: CONSTANT TENSION HOSE CLAMPS ARE USED ON MOST COOLING SYSTEM HOSES.
WHEN REMOVING OR INSTALLING, USE ONLY TOOLS DESIGNED FOR SERVICING THIS TYPE OF CLAMP, SUCH AS SPECIAL CLAMP TOOL (NUMBER 6094) (Fig. 38). SNAP-ON CLAMP TOOL (NUMBER HPC-20) MAY BE USED FOR LARGER CLAMPS.
ALWAYS WEAR SAFETY GLASSES WHEN SERVICING CONSTANT TENSION CLAMPS.
CAUTION: A number or letter is stamped into the tongue of constant tension clamps (Fig. 39). If replacement is necessary, use only an original equipment clamp with matching number or letter.
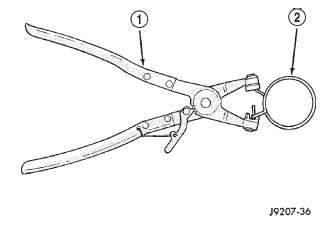 Fig. 38 Hose Clamp Tool-Typical
1 - HOSE CLAMP TOOL 6094
2 - HOSE CLAMP
(2) Loosen both bypass hose clamps (Fig. 38) and position to center of hose. Remove hose from vehicle
INSTALLATION
(1) Position bypass hose clamps (Fig. 38) to center of hose.
(2) Install bypass hose to engine.
(3) Secure both hose clamps (Fig. 38).
(4) Fill cooling system.
(5) Start and warm the engine. Check for leaks.
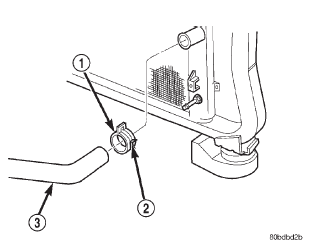 Fig. 39 Clamp Number/Letter Location
1 - CONSTANT TENSION HOSE CLAMP
2 - CLAMP NUMBER/LETTER LOCATION
3 - HOSE
REMOVAL WITH AIR CONDITIONING
If equipped with A/C, the generator and A/C compressor along with their common mounting bracket (Fig. 40) must be partially removed. Removing generator or A/C compressor from their mounting bracket is not necessary. Also, discharging A/C system is not necessary. Do not remove any refrigerant lines from A/C compressor.
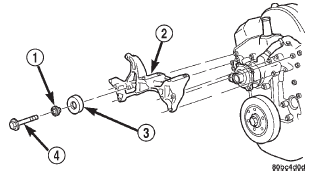 Fig. 40 Generator-A/C Compressor Mounting Bracket-5.2L/5.9L Engine
1 - IDLER PULLEY BUSHING
2 - A/C AND/OR GENERATOR MOUNTING BRACKET
3 - IDLER PULLEY
4 - SCREW AND WASHER
WARNING: THE A/C SYSTEM IS UNDER PRESSURE EVEN WITH ENGINE OFF. REFER TO REFRIGERANT WARNINGS IN GROUP 24, HEATING AND AIR CONDITIONING.
(1) Disconnect battery negative cable.
(2) Partially drain cooling system. Refer to COOLING SYSTEM-DRAINING and FILLING in this Section.
Do not waste reusable coolant. If solution is clean, drain coolant into a clean container for reuse.
(3) Remove upper radiator hose clamp (Fig. 38) and hose at radiator.
(4) Unplug wiring harness from A/C compressor.
(5) Remove air cleaner assembly.
(6) Remove accessory drive belt as follows: The drive belt is equipped with a spring loaded automatic tensioner (Fig. 41). Relax tension from belt by rotating tensioner clockwise (as viewed from front) (Fig.
41). When all belt tension has been relaxed, remove accessory drive belt.
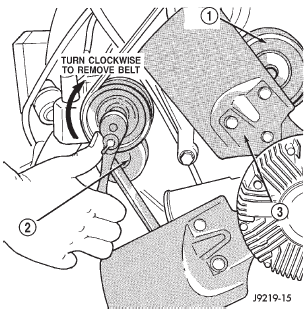 Fig. 41 Automatic Belt Tensioner Assembly
1 - IDLER PULLEY
2 - TENSIONER
3 - FAN BLADE
(7) The drive belt idler pulley must be removed to gain access to one of A/C compressor/generator bracket mounting bolts. Remove idler pulley bolt and remove idler pulley (Fig. 40).
(8) Remove oil dipstick tube mounting bolt at side of A/C-generator mounting bracket.
(9) Disconnect throttle body control cables. Refer to ACCELERATOR PEDAL and THROTTLE CABLE in FUEL SYSTEM for procedure.
(10) Remove heater hose clamp and heater hose from heater hose coolant return tube.
(11) Remove heater hose coolant return tube mounting bolt (Fig. 42) and remove tube from engine.
Discard the old tube O-ring.
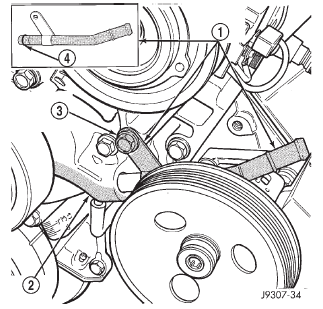 Fig. 42 Coolant Return Tube-5.2L/5.9L Engines- Typical
1 - COOLANT RETURN TUBE
2 - WATER PUMP
3 - TUBE MOUNTING BOLT
4 - O-RING
(12) Remove bracket-to-intake manifold bolts (number 1 and 2- (Fig. 40).
(13) Remove six bracket bolts (number 3- (Fig.
40).
(14) Lift and position generator and A/C compressor (along with their common mounting bracket) to gain access to bypass hose. A block of wood may be used to hold assembly in position.
(15) Loosen and position both hose clamps to center of bypass hose. Remove hose from vehicle.
INSTALLATION
(1) Position bypass hose clamps to center of hose.
(2) Install bypass hose to engine.
(3) Secure both hose clamps (Fig. 38).
(4) Install generator-A/C mounting bracket assembly to engine. Tighten bolts (number 1 and 2- (Fig.
40) to 54 N*m (40 ft. lbs.) torque. Tighten bolts (number 3- (Fig. 40) to 40 N*m (30 ft. lbs.) torque.
(5) Install a new O-ring to the heater hose coolant return tube (Fig. 42). Coat the new O-ring with antifreeze before installation.
(6) Install coolant return tube and its mounting bolt to engine (Fig. 42).
(7) Connect throttle body control cables.
(8) Install oil dipstick mounting bolt.
(9) Install idler pulley. Tighten bolt to 54 N*m (40 ft. lbs.) torque.
(10) Relax tension from belt tensioner (Fig. 41).
Install drive belt.
CAUTION: When installing serpentine accessory drive belt, the belt must be routed correctly. If not, engine may overheat due to water pump rotating in wrong direction. Refer to (Fig. 43) for correct belt routing. The correct belt with correct length must be used.
 Fig. 43 Belt Routing-5.2L/5.9L Engines
1 - IDLER PULLEY
2 - GENERATOR PULLEY
3 - A/C COMPRESSOR PULLEY
4 - IF W/OUT A/C
5 - POWER STEERING PUMP PULLEY
6 - WATER PUMP PULLEY
7 - CRANKSHAFT PULLEY
8 - AUTOMATIC TENSIONER
(11) Install air cleaner assembly.
(12) Install upper radiator hose to radiator.
(13) Connect wiring harness to A/C compressor.
(14) Connect battery negative cable.
(15) Fill cooling system. Refer to Draining and Filling Cooling System in this section.
(16) Start and warm the engine. Check for leaks.
Dodge Durango (DN) 1998-2003 Service Manual
- Lubrication and Maintenance
- Suspension
- Differential and Driveline
- Brakes
- Cooling System
- Battery
- Starting Systems
- Charging System
- Ignition System
- Instrument Panel Systems
- Audio Systems
- Horn Systems
- Speed Control System
- Turn Signal and Hazard Warning Systems
- Wiper and Washer Systems
- Lamps
- Passive Restraint Systems
- Electrically Heated Systems
- Power Distribution System
- Power Lock Systems
- Vehicle Theft/Security Systems
- Power Seat System
- Power Window Systems
- Power Mirror Systems
- Chime/Buzzer Warning Systems
- Overhead Console Systems
- Engine
- Exhaust System
- Frame and Bumpers
- Fuel System
- Steering
- Transmission and Transfer Case
- Tires and Wheels
- Body
- Heating and Air Conditioning
- Emission Control Systems
- Introduction
Categories
