 Dodge Durango Service ManualStarting Systems » Removal and installation
Starter relay
Starter relay
REMOVAL
(1) Disconnect and isolate the battery negative cable.
(2) Remove the cover from the Power Distribution Center (PDC) (Fig. 12).
(3) See the fuse and relay layout label affixed to the underside of the PDC cover for starter relay identification and location.
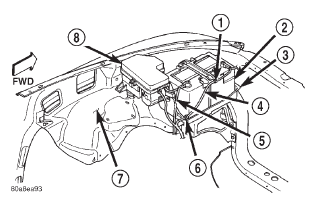 Fig. 12 Power Distribution Center
1 - CLIP
2 - BATTERY
3 - TRAY
4 - NEGATIVE CABLE
5 - POSITIVE CABLE
6 - CLIP
7 - FENDER INNER SHIELD
8 - POWER DISTRIBUTION CENTER
(4) Remove the starter relay from the PDC.
INSTALLATION
(1) See the fuse and relay layout label affixed to the underside of the PDC cover for the proper starter relay location.
(2) Position the starter relay in the proper receptacle in the PDC.
(3) Align the starter relay terminals with the terminal cavities in the PDC receptacle.
(4) Push down firmly on the starter relay until the terminals are fully seated in the terminal cavities in the PDC receptacle.
(5) Install the cover onto the PDC.
(6) Reconnect the battery negative cable.
Specifications
Starting system
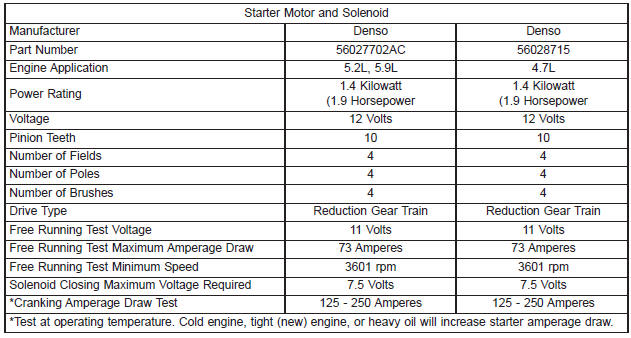
Starter motor
Starter relay
Dodge Durango Service Manual
- Lubrication and Maintenance
- Suspension
- Differential and Driveline
- Brakes
- Cooling System
- Battery
- Starting Systems
- Charging System
- Ignition System
- Instrument Panel Systems
- Audio Systems
- Horn Systems
- Speed Control System
- Turn Signal and Hazard Warning Systems
- Wiper and Washer Systems
- Lamps
- Passive Restraint Systems
- Electrically Heated Systems
- Power Distribution System
- Power Lock Systems
- Vehicle Theft/Security Systems
- Power Seat System
- Power Window Systems
- Power Mirror Systems
- Chime/Buzzer Warning Systems
- Overhead Console Systems
- Engine
- Exhaust System
- Frame and Bumpers
- Fuel System
- Steering
- Transmission and Transfer Case
- Tires and Wheels
- Body
- Heating and Air Conditioning
- Emission Control Systems
- Introduction
Categories

0.0057