 Dodge Durango Service ManualSpeed Control System » Removal and installation
Servo cable-4.7L v-8 engine
Servo cable-4.7L v-8 engine
REMOVAL
(1) Disconnect negative battery cable at battery.
(2) Remove air box housing from throttle body.
The accelerator cable must be partially removed to gain access to speed control cable.
(3) Using finger pressure only, disconnect accelerator cable connector at throttle body bellcrank pin by pushing connector off bellcrank pin towards front of vehicle (Fig. 5). DO NOT try to pull connector off perpendicular to the bellcrank pin. Connector will be broken.
(4) Lift accelerator cable from top of cable cam (Fig. 5).
(5) Press tab (Fig. 6) to release plastic cable mount from bracket. Press on tab only enough to release cable from bracket. If tab is pressed too much, it will be broken. Slide plastic mount (Fig.
6) towards passenger side of vehicle to remove cable from bracket.
(6) Using finger pressure only, disconnect speed control cable connector at throttle body bellcrank pin by pushing connector off bellcrank pin towards front of vehicle (Fig. 5). DO NOT try to pull connector off perpendicular to the bellcrank pin. Connector will be broken.
(7) Slide speed control cable plastic mount towards passenger side of vehicle to remove cable from bracket (Fig. 7).
(8) Remove servo cable from servo. Refer to Speed Control Servo Removal/Installation.
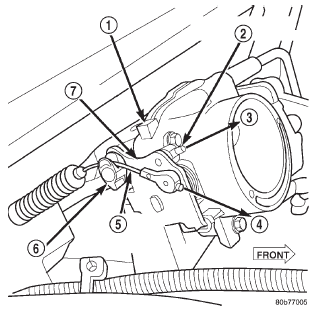 Fig. 5 Cable Connectors at Bell Crank-4.7L V-8 Engine
1 - THROTTLE BODY
2 - SPEED CONTROL CABLE CONNECTOR
3 - OFF
4 - OFF
5 - ACCELERATOR CABLE CONNECTOR
6 - CABLE CAM
7 - BELLCRANK
INSTALLATION
1) Install end of cable to speed control servo.
Refer to Speed Control Servo Removal/Installation.
(2) Slide speed control cable plastic mount into bracket.
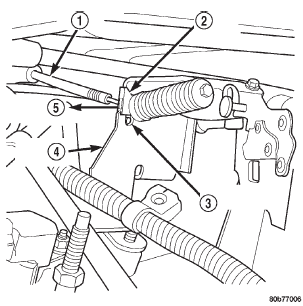 Fig. 6 Accelerator Cable Release Tab-4.7L V-8 Engine
1 - ACCELERATOR CABLE
2 - PLASTIC CABLE MOUNT
3 - PRESS TAB FOR REMOVAL
4 - CABLE BRACKET
5 - SLIDE FOR REMOVAL
(3) Install speed control cable connector onto throttle body bellcrank pin (snaps on).
(4) Slide accelerator cable plastic mount into bracket. Continue sliding until tab (Fig. 6) is aligned to hole in mounting bracket.
(5) Route accelerator cable over top of cable cam (Fig. 5).
(6) Install accelerator cable connector onto throttle body bellcrank pin (snaps on).
(7) Install air box housing to throttle body.
(8) Connect negative battery cable at battery.
(9) Before starting engine, operate accelerator pedal to check for any binding.
VACUUM RESERVOIR
The vacuum reservoir is located under the plastic cowl plenum cover at lower base of windshield (Fig.
8) or (Fig. 10).
REMOVAL
(1) Disconnect and isolate negative battery at cable.
(2) Remove both windshield wiper arm/blade assemblies. Refer to Group 8K, Wiper and Washer Systems.
(3) Remove rubber weather-strip at front edge of cowl grill (Fig. 9).
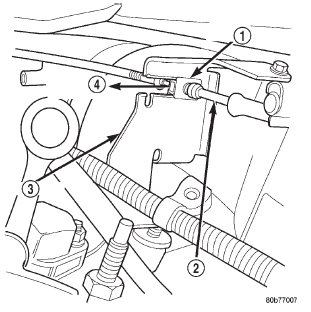 Fig. 7 Speed Control Cable at Bracket-4.7L V-8 Engine
1 - PLASTIC CABLE MOUNT
2 - SPEED CONTROL CABLE
3 - BRACKET
4 - SLIDE FOR REMOVAL
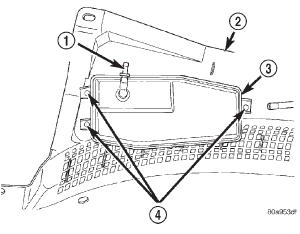 Fig. 8 Vacuum Reservoir Mounting
1 - VACUUM SUPPLY CONNECTOR
2 - COWL PLENUM COVER/GRILLE PANEL
3 - VACUUM RESERVOIR
4 - SCREWS
(4) Remove four plastic nuts securing cowl plenum cover/grille panel to studs on cowl top panel near base of windshield (Fig. 10).
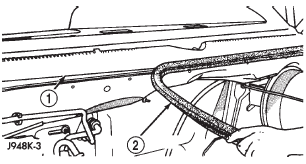 Fig. 9 Cowl Grille Panel Weather-strip
1 - COWL GRILLE
2 - WEATHERSTRIP
(5) Remove two plastic rivets securing each side of the cowl plenum cover/grille panel to cowl plenum panel and cowl top panel.
(6) Lift cowl plenum cover/grille panel from vehicle far enough to access windshield washer and vacuum plumbing near right end of cowl plenum.
(7) Disconnect windshield washer supply hose at in-line connector.
(8) Disconnect vacuum supply hose from vacuum supply connector at vacuum reservoir (Fig. 8).
(9) Remove cowl plenum cover/grille panel from vehicle.
(10) Remove three reservoir mounting screws (Fig.
8).
(11) Remove vacuum reservoir from vehicle.
INSTALLATION
(1) Install vacuum reservoir and three mounting screws to plastic cowl cover. Tighten three screws to 2.2 N*m (20 in. lbs.) torque.
(2) Position cowl plenum cover/grille panel to vehicle.
(3) Connect vacuum supply hose to vacuum reservoir.
(4) Connect windshield washer supply hose at inline connector.
(5) Install and tighten cowl cover fasteners to vehicle body.
(6) Install rubber weather-strip at front edge of cowl grill.
(7) Install windshield wiper arms. Refer to Group 8K, Wiper and Washer Systems.
(8) Connect negative battery to cable.
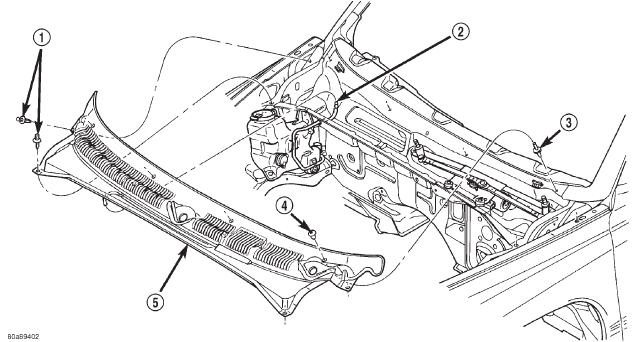 Fig. 10 Cowl Plenum Cover/Grille Panel Remove/Install
1 - PLASTIC RIVET
2 - IN-LINE WASHER SUPPLY HOSE CONNECTOR
3 - STUD
4 - PLASTIC NUT
5 - COWL PLENUM COVER/GRILLE PANEL
Speed control servo
Speed control switches
Servo cable (except 4.7L engine)
Servo cable-4.7L v-8 engine
Vacuum reservoir
Dodge Durango Service Manual
- Lubrication and Maintenance
- Suspension
- Differential and Driveline
- Brakes
- Cooling System
- Battery
- Starting Systems
- Charging System
- Ignition System
- Instrument Panel Systems
- Audio Systems
- Horn Systems
- Speed Control System
- Turn Signal and Hazard Warning Systems
- Wiper and Washer Systems
- Lamps
- Passive Restraint Systems
- Electrically Heated Systems
- Power Distribution System
- Power Lock Systems
- Vehicle Theft/Security Systems
- Power Seat System
- Power Window Systems
- Power Mirror Systems
- Chime/Buzzer Warning Systems
- Overhead Console Systems
- Engine
- Exhaust System
- Frame and Bumpers
- Fuel System
- Steering
- Transmission and Transfer Case
- Tires and Wheels
- Body
- Heating and Air Conditioning
- Emission Control Systems
- Introduction
Categories
0.0206
