Roof rail weatherstrip and retainer. Body side moldings
REMOVAL (1) Release door latch and open door.
(2) The rearward corner of the weatherstip is
adhesively attached to the body. Peel back the corner
of the weatherstrip to release it from the body.
(3) Pull weatherstrip from retainer (Fig. 61).
(4) Remove screws attaching retainer to roof rail
(Fig. 62).
(5) Separate retainer from vehicle. INSTALLATION NOTE: The screws attaching the retainer to the roof
are coated with wax to prevent water leakage. If the
retainer has been removed from the roof, replace
the screws.
1 - UPPER BODY SIDE SEAL
1 - RETAINER (1) Ensure the area where tape secures the weatherstrip
is clean. Use Mopar Super Clean or equivalent.
(2) Position retainer on vehicle.
(3) Install screws attaching retainer to roof rail.
(4) Starting at the forward end of retainer, push
weatherstrip on until seated.
(5) Peel the backing from the rearward end of the
weatherstrip and press to secure. REMOVAL (1) Apply a length of masking tape on the body,
parallel to the top edge of the molding to use as a
guide, if necessary. (2) Warm the effected stick-on molding and body
metal to approximately 38C (100F) using a suitable
heat lamp or heat gun.
(3) Pull stick-on molding from painted surface
(Fig. 63). INSTALLATION (1) Clean body surface with MOPAR Super Kleen
solvent or equivalent. Wipe surface dry with lint free
cloth.
(2) Remove protective cover from tape on back of
molding. Apply molding to body below the masking
tape guide.
(3) Remove masking tape guide and heat body and
molding. Firmly press molding to body surface to
assure adhesion.Roof rail weatherstrip and retainer
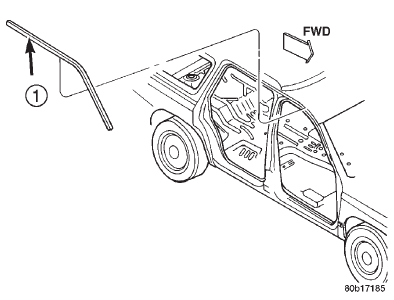 Fig. 61 Roof Rail Weatherstrip
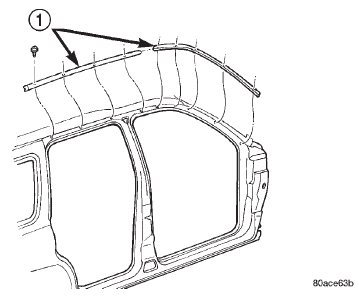 Fig. 62 Roof Rail Retainer
Body side moldings
Dodge Durango (DN) 1998-2003 Service Manual
- Lubrication and Maintenance
- Suspension
- Differential and Driveline
- Brakes
- Cooling System
- Battery
- Starting Systems
- Charging System
- Ignition System
- Instrument Panel Systems
- Audio Systems
- Horn Systems
- Speed Control System
- Turn Signal and Hazard Warning Systems
- Wiper and Washer Systems
- Lamps
- Passive Restraint Systems
- Electrically Heated Systems
- Power Distribution System
- Power Lock Systems
- Vehicle Theft/Security Systems
- Power Seat System
- Power Window Systems
- Power Mirror Systems
- Chime/Buzzer Warning Systems
- Overhead Console Systems
- Engine
- Exhaust System
- Frame and Bumpers
- Fuel System
- Steering
- Transmission and Transfer Case
- Tires and Wheels
- Body
- Heating and Air Conditioning
- Emission Control Systems
- Introduction
Categories
