Rear door trim panel. Rear door waterdam
REMOVAL (1) Release door latch and open door.
(2) Roll window down.
(3) Remove window crank (Fig. 42), if equipped. (4) Remove screws attaching trim panel to door
(Fig. 43). CAUTION: Do not forcibly pull trim panel from
door, damage to trim panel may occur. (5) Simultaneously lift upward and outward to
release retainer steps from inner door panel (Fig. 44).
(6) Disengage inside handle linkage rod from
inside handle.
(7) Disconnect power widow/lock harness connector,
if equipped (Fig. 45).
(8) Separate door trim panel from vehicle.
(9) If necessary, pull upper trim extension outward
to disengage from rear door.
1 - WINDOW CRANK REMOVAL TOOL 2 - WINDOW CRANK
1 - UPPER TRIM EXTENSION 2 - REAR DOOR 3 - PLASTIC SNAP-IN NUT 4 - TRIM PANEL
1 - TRIM PANEL 2 - RETAINER STEP 3 - INNER DOOR PANEL
1 - TRIM PANEL 2 - INSIDE HANDLE LATCH ROD 3 - POWER WINDOW/LOCK CONNECTOR INSTALLATION (1) If removed, install upper trim extension on
rear door.
(2) Position trim panel at door.
(3) Engage harness connector for power window/
lock, if equipped.
(4) Engage inside handle linkage rod to inside
handle.
(5) Align trim panel retainer steps with inner door
panel and slide trim panel into place.
(6) Install screws attaching trim panel to door. (7) Install window crank, if equipped. REMOVAL (1) Remove door trim panel.
(2) Peel the waterdam from the door.
(3) Route the latch rods and wire harnesses
through the waterdam.
(4) Separate the waterdam from the door inner
panel (Fig. 46).
1 - WATER DAM 2 - REAR DOOR INSTALLATION (1) Route the latch rods and wire harnesses
through the waterdam.
(2) Position the waterdam on the door, apply adhesive
as necessary and press into place.
(3) Install door trim panel.Rear door trim panel
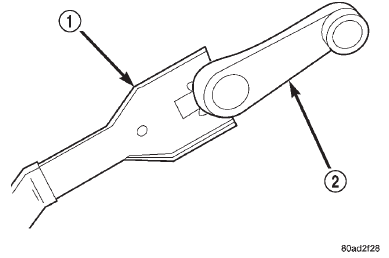 Fig. 42 Window Crank-Typical
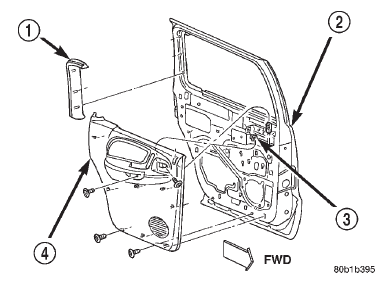 Fig. 43 Rear Door Trim Panel
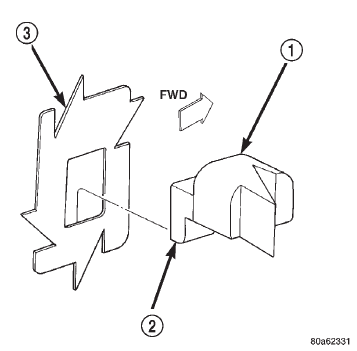 Fig. 44 Trim Panel Retainer
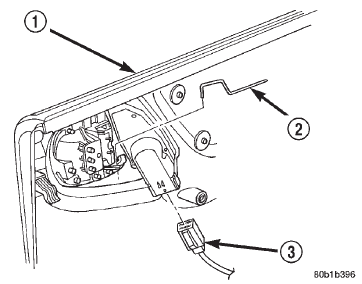 Fig. 45 Power Window/Lock Connector
Rear door waterdam
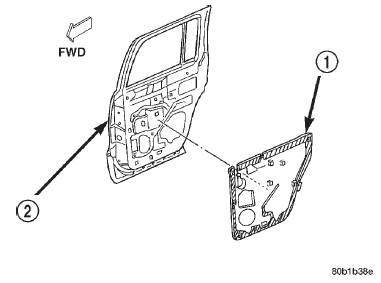 Fig. 46 Rear Door Waterdam
Dodge Durango (DN) 1998-2003 Service Manual
- Lubrication and Maintenance
- Suspension
- Differential and Driveline
- Brakes
- Cooling System
- Battery
- Starting Systems
- Charging System
- Ignition System
- Instrument Panel Systems
- Audio Systems
- Horn Systems
- Speed Control System
- Turn Signal and Hazard Warning Systems
- Wiper and Washer Systems
- Lamps
- Passive Restraint Systems
- Electrically Heated Systems
- Power Distribution System
- Power Lock Systems
- Vehicle Theft/Security Systems
- Power Seat System
- Power Window Systems
- Power Mirror Systems
- Chime/Buzzer Warning Systems
- Overhead Console Systems
- Engine
- Exhaust System
- Frame and Bumpers
- Fuel System
- Steering
- Transmission and Transfer Case
- Tires and Wheels
- Body
- Heating and Air Conditioning
- Emission Control Systems
- Introduction
