Power brake booster. Disc brake caliper
REMOVAL (1) Remove master cylinder.
(2) Disconnect vacuum lines at booster.
(3) Remove clip securing booster push rod to brake
pedal (Fig. 18).
(4) Remove nuts from booster mounting studs (Fig.
19).
(5) Remove booster, spacer and gaskets from front
cowl panel.
1 - BOOSTER ROD 2 - BRAKE PEDAL 3 - CLIP
1 - BRAKE BOOSTER 2 - SPACER 3 - FRONT COWL PANEL 4 - BRAKE PEDAL 5 - BRAKE BOOSTER ROD INSTALLATION 1) Position spacer and gaskets on booster studs.
(2) Guide booster studs into cowl panel holes and
seat booster on panel.
(3) Install and tighten booster attaching nuts to 28
N*m (250 in. lbs.).
(4) Install booster push rod on brake pedal and
install clip.
(5) Install booster check valve if removed and connect
vacuum hose to check valve.
(6) Install master cylinder.
(7) Fill and bleed brake system. REMOVAL (1) Clean master cylinder reservoir and filler caps.
(2) Remove reservoir filler cap and drain approximately
1/4 of fluid from reservoir. Use clean suction
gun or similar device to drain fluid.
(3) Raise and support vehicle.
(4) Remove front wheel and tire assemblies.
(5) Bottom caliper pistons in bores with large
C-clamp. Position clamp frame on rear of caliper and
clamp screw on outboard brake shoe.
(6) Disconnect brake hose at caliper. Discard hose
fitting washers if worn, or damaged (Fig. 20).
1 - CALIPER 2 - FRONT BRAKE HOSE 3 - FITTING WASHERS (7) With a screw driver pry up on the caliper
spring and pull the spring out of the caliper holes.
(8) Remove caliper and brake shoes from caliper. INSTALLATION (1) Install brake shoes in caliper.
(2) Install caliper and shoes over rotor and into
ledges in steering knuckle. Be sure ends of brake
shoes are properly seated on slide surfaces of ledges.
(3) Install and tighten caliper slide pins to 30 N*m
(22 ft. lbs.). Start the slide pins by hand before
tightening. Do not cross thread the pins.
(4) Install caliper spring into one caliper hole and
under the adapter. Pull down on the opposite end of
the spring (Fig. 21) and hold the end under the
adapter. With a scew driver pry up on the spring
(Fig. 22) to seat the spring into the other caliper
hole. NOTE: Verify the spring is seated properly into the
caliper holes.
1 - CALIPER 2 - ADAPTER 3 - CALIPER SPRING
1 - SCREWDRIVER 2 - ADAPTER 3 - CALIPER 4 - ADAPTER 5 - CALIPER SPRING (5) Install brake hose to caliper with new seal
washers and tighten fitting bolt to 24 N*m (18 ft.
lbs.). CAUTION: Verify brake hose is not twisted or
kinked before tightening fitting bolt. (6) Bleed base brake system.
(7) Install wheel and tire assemblies.
(8) Remove supports and lower vehicle.
(9) Pump brake pedal to seat brake shoes.
(10) Fill brake fluid reservoir.
(11) Verify firm pedal before moving vehicle.Power brake booster
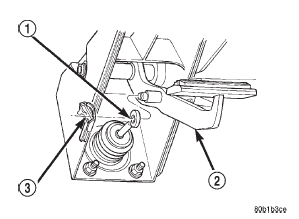 Fig. 18 Booster Rod Clip
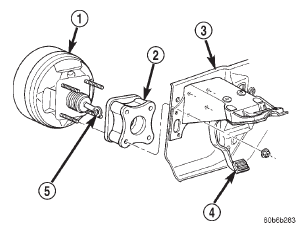 Fig. 19 Power Brake Booster Mounting
Disc brake caliper
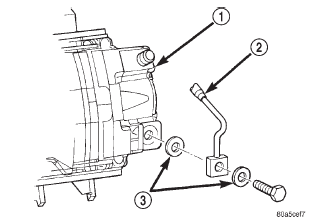 Fig. 20 Caliper Brake Hose Connection
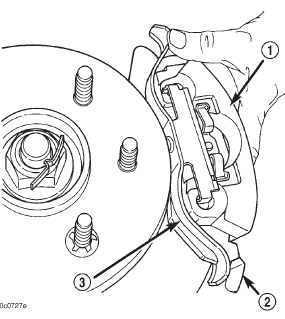 Fig. 21 Caliper Spring
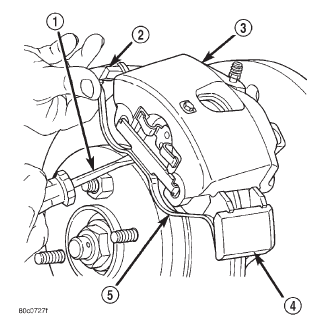 Fig. 22 Seat Caliper Spring
Dodge Durango (DN) 1998-2003 Service Manual
- Lubrication and Maintenance
- Suspension
- Differential and Driveline
- Brakes
- Cooling System
- Battery
- Starting Systems
- Charging System
- Ignition System
- Instrument Panel Systems
- Audio Systems
- Horn Systems
- Speed Control System
- Turn Signal and Hazard Warning Systems
- Wiper and Washer Systems
- Lamps
- Passive Restraint Systems
- Electrically Heated Systems
- Power Distribution System
- Power Lock Systems
- Vehicle Theft/Security Systems
- Power Seat System
- Power Window Systems
- Power Mirror Systems
- Chime/Buzzer Warning Systems
- Overhead Console Systems
- Engine
- Exhaust System
- Frame and Bumpers
- Fuel System
- Steering
- Transmission and Transfer Case
- Tires and Wheels
- Body
- Heating and Air Conditioning
- Emission Control Systems
- Introduction
Categories
