Pinion gear
NOTE: The ring gear and pinion are serviced in a matched set. Do not replace the pinion without replacing the ring gear.
REMOVAL
(1) Remove differential from the axle housing.
(2) Mark the companion yoke and companion flange for installation alignment.
(3) Remove the bolts holding the companion yoke to the companion flange.
(4) Separate the propeller shaft from the companion flange and using suitable wire, tie the propeller shaft to the vehicle underbody.
(5) Rotate the pinion gear three or four times.
(6) Measure the amount of torque necessary to rotate the pinion with a (in. lbs.) dial-type torque wrench (Fig. 18). Record the torque reading for installation reference.
(7) Install socket head bolts into two of the threaded holes in the companion flange, 180 apart.
(8) Position Holder 6719 against the companion flange and install a hex head bolt and washer into one of the remaining threaded holes. Tighten the bolt and washer so that the Holder 6719 is held to the flange.
(9) Hold the flange with Holder 6719. Remove the pinion nut.
(10) Remove the companion flange with Remover C-452 (Fig. 19).
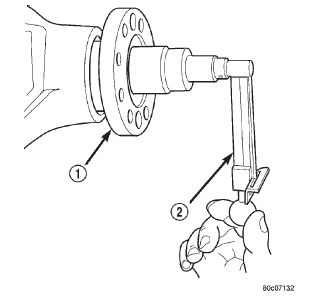 Fig. 18 Measure Pinion Rotating Torque
1 - COMPANION FLANGE
2 - INCH POUND TORQUE WRENCH
(11) Remove the pinion from housing (Fig. 20).
Catch the pinion with your hand to prevent it from falling and being damaged.
(12) Using a suitable pry tool, or a slide hammer mounted screw, remove the pinion seal.
(13) Remove oil slinger, if equipped, and front pinion bearing.
(14) Remove the front pinion bearing cup with Remover D-103 and Handle C-4171 (Fig. 21).
(15) Remove the rear bearing cup from housing (Fig. 22). Use Remover 8401 and Handle C-4171.
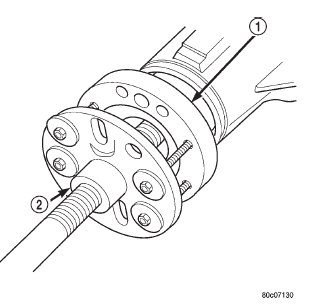 Fig. 19 Companion Flange Removal
1 - COMPANION FLANGE
2 - PULLER TOOL
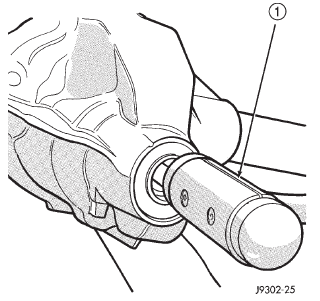 Fig. 20 Remove Pinion
1 - RAWHIDE HAMMER
(16) Remove the collapsible preload spacer (Fig.
23).
(17) Remove the rear bearing from the pinion with Puller/Press C-293-PA and Adapters C-293-42 (Fig.
24).
Place 4 adapter blocks so they do not damage the bearing cage.
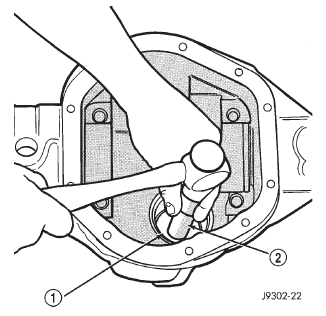 Fig. 21 Front Bearing Cup Removal
1 - REMOVER
2 - HANDLE
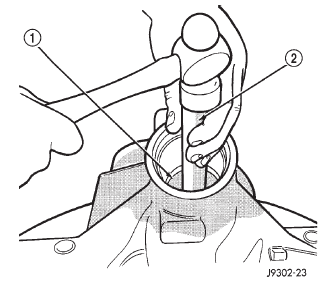 Fig. 22 Rear Bearing Cup Removal
1 - DRIVER
2 - HANDLE
(18) Remove the depth shims from the pinion shaft. Record the thickness of the depth shims.
INSTALLATION
(1) Apply Mopart Door Ease, or equivalent, stick lubricant to outside surface of bearing cup.
 Fig. 23 Collapsible Spacer
1 - COLLAPSIBLE SPACER
2 - SHOULDER
3 - PINION
4 - PINION DEPTH SHIM
5 - REAR BEARING
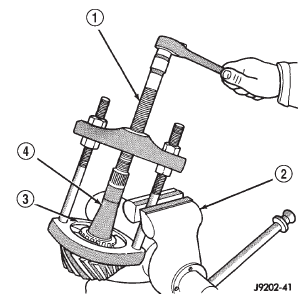 Fig. 24 Rear Bearing Removal
1 - SPECIAL TOOL C-293-PA
2 - VISE
3 - ADAPTERS
4 - DRIVE PINION GEAR SHAFT
(2) Install the pinion rear bearing cup with Installer D-145 and Driver Handle C-4171 (Fig. 25).
Ensure cup is correctly seated.
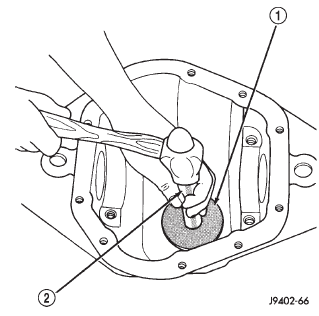 Fig. 25 Pinion Rear Bearing Cup Installation
1 - INSTALLER
2 - HANDLE
(3) Apply Mopart Door Ease, or equivalent, stick lubricant to outside surface of bearing cup.
(4) Install the pinion front bearing cup with Installer D-129 and Handle C-4171 (Fig. 26).
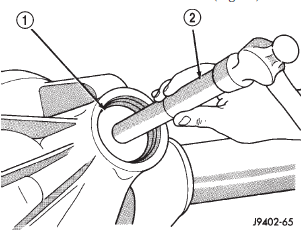 Fig. 26 Pinion Front Bearing Cup Installation
1 - INSTALLER
2 - HANDLE
(5) Install pinion front bearing, and oil slinger, if equipped.
(6) Apply a light coating of gear lubricant on the lip of pinion seal.
(7) Install seal with Installer C-3972-A and Handle C-4171 (Fig. 27).
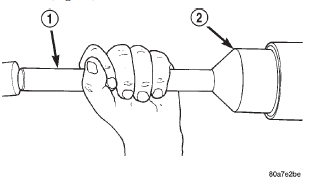 Fig. 27 Pinion Seal Installation
1 - SPECIAL TOOL C-4171
2 - SPECIAL TOOL C-3972-A
NOTE: Pinion depth shims are placed between the rear pinion bearing cone and pinion gear head to achieve proper ring gear and pinion mesh. If the factory installed ring gear and pinion are reused, the pinion depth shim should not require replacement.
If required, refer to Pinion Gear Depth to select the proper thickness shim before installing rear pinion bearing.
(8) Place the proper thickness depth shim on the pinion shaft.
(9) Install the rear bearing and slinger, if equipped, onto the pinion shaft with Installer 6448 (Fig. 28).
(10) Install a new collapsible preload spacer onto the pinion shaft (Fig. 29).
(11) Install the pinion in the axle housing.
(12) Seat the companion flange on the pinion shaft with Installer C-3718 and Holder 6719.
(13) Remove the Installer C-3718 and install the new pinion nut.
CAUTION: Do not exceed the minimum tightening torque when installing the companion flange at this point. Damage to the collapsible spacer or bearings may result.
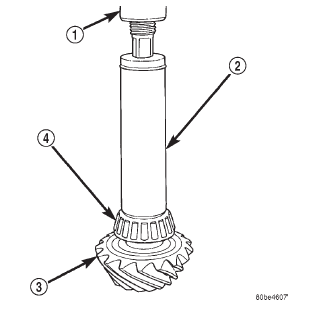 Fig. 28 Shaft Rear Bearing Installation
1 - PRESS
2 - INSTALLATION TOOL
3 - DRIVE PINION
4 - DRIVE PINION SHAFT REAR BEARING
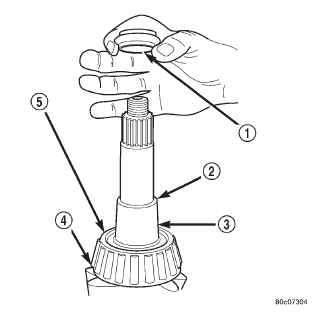 Fig. 29 Collapsible Preload Spacer
1 - COLLAPSIBLE SPACER
2 - SHOULDER
3 - PINION
4 - PINION DEPTH SHIM
5 - REAR BEARING
(14) Tighten the pinion nut until there is zero bearing end-play (Fig. 30).
(15) Tighten the nut to 271 N*m (200 ft. lbs.).
CAUTION: Never loosen pinion nut to decrease pinion bearing rotating torque and never exceed specified preload torque. If preload torque or rotating torque is exceeded a new collapsible spacer must be installed. The torque sequence will then have to be repeated.
(16) Using Holder 6719 and a torque wrench set at 474 N*m (350 ft. lbs.), crush collapsible spacer until bearing end play is taken up.
NOTE: If the spacer requires more than 474 N*m (350 ft. lbs.) torque to crush, the collapsible spacer is defective and must be replaced.
 Fig. 30 Tighten Pinion Nut
1 - DIFFERENTIAL HOUSING
2 - COMPANION FLANGE HOLDER
3 - TORQUE WRENCH
(17) Slowly tighten the nut in 6.8 N*m (5 ft. lbs.) increments until the desired rotating torque is achieved. Measure the rotating torque frequently to avoid overcrushing the collapsible spacer (Fig. 31).
(18) Check bearing rotating torque with an inch pound torque wrench (Fig. 31). The torque necessary to rotate the pinion should be:
- Original Bearings - 1 to 2.5 N*m (10 to 20 in.
lbs.).
- New Bearings - 1.7 to 2.5 N*m (15 to 22 in.
lbs.).
(19) Install the differential in the axle housing.
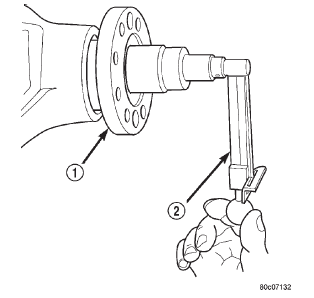 Fig. 31 Check Pinion Rotating Torque
1 - COMPANION FLANGE
2 - INCH POUND TORQUE WRENCH
Dodge Durango (DN) 1998-2003 Service Manual
- Lubrication and Maintenance
- Suspension
- Differential and Driveline
- Brakes
- Cooling System
- Battery
- Starting Systems
- Charging System
- Ignition System
- Instrument Panel Systems
- Audio Systems
- Horn Systems
- Speed Control System
- Turn Signal and Hazard Warning Systems
- Wiper and Washer Systems
- Lamps
- Passive Restraint Systems
- Electrically Heated Systems
- Power Distribution System
- Power Lock Systems
- Vehicle Theft/Security Systems
- Power Seat System
- Power Window Systems
- Power Mirror Systems
- Chime/Buzzer Warning Systems
- Overhead Console Systems
- Engine
- Exhaust System
- Frame and Bumpers
- Fuel System
- Steering
- Transmission and Transfer Case
- Tires and Wheels
- Body
- Heating and Air Conditioning
- Emission Control Systems
- Introduction
Categories
