Overdrive unit
REMOVAL
(1) Shift transmission into Park.
(2) Raise vehicle.
(3) Remove transfer case, if equipped.
(4) Mark propeller shaft universal joint(s) and axle pinion yoke, or the companion flange and flange yoke, for alignment reference at installation, if neccesary.
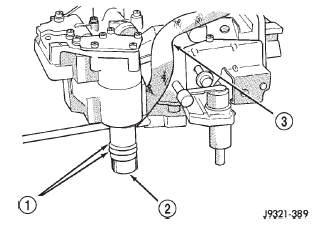 Fig. 89 Valve Body Harness Connector O-Ring Seal
1 - CONNECTOR O-RINGS
2 - VALVE BODY HARNESS CONNECTOR
3 - HARNESS
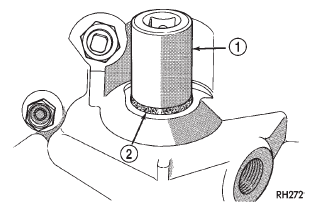 Fig. 90 Manual Lever Shaft Seal
1 - 15/1688 SOCKET
2 - SEAL
(5) Disconnect and remove the rear propeller shaft, if necessary.
(6) Remove transmission oil pan, remove gasket, drain oil and reinstall pan.
(7) If overdrive unit had malfunctioned, or if fluid is contaminated, remove entire transmission. If diagnosis indicated overdrive problems only, remove just the overdrive unit.
(8) Support transmission with transmission jack.
(9) Remove vehicle speed sensor.
(10) Remove bolts attaching overdrive unit to transmission (Fig. 92).
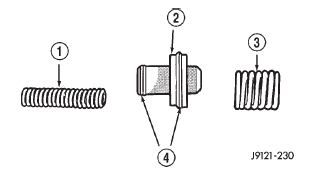 Fig. 91 Accumulator Piston Components
1 - INNER SPRING
2 - ACCUMULATOR PISTON
3 - OUTER SPRING
4 - SEAL RINGS
CAUTION: Support the overdrive unit with a jack before moving it rearward. This is necessary to prevent damaging the intermediate shaft. Do not allow the shaft to support the entire weight of the overdrive unit.
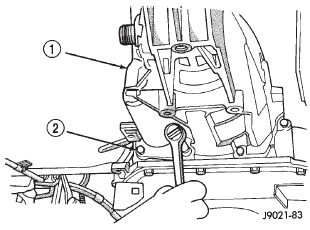 Fig. 92 Overdrive Unit Bolts
1 - OVERDRIVE UNIT
2 - ATTACHING BOLTS (7)
(11) Carefully work overdrive unit off intermediate shaft. Do not tilt unit during removal. Keep it as level as possible.
(12) If overdrive unit does not require service, immediately insert Alignment Tool 6227-2 in splines of planetary gear and overrunning clutch to prevent splines from rotating out of alignment. If misalignment occurs, overdrive unit will have to be disassembled in order to realign splines.
(13) Remove and retain overdrive piston thrust bearing. Bearing may remain on piston or in clutch hub during removal.
(14) Position drain pan on workbench.
(15) Place overdrive unit over drain pan. Tilt unit to drain residual fluid from case.
(16) Examine fluid for clutch material or metal fragments. If fluid contains these items, overhaul will be necessary.
(17) If overdrive unit does not require any service, leave alignment tool in position. Tool will prevent accidental misalignment of planetary gear and overrunning clutch splines.
INSTALLATION
(1) Be sure overdrive unit Alignment Tool 6227-2 is fully seated before moving unit. If tool is not seated and gear splines rotate out of alignment, overdrive unit will have to be disassembled in order to realign splines.
(2) If overdrive piston retainer was not removed during service and original case gasket is no longer reusable, prepare new gasket by trimming it.
(3) Cut out old case gasket around piston retainer with razor knife (Fig. 93).
(4) Use old gasket as template and trim new gasket to fit.
(5) Position new gasket over piston retainer and on transmission case. Use petroleum jelly to hold gasket in place if necessary. Do not use any type of sealer to secure gasket. Use petroleum jelly only.
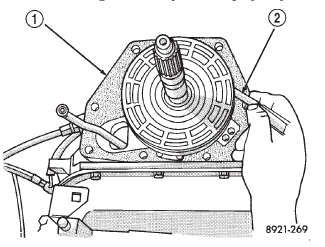 Fig. 93 Trimming Overdrive Case Gasket
1 - GASKET
2 - SHARP KNIFE
(6) Install selective spacer on intermediate shaft, if removed. Spacer goes in groove just rearward of shaft rear splines (Fig. 94).
(7) Install thrust bearing in overdrive unit sliding hub. Use petroleum jelly to hold bearing in position.
CAUTION: Be sure the shoulder on the inside diameter of the bearing is facing forward.
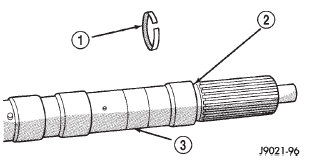 Fig. 94 Intermediate Shaft Selective Spacer Location
1 - SELECTIVE SPACER
2 - SPACER GROOVE
3 - INTERMEDIATE SHAFT
(8) Verify that splines in overdrive planetary gear and overrunning clutch hub are aligned with Alignment Tool 6227-2. Overdrive unit cannot be installed if splines are not aligned. If splines have rotated out of alignment, unit will have to be disassembled to realign splines.
(9) Carefully slide Alignment Tool 6227-2 out of overdrive planetary gear and overrunning clutch splines.
(10) Raise overdrive unit and carefully slide it straight onto intermediate shaft. Insert park rod into park lock reaction plug at same time. Avoid tilting overdrive during installation as this could cause planetary gear and overrunning clutch splines to rotate out of alignment. If this occurs, it will be necessary to remove and disassemble overdrive unit to realign splines.
(11) Work overdrive unit forward on intermediate shaft until seated against transmission case.
(12) Install bolts attaching overdrive unit to transmission unit. Tighten bolts in diagonal pattern to 34 N*m (25 ft-lbs).
(13) Install speed sensor.
(14) Connect speed sensor and overdrive wires.
(15) Install the transfer case, if equipped.
(16) Align and install rear propeller shaft, if necessary.
Dodge Durango (DN) 1998-2003 Service Manual
- Lubrication and Maintenance
- Suspension
- Differential and Driveline
- Brakes
- Cooling System
- Battery
- Starting Systems
- Charging System
- Ignition System
- Instrument Panel Systems
- Audio Systems
- Horn Systems
- Speed Control System
- Turn Signal and Hazard Warning Systems
- Wiper and Washer Systems
- Lamps
- Passive Restraint Systems
- Electrically Heated Systems
- Power Distribution System
- Power Lock Systems
- Vehicle Theft/Security Systems
- Power Seat System
- Power Window Systems
- Power Mirror Systems
- Chime/Buzzer Warning Systems
- Overhead Console Systems
- Engine
- Exhaust System
- Frame and Bumpers
- Fuel System
- Steering
- Transmission and Transfer Case
- Tires and Wheels
- Body
- Heating and Air Conditioning
- Emission Control Systems
- Introduction
