Left front fender. Right front fender
REMOVAL (1) Remove battery.
(2) Raise and support the vehicle.
(3) Remove left front wheel.
(4) Remove wheel opening molding.
(5) Remove wheelhouse liner.
(6) Remove left headlamp module.
(7) Remove PDC (power distribution center).
(8) Remove battery tray and battery support
bracket (Fig. 13).
(9) Remove HCU (hydraulic control unit) if
equipped. Refer to Group 5, Brakes for service procedures.
(10) Disengage clips attaching hood release cable
to inner fender.
(11) Disengage clips attaching wire harness to
inner fender and wheelhouse.
(12) Remove bolt attaching fender to lower rocker
panel.
(13) Remove bolts attaching fender to lower radiator
closure panel (Fig. 15).
(14) Remove bolts attaching fender to hood hinge
support bracket.
(15) Remove bolts attaching fender to upper cowl
(Fig. 14).
(16) Remove bolts attaching fender to upper radiator
closure panel.
(17) Separate fender and wheelhouse from vehicle.
1 - FRONT FENDER 2 - BATTERY TRAY SUPPORT BRACKET 3 - BATTERY TRAY INSTALLATION (1) Position fender and wheelhouse from vehicle.
(2) Install bolts attaching fender to upper radiator
closure panel.
(3) Install bolts attaching fender to upper cowl.
(4) Install bolts attaching fender to hood hinge
support bracket.
(5) Install bolts attaching fender to lower radiator
closure panel.
(6) Install bolt attaching fender to lower rocker
panel.
(7) Position the hood release cable to inner fender
and engage clips.
(8) Position the wire harnesses on the inner fender
and wheelhouse and engage clips.
(9) Install HCU if equipped. Refer to Group 5,
Brakes for service procedures. (10) Install battery support bracket and battery
tray.
(11) Install PDC (power distribution center).
(12) Install left headlamp module.
(13) Install battery.
(14) Install wheelhouse liner.
(15) Install wheel opening molding.
(16) Install left front wheel.
(17) Remove the support and lower the vehicle. REMOVAL (1) Disconnect battery negative cable.
(2) Raise and support the vehicle.
(3) Remove right front wheel.
(4) Remove wheel opening molding.
(5) Remove wheelhouse liner.
(6) Remove right headlamp module.
(7) Remove air cleaner element housing.
1 - FRONT FENDER 2 - BRACKET 3 - U-NUT 4 - DASH PANEL 5 - U-NUT (8) Remove powertrain control module.
(9) Disengage clips attaching wire harnesses to
inner fender and wheelhouse. (10) Remove bolt attaching fender to lower rocker
panel.
(11) Remove bolts attaching fender to lower radiator
closure panel (Fig. 15).
(12) Remove bolts attaching fender to hood hinge
support bracket.
(13) Remove bolts attaching fender to upper cowl.
(14) Remove bolts attaching fender to upper radiator
closure panel.
(15) Separate fender and wheelhouse from vehicle. INSTALLATION (1) Position fender and wheelhouse from vehicle.
(2) Install bolts attaching fender to upper radiator
closure panel.
(3) Install bolts attaching fender to upper cowl.
(4) Install bolts attaching fender to hood hinge
support bracket.
(5) Install bolts attaching fender to lower radiator
closure panel.
(6) Install bolt attaching fender to lower rocker
panel.
(7) Position the wire harnesses on the inner fender
and wheelhouse and engage clips.
(8) Install powertrain control module.
(9) Install air cleaner element housing.
1 - U-NUT 2 - U-NUT 3 - FRONT FENDER 4 - RADIATOR CLOSURE PANEL (10) Install right headlamp module.
(11) Install wheelhouse liner.
(12) Install wheel opening molding.
(13) Install right front wheel.
(14) Remove the support and lower the vehicle.
(15) Connect battery negative cable.Left front fender
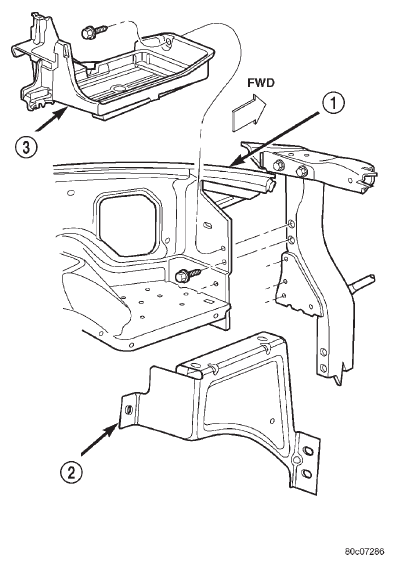 Fig. 13 Battery Tray and Support Bracket
Right front fender
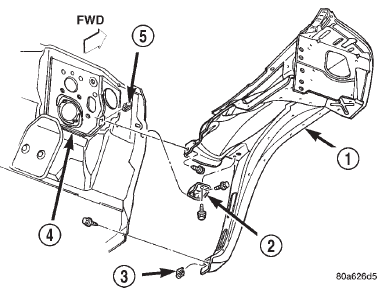 Fig. 14 Front Fender
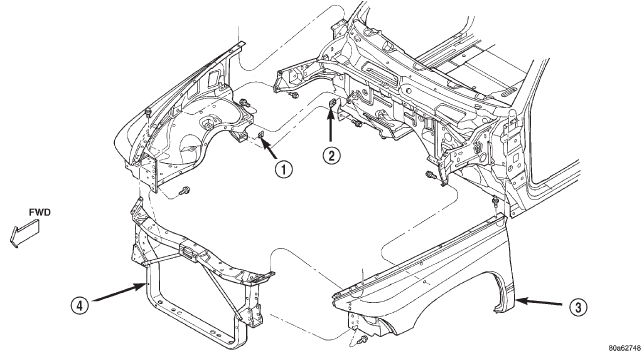 Fig. 15 Front Fender
Dodge Durango (DN) 1998-2003 Service Manual
- Lubrication and Maintenance
- Suspension
- Differential and Driveline
- Brakes
- Cooling System
- Battery
- Starting Systems
- Charging System
- Ignition System
- Instrument Panel Systems
- Audio Systems
- Horn Systems
- Speed Control System
- Turn Signal and Hazard Warning Systems
- Wiper and Washer Systems
- Lamps
- Passive Restraint Systems
- Electrically Heated Systems
- Power Distribution System
- Power Lock Systems
- Vehicle Theft/Security Systems
- Power Seat System
- Power Window Systems
- Power Mirror Systems
- Chime/Buzzer Warning Systems
- Overhead Console Systems
- Engine
- Exhaust System
- Frame and Bumpers
- Fuel System
- Steering
- Transmission and Transfer Case
- Tires and Wheels
- Body
- Heating and Air Conditioning
- Emission Control Systems
- Introduction
Categories
