Diagnosis and testing. Service procedures
Pressure gauges A quality air pressure gauge is recommended to
check tire pressure. After checking the air pressure,
replace valve cap finger tight. Tread wear indicators Tread wear indicators are molded into the bottom
of the tread grooves. When tread depth is 1.6 mm
(1/16 in.), the tread wear indicators will appear as a
13 mm (1/2 in.) band (Fig. 4).
Tire replacement is necessary when indicators
appear in two or more grooves or if localized balding
occurs. Under inflation will cause wear on the shoulders of
tire. Over inflation will cause wear at the center of
tire.
Excessive camber causes the tire to run at an
angle to the road. One side of tread is then worn
more than the other (Fig. 5).
Excessive toe-in or toe-out causes wear on the
tread edges and a feathered effect across the tread
(Fig. 5).
1 - TREAD ACCEPTABLE 2 - TREAD UNACCEPTABLE 3 - WEAR INDICATOR
Radial-ply tires are sensitive to force impulses
caused by improper mounting, vibration, wheel
defects, or possibly tire imbalance.
To find out if tires are causing the noise or vibration,
drive the vehicle over a smooth road at varying
speeds. Note the noise level during acceleration and
deceleration. The engine, differential and exhaust
noises will change as speed varies, while the tire
noise will usually remain constant. Tires on the front and rear operate at different
loads and perform different steering, driving, and
braking functions. For these reasons they wear at
unequal rates and tend to develop irregular wear
patterns. These effects can be reduced by rotating
the tires at regular intervals. The benefits of tire
rotation are: The suggested method of tire rotation is (Fig. 6).
Other rotation methods can be used, but they will
not provide all the tire longevity benefits. Wheels and tires are match mounted at the factory.
This means that the high spot of the tire is matched
to the low spot on the wheel rim. Each are marked
with a bright colored temporary label on the outboard
surface for alignment. The wheel is also
marked permanently on the inside of the rim in the tire well. This permanent
mark may be a paint dot
or line, a permanent label or a stamped impression
such as an X. An optional location mark is a small
spherical indentation on the vertical face of the outboard
flange on some non styled base steel wheels.
The tire must be removed to locate the permanent
mark on the inside of the wheel.
Before dismounting a tire from its wheel, a reference
mark should be placed on the tire at the valve stem location. This reference
will ensure that it is
remounted in the original position on the wheel.
(1) Remove the tire and wheel assembly from the
vehicle and mount on a service dynamic balance
machine.
(2) Measure the total runout on the center of the
tire tread rib with a dial indicator. Record the indicator
reading. Mark the tire to indicate the high spot.
Place a mark on the tire at the valve stem location
(Fig. 7).
1 - REFERENCE MARK 2 - 1ST MEASUREMENT
HIGH SPOT MARK TIRE AND RIM 3 - WHEEL 4 - VALVE STEM (3) Break down the tire and remount it 180
degrees on the rim (Fig. 8).
1 - VALVE STEM 2 - REFERENCE MARK (4) Measure the total indicator runout again. Mark
the tire to indicate the high spot.
(5) If runout is still excessive, the following procedures
must be done. For proper repairing, a radial tire must be removed
from the wheel. Repairs should only be made if the
defect, or puncture, is in the tread area (Fig. 10). The
tire should be replaced if the puncture is located in
the sidewall.
Deflate tire completely before removing the tire
from the wheel. Use lubrication such as a mild soap
solution when dismounting or mounting tire. Use
tools free of burrs or sharp edges which could damage
the tire or wheel rim.
Before mounting tire on wheel, make sure all rust
is removed from the rim bead and repaint if necessary.
1 - 2ND HIGH SPOT ON TIRE 2 - 1ST HIGH SPOT ON TIRE Install wheel on vehicle, and tighten to proper
torque specification.Diagnosis and testing
Tire wear patterns
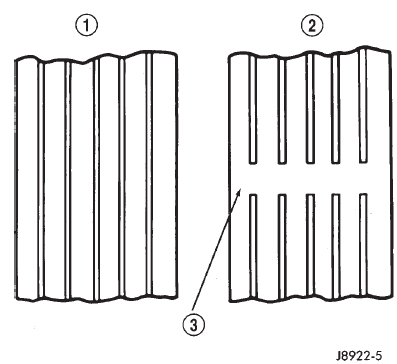 Fig. 4 Tread Wear Indicators
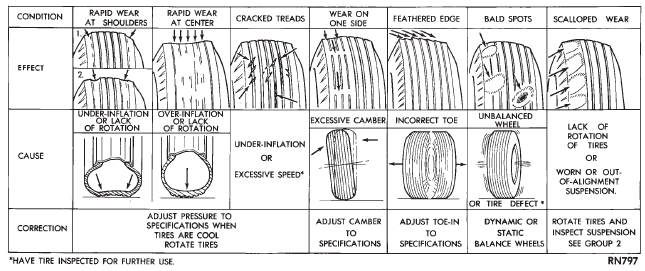 Fig. 5 Tire Wear Patterns
Tire noise or vibration
Service procedures
Rotation
Match mounting
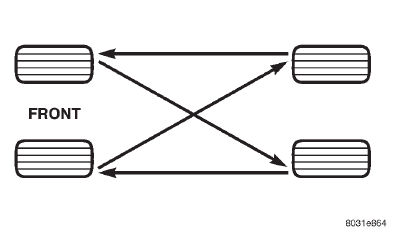 Fig. 6 Tire Rotation Pattern
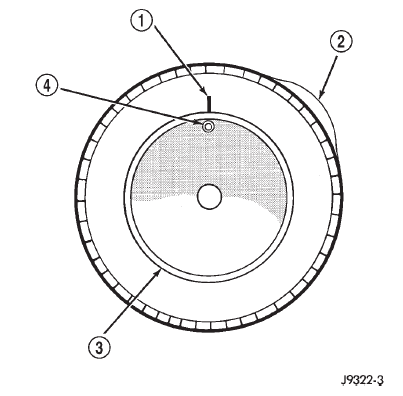 Fig. 7 First Measurement On Tire
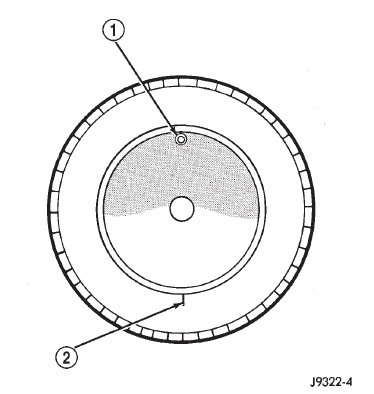 Fig. 8 Remount Tire 180 Degrees
Repairing leaks
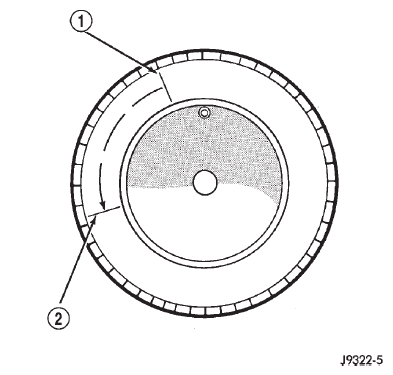 Fig. 9 Remount Tire 90 Degrees In Direction of Arrow
Dodge Durango (DN) 1998-2003 Service Manual
- Lubrication and Maintenance
- Suspension
- Differential and Driveline
- Brakes
- Cooling System
- Battery
- Starting Systems
- Charging System
- Ignition System
- Instrument Panel Systems
- Audio Systems
- Horn Systems
- Speed Control System
- Turn Signal and Hazard Warning Systems
- Wiper and Washer Systems
- Lamps
- Passive Restraint Systems
- Electrically Heated Systems
- Power Distribution System
- Power Lock Systems
- Vehicle Theft/Security Systems
- Power Seat System
- Power Window Systems
- Power Mirror Systems
- Chime/Buzzer Warning Systems
- Overhead Console Systems
- Engine
- Exhaust System
- Frame and Bumpers
- Fuel System
- Steering
- Transmission and Transfer Case
- Tires and Wheels
- Body
- Heating and Air Conditioning
- Emission Control Systems
- Introduction
