Description and operation. Removal and installation
DESCRIPTION Windshields are made of two pieces of glass with a
plastic inner layer. Windshields and selected stationary
glass are structural members of the vehicle. The
windshield glass is bonded to the windshield frame
with urethane adhesive. OPERATION Windshields and other stationary glass protect the
occupants from the effects of the elements. Windshields
are also used to retain some airbags in position
during deployment. Urethane bonded glass is
difficult to salvage during removal. The urethane
bonding is difficult to cut or clean from any surface.
Before removing the glass, check the availability of
replacement components. WARNING: DO NOT OPERATE THE VEHICLE
WITHIN 24 HOURS OF WINDSHIELD INSTALLATION.
IT TAKES AT LEAST 24 HOURS FOR URETHANE
ADHESIVE TO CURE. IF IT IS NOT CURED, THE
WINDSHIELD MAY NOT PERFORM PROPERLY IN
AN ACCIDENT.
URETHANE ADHESIVES ARE APPLIED AS A SYSTEM.
USE GLASS CLEANER, GLASS PREP SOLVENT,
GLASS PRIMER, PVC (VINYL) PRIMER AND
PINCH WELD (FENCE) PRIMER PROVIDED BY THE
ADHESIVE MANUFACTURER. IF NOT, STRUCTURAL
INTEGRITY COULD BE COMPROMISED.
DAIMLERCHRYSLER DOES NOT RECOMMEND
GLASS ADHESIVE BY BRAND. TECHNICIANS
SHOULD REVIEW PRODUCT LABELS AND TECHNICAL
DATA SHEETS, AND USE ONLY ADHESIVES
THAT THEIR MANUFACTURES WARRANT WILL
RESTORE A VEHICLE TO THE REQUIREMENTS OF
FMVSS 212. TECHNICIANS SHOULD ALSO INSURE
THAT PRIMERS AND CLEANERS ARE COMPATIBLE
WITH THE PARTICULAR ADHESIVE USED.
BE SURE TO REFER TO THE URETHANE MANUFACTURER'S
DIRECTIONS FOR CURING TIME
SPECIFICATIONS, AND DO NOT USE ADHESIVE
AFTER ITS EXPIRATION DATE.
VAPORS THAT ARE EMITTED FROM THE URETHANE
ADHESIVE OR PRIMER COULD CAUSE
PERSONAL INJURY. USE THEM IN A WELL-VENTILATED
AREA.
SKIN CONTACT WITH URETHANE ADHESIVE
SHOULD BE AVOIDED. PERSONAL INJURY MAY
RESULT.
ALWAYS WEAR EYE AND HAND PROTECTION
WHEN WORKING WITH GLASS. CAUTION: Protect all painted and trimmed surfaces
from coming in contact with urethane or primers.
Be careful not to damage painted surfaces when
removing moldings or cutting urethane around
windshield. REMOVAL (1) Remove rear view mirror.
(2) Remove wipers and cowl grille.
(3) With doors open, remove the weatherstrip from
the side windshield moldings.
(4) Remove the screws attaching the side windshield
molding to the A-pillars.
(5) Cut urethane bonding from around windshield
using a suitable sharp cold knife (Fig. 1).
(6) Using a long knife, cut urethane bonding from
inside the cab at the base of the windshield.
1 - WINDSHIELD 2 - COLD KNIFE INSTALLATION WARNING: Allow the urethane at least 24 hours to
cure before returning the vehicle to use. CAUTION: Roll down the left and right front door
glass and open the rear glass slider (if available)
before installing windshield to avoid pressurizing
the passenger compartment if a door is slammed
before urethane is cured. Water leaks can result. The windshield fence should be cleaned of most of its
old urethane bonding material. A small amount of old
urethane, approximately 1-2 mm in height, should
remain on the fence. Do not grind off or completely
remove all old urethane from the fence, the paint finish
and bonding strength will be adversely affected. Support
spacers located on the cowl at the bottom of the windshield
opening (Fig. 2) should be replaced with new
parts. Replace any missing or damaged spacers around
the perimeter of the windshield opening.
(1) Place replacement windshield into windshield
opening and position glass in the center of the opening
against the support spacers. Mark the glass at
the support spacers with a grease pencil or pieces of
masking tape and ink pen to use as a reference for
installation. Remove replacement windshield from
windshield opening (Fig. 3).
(2) Position the windshield inside up on a suitable
work surface with two padded, wood 10 cm by 10 cm
by 50 cm (4 in. by 4 in. by 20 in.) blocks, placed parallel
75 cm (2.5 ft.) apart (Fig. 4).
(3) Clean inside of windshield with MOPAR Glass
Cleaner and lint-free cloth.
(4) Apply clear glass primer 25 mm (1 in.) wide
around perimeter of windshield and wipe with a new
clean and dry lint- free cloth.
(5) Apply the header molding to the windshield.
(6) Apply pinchweld primer 15 mm (.75 in.) wide
around the windshield fence. Allow at least three
minutes drying time.
(7) Apply a 13mm (1/2 in.) high and 10mm (3/8 in.)
wide bead of urethane around the perimeter of windshield.
At the bottom, apply the bead 7 mm (1/4 in.)
inboard from the glass edge. On the three sides
where the molding is on the glass, follow the edge of
molding. The urethane bead should be shaped in a
triangular cross-section, this can be achieved by
notching the tip of the applicator (Fig. 5).
(8) With the aid of a helper, position the windshield
over the windshield opening. Align the reference marks
at the bottom of the windshield to the support spacers.
(9) Slowly lower windshield glass to the fence
opening guiding the lower corners into proper position.
Beginning at the bottom and continuing to the
top, push glass onto fence along the A-Pillars. Push
windshield inward to the fence at the bottom corners.
(10) Clean excess urethane from exterior with
MOPAR Super Clean or equivalent.
(11) Apply 150 mm (6 in.) lengths of 50 mm (2 in.)
masking tape spaced 250 mm (10 in.) apart to hold
molding in place until urethane cures.
(12) Install new screws attaching the side windshield
moldings to the A-pillars.
(13) Install the weatherstrip onto side windshield
moldings.
(14) Install cowl grille and wipers.
(15) Install rear view mirror.
(16) After urethane has cured, remove tape strips
and water test windshield to verify repair.
1 - WINDSHIELD 2 - SPACERS 3 - SUPPORTS
1 - WINDSHIELD 2 - INDEX MARKS 3 - SUPPORT SPACERS
1 - WINDSHIELD AND MOULDINGS 2 - URETHANE BEAD AROUND GLASS 7mm (.3 in.) FROM EDGE 3 - BLOCKS REMOVAL (1) Remove trim panel.
(2) Remove waterdam.
(3) Remove inner beltline weatherstrip
(4) Remove outer beltline weatherstrip.
(5) Remove door glass from door.
(6) Remove bolt attaching bottom of rearward run
channel to door inner panel.
(7) Remove nuts attaching stationary glass to door
(Fig. 6).
1 - APPLICATOR TIP (8) Separate rearward run channel/stationary
glass from door.
(9) Pull to separate stationary glass from run
channel.
1 - RUN CHANNEL WITH STATIONARY GLASS 2 - REAR DOOR 3 - REGULATOR 4 - RUN CHANNEL 5 - DOOR GLASS INSTALLATION (1) Ensure glass and run channel are clean.
(2) Apply butyl adhesive to glass and insert in
glass run channel.
(3) Install nuts attaching stationary glass to door.
Tighten nuts to 3 N*m (30 in. lbs.) torque (Fig. 6).
(4) Install bolt attaching bottom of rearward run
channel to door inner panel.
(5) Position door glass in door.
(6) Install door glass to regulator.
(7) Install outer beltline weatherstrip.
(8) Install inner beltline weatherstrip
(9) Install waterdam.
(10) Install trim panel. REMOVAL (1) Remove quarter panel trim.
(2) Carefully pull down headliner to access upper
nuts attaching quarter window glass to pinchweld
and remove nuts.
(3) Remove nuts attaching quarter window glass to
pinchweld (Fig. 7).
(4) Using razor knife, cut butyl sealer between the
mounting studs attaching glass to pinchweld.
(5) Push glass from opening.
1 - QUARTER GLASS 2 - STUD 3 - NUT INSTALLATION The pinchweld should be cleaned of all old butyl sealer.
(1) Apply 6 mm (0.25 in.) of butyl tape around
perimeter of glass assembly encapsulation track. Ensure the butyl tape is wrapped around the mounting
studs.
(2) Place glass into opening and insert mounting
studs through holes in pinchweld.
(3) Install nuts attaching quarter window glass to
pinchweld. Tighten nuts to 4.5 N*m (40 in. lbs.)
torque.
(4) Install interior trim. REMOVAL Refer to the Windshield paragraph of this section
for all warnings and cautions.
(1) Remove liftgate upper trim panel.
(2) Remove CHMSL.
(3) Remove rear window wiper arm, if equipped.
(4) Remove side moldings.
(5) Cut urethane bonding from around liftgate
backlite using a suitable sharp cold knife. A pneumatic
cutting device can be used if available.
(6) Separate backlite from vehicle. INSTALLATION CAUTION: Open a window before installing backlite.
This will avoid pressurizing the passenger compartment.
If a door is slammed before urethane is
cured, water leaks can result. The window opening fence should be cleaned of old
urethane bonding material.
(1) Clean inside of backlite with Mopar Glass
Cleaner or equivalent and lint-free cloth.
(2) Apply PVC (vinyl) primer 25 mm (1 in.) wide
around edge of backlite. Wipe with clean/dry lint-free
cloth.
(3) Apply fence primer around edge of fence. Allow
at least eighteen minutes drying time.
(4) Install new upper and lower seals on liftgate
backlite (Fig. 8). (5) Apply a 12 mm (0.4 in.) bead of urethane
around window opening fence.
Position backlite into window opening (Fig. 9).
1 - UPPER SEAL 2 - LIFTGATE BACKLITE 3 - LOWER SEAL
1 - BACKLITE 2 - LIFTGATEDescription and operation
Stationary glass
Windshield safety precautions
Removal and installation
Windshield
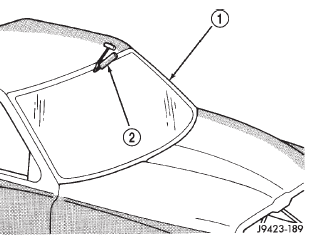 Fig. 1 Cut Urethane Around Windshield
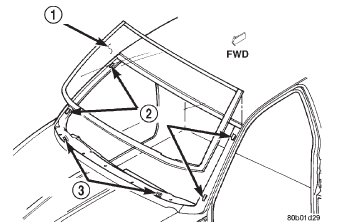 Fig. 2 Support Spacers
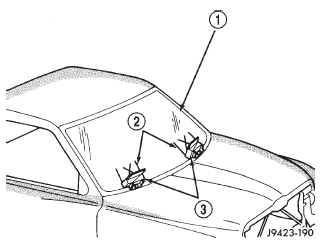 Fig. 3 Center Windshield and Mark at Support Spacers
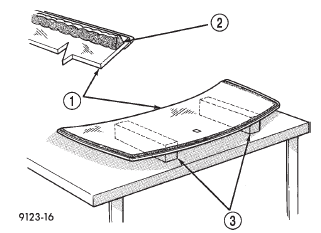 Fig. 4 Work Surface Set up and Molding Installation
Rear door stationary glass
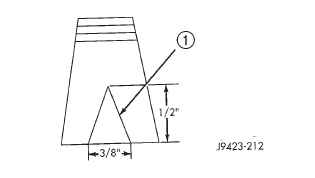 Fig. 5 Applicator Tip
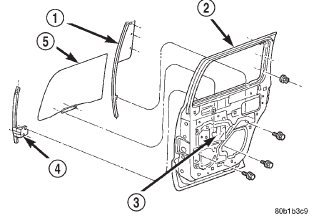 Fig. 6 Rear Door Stationary Glass
Quarter window glass
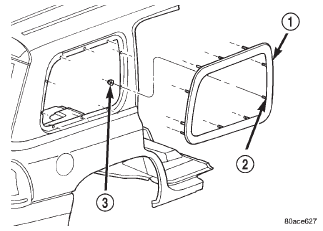 Fig. 7 Quarter Window Glass
Liftgate backlite
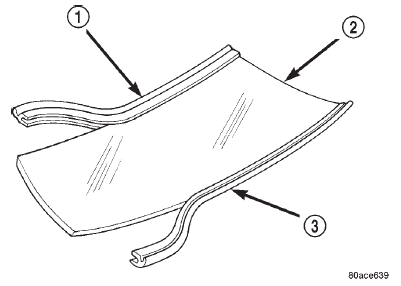 Fig. 8 Liftgate Backlite Seals
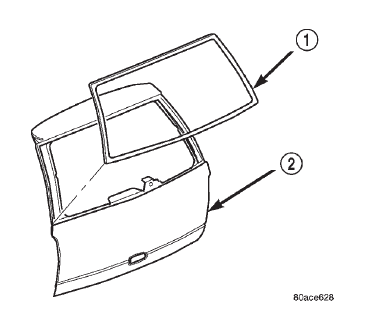 Fig. 9 Liftgate Backlite
Dodge Durango (DN) 1998-2003 Service Manual
- Lubrication and Maintenance
- Suspension
- Differential and Driveline
- Brakes
- Cooling System
- Battery
- Starting Systems
- Charging System
- Ignition System
- Instrument Panel Systems
- Audio Systems
- Horn Systems
- Speed Control System
- Turn Signal and Hazard Warning Systems
- Wiper and Washer Systems
- Lamps
- Passive Restraint Systems
- Electrically Heated Systems
- Power Distribution System
- Power Lock Systems
- Vehicle Theft/Security Systems
- Power Seat System
- Power Window Systems
- Power Mirror Systems
- Chime/Buzzer Warning Systems
- Overhead Console Systems
- Engine
- Exhaust System
- Frame and Bumpers
- Fuel System
- Steering
- Transmission and Transfer Case
- Tires and Wheels
- Body
- Heating and Air Conditioning
- Emission Control Systems
- Introduction
Categories
