Compressor clutch relay. Condenser
(1) Disconnect and isolate the battery negative
cable.
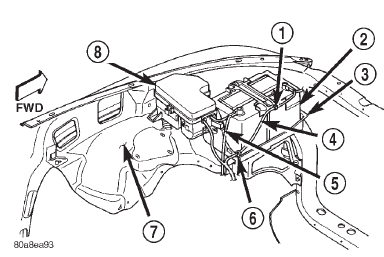
(2) Remove the cover from the Power Distribution
Center (PDC) (Fig. 36).
1 - CLIP 2 - BATTERY 3 - TRAY 4 - NEGATIVE CABLE 5 - POSITIVE CABLE 6 - CLIP 7 - FENDER INNER SHIELD 8 - POWER DISTRIBUTION CENTER (3) Refer to the label on the PDC for compressor
clutch relay identification and location.
(4) Unplug the compressor clutch relay from the
PDC.
(5) Install the compressor clutch relay by aligning
the relay terminals with the cavities in the PDC and
pushing the relay firmly into place.
(6) Install the PDC cover.
(7) Connect the battery negative cable.
(8) Test the relay operation. WARNING: REVIEW THE WARNINGS AND CAUTIONS
IN THE GENERAL INFORMATION SECTION
NEAR THE FRONT OF THIS GROUP BEFORE PERFORMING
THE FOLLOWING OPERATION. CAUTION: Before removing the condenser, note the
location of each of the radiator and condenser air
seals. These seals are used to direct air through the
condenser and radiator. The air seals must be reinstalled
in their proper locations in order for the air
conditioning and engine cooling systems to perform
as designed. REMOVAL (1) Disconnect and isolate the battery negative
cable.
(2) Recover the refrigerant from the refrigerant
system. See Refrigerant Recovery in the Service Procedures
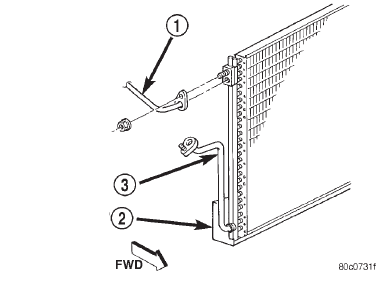
section of this group. (3) Disconnect the refrigerant line fitting that
secures the discharge line to the condenser inlet (Fig.
37). Install plugs in, or tape over all of the opened
refrigerant line fittings.
1 - DISCHARGE LINE 2 - CONDENSOR 3 - TO LIQUID LINE (4) Disconnect the refrigerant line fitting that
secures the liquid line to the condenser outlet. Install
plugs in, or tape over all of the opened refrigerant
line fittings.
(5) Remove the two screws that secure the radiator
and fan shroud module to the inside of the upper
radiator crossmember.
(6) On models equipped with a V-8 engine, remove
the radiator from the engine compartment. Refer to
Cooling Systems for the procedures.
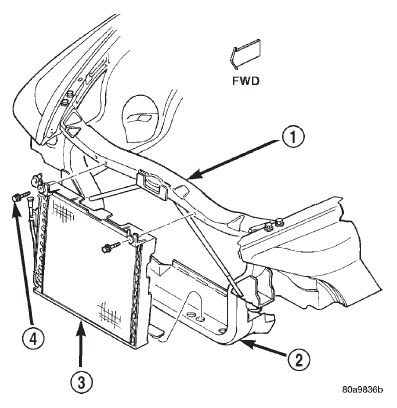
(7) Remove the two screws that secure the condenser
to the outside of the upper radiator crossmember
(Fig. 38).
(8) Tilt the top of the radiator and fan shroud
module towards the engine, using care not to damage
the radiator fins on the engine cooling fan.
(9) With the radiator and fan shroud module
tilted, carefully lift the condenser upwards until the
lower condenser mounts are clear of the isolators in
the lower crossmember.
(10) Remove the condenser from the vehicle. INSTALLATION (1) With the radiator and fan shroud module tilted
towards the engine, carefully position the lower condenser
mounts in the lower crossmember isolators.
(2) Reinstall the two screws that secure the condenser
to the outside of the upper radiator crossmember
and tighten to 10.7 N*m (95 in. lbs.).
1 - UPPER CROSSMEMBER 2 - LOWER CROSSMEMBER 3 - CONDENSER 4 - SCREW (3) On models equipped with a V-8 engine, reinstall
the radiator to the engine compartment. Refer
to Cooling Systems for the procedures.
(4) Reinstall the two screws that secure the radiator
and fan shroud module to the inside of the upper
radiator crossmember.
(5) Remove the plugs or tape from the refrigerant
line fittings on the liquid line and the condenser outlet.
Connect the liquid line to the condenser outlet.
Tighten the fitting to 25.99 63.39 N*m (230 630 in.
lbs.).
(6) Remove the plugs or tape from the refrigerant
line fittings on the discharge line and the condenser
inlet. Connect the discharge line to the condenser
inlet. Tighten the fitting to 25.99 63.39 N*m (230
630 in. lbs.).
(7) Check that all of the condenser and radiator
air seals are in their proper locations.
(8) Connect the battery negative cable.
(9) Evacuate the refrigerant system. See Refrigerant
System Evacuate in the Service Procedures section
of this group.
(10) Charge the refrigerant system. See Refrigerant
System Charge in the Service Procedures section
of this group. NOTE: If the condenser is replaced, add 30 milliliters
(1 fluid ounce) of refrigerant oil to the refrigerant
system. Use only refrigerant oil of the type
recommended for the compressor in the vehicle.Compressor clutch relay
 Fig. 36 Power Distribution Center
Condenser
 Fig. 37 Condenser Line Fittings
 Fig. 38 Condenser Remove/Install - Typical
Dodge Durango (DN) 1998-2003 Service Manual
- Lubrication and Maintenance
- Suspension
- Differential and Driveline
- Brakes
- Cooling System
- Battery
- Starting Systems
- Charging System
- Ignition System
- Instrument Panel Systems
- Audio Systems
- Horn Systems
- Speed Control System
- Turn Signal and Hazard Warning Systems
- Wiper and Washer Systems
- Lamps
- Passive Restraint Systems
- Electrically Heated Systems
- Power Distribution System
- Power Lock Systems
- Vehicle Theft/Security Systems
- Power Seat System
- Power Window Systems
- Power Mirror Systems
- Chime/Buzzer Warning Systems
- Overhead Console Systems
- Engine
- Exhaust System
- Frame and Bumpers
- Fuel System
- Steering
- Transmission and Transfer Case
- Tires and Wheels
- Body
- Heating and Air Conditioning
- Emission Control Systems
- Introduction
