Automatic belt tensioner-4.7L engine. Radiator draincock
On 4.7L engines, the tensioner is equipped
with an indexing tang on back of tensioner and
an indexing stop on tensioner housing. If a new
belt is being installed, tang must be within
approximately 24 mm (.94 inches) of indexing
stop. Belt is considered new if it has been used
15 minutes or less. If the above specification cannot be met, check for: NOTE: A used belt should be replaced if tensioner
indexing arrow has moved to the minmum tension
indicator. Tensioner travel stops at this point. REMOVAL (1) Remove accessory drive belt. Refer to Accessory
Drive Belt in this section.
(2) Remove tensioner assembly from mounting
bracket (Fig. 62).
1 - TIMING CHAIN COVER 2 - BOLT TORQUE TO 41 N*m (30 FT LBS) 3 - AUTOMATIC BELT TENSIONER WARNING: BECAUSE OF HIGH SPRING PRESSURE,
DO NOT ATTEMPT TO DISASSEMBLE AUTOMATIC
TENSIONER. UNIT IS SERVICED AS AN
ASSEMBLY EXCEPT FOR PULLEY ON TENSIONER. (3) Remove pulley bolt. Remove pulley from tensioner. INSTALLATION (1) Install pulley and pulley bolt to tensioner.
Tighten bolt to 61 N*m (45 ft. lbs.) torque.
(2) An indexing slot is located on back of tensioner.
Align this slot to the head of the bolt on the front
cover. Install the mounting bolt. Tighten bolt to 41
N*m (30 ft. lbs.).
(3) Install accessory drive belt.
(4) Check belt indexing marks. REMOVAL WARNING: DO NOT LOOSEN RADIATOR DRAINCOCK
WITH SYSTEM HOT AND PRESSURIZED.
SERIOUS BURNS FROM COOLANT CAN OCCUR. (1) Unscrew draincock stem (counterclockwise
rotation). When stem is completely unscrewed, pull it
from radiator tank and draincock body (Fig. 63).
1 - BODY 2 - SEAL 3 - STEM (2) Using a pair of needle nose pliers, compress
draincock body and pull straight out of radiator (Fig.
64).
1 - DRAINCOCK BODY 2 - NEEDLE NOSE PLIERS INSTALLATION (1) Install draincock stem loosely into body (Fig.
65). The draincock assembly cannot be installed if
stem is threaded into the body.
(2) Push draincock assembly into opening in radiator
tank. It will snap into place when fully seated.
(3) Tighten draincock (clockwise) to 2.0 to 2.7 N*m
(18-25 in. lbs.) torque.
1 - STEM 2 - BODY LOOSE ON STEMAutomatic belt tensioner-4.7L engine
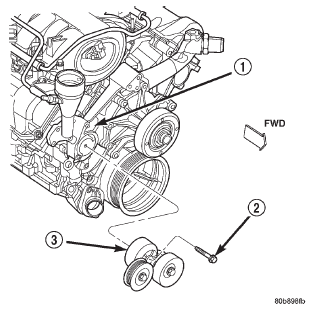 Fig. 62 Automatic Belt Tensioner-4.7L Engine
Radiator draincock
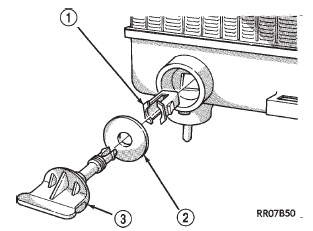 Fig. 63 Draincock Assembly
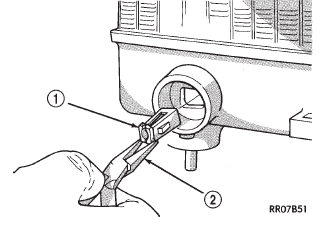 Fig. 64 Draincock Body Removal
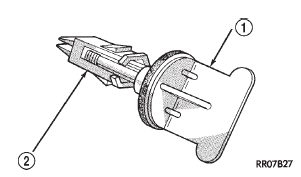 Fig. 65 Draincock Assembled for Installation
Dodge Durango (DN) 1998-2003 Service Manual
- Lubrication and Maintenance
- Suspension
- Differential and Driveline
- Brakes
- Cooling System
- Battery
- Starting Systems
- Charging System
- Ignition System
- Instrument Panel Systems
- Audio Systems
- Horn Systems
- Speed Control System
- Turn Signal and Hazard Warning Systems
- Wiper and Washer Systems
- Lamps
- Passive Restraint Systems
- Electrically Heated Systems
- Power Distribution System
- Power Lock Systems
- Vehicle Theft/Security Systems
- Power Seat System
- Power Window Systems
- Power Mirror Systems
- Chime/Buzzer Warning Systems
- Overhead Console Systems
- Engine
- Exhaust System
- Frame and Bumpers
- Fuel System
- Steering
- Transmission and Transfer Case
- Tires and Wheels
- Body
- Heating and Air Conditioning
- Emission Control Systems
- Introduction
Categories
