2Nd row seat back. 2Nd row seat back cover
REMOVAL (1) Tumble seat forward.
(2) Remove tumble release outboard handle.
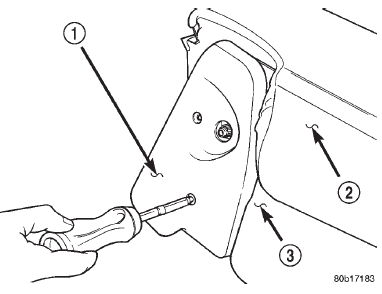
(3) Remove inboard & outboard side shields (Fig.
7).
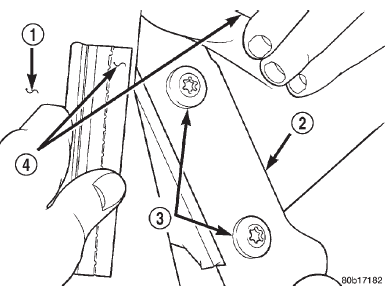
(4) Disengage J-straps to access inboard and outboard
bolts attaching seat back to hinge (Fig. 8).
(5) Remove bolts attaching hinge to seat back.
(6) Separate seat back from vehicle.
1 - OUT BOARD SIDE SHIELD 2 - SEAT BACK 3 - SEAT CUSHION
1 - SEAT BACK 2 - HINGE BRACKET 3 - BOLTS 4 - J-STRAP INSTALLATION (1) Position seat back in vehicle.
(2) Install bolts attaching hinge to seat back.
Tighten bolts to 27 N*m (19 ft. lbs.) torque.
(3) Engage inboard and outboard J-straps.
(4) Install inboard & outboard side shields (Fig. 7).
(5) Install tumble release outboard handle.
(6) Return seat to seating position. NOTE: CLOTH TRIM IS BONDED TO SEAT FOAM REMOVAL (1) Tumble seat forward.
(2) Disengage J-strap at seat back base.
(3) Disengage inboard and outboard J-straps on
seat back.
(4) Return seat to seating position. NOTE: When removing the head restraint sleeves
and guides, the retaining tabs on the sleeves and
guides will be damaged. Check the availability of
replacement parts before servicing. (5) Remove head restraint, head restraint sleeves,
and head restraint guides. Discard sleeves and
guides.
(6) Roll cover upward and remove from seat back. INSTALLATION (1) Position cover on seat back.
(2) Roll cover downward over seat back.
(3) Install new head restraint sleeves and guides.
Install head restraint.
(4) Tumble seat forward.
(5) Engage inboard and outboard J-straps on seat
back.
(6) Engage J-strap at seat back base.
(7) Return seat to seating position.2Nd row seat back
 Fig. 7 2nd Row Seat Side Shield
 Fig. 8 2nd Row Seat Back J-Straps
2Nd row seat back cover
Dodge Durango (DN) 1998-2003 Service Manual
- Lubrication and Maintenance
- Suspension
- Differential and Driveline
- Brakes
- Cooling System
- Battery
- Starting Systems
- Charging System
- Ignition System
- Instrument Panel Systems
- Audio Systems
- Horn Systems
- Speed Control System
- Turn Signal and Hazard Warning Systems
- Wiper and Washer Systems
- Lamps
- Passive Restraint Systems
- Electrically Heated Systems
- Power Distribution System
- Power Lock Systems
- Vehicle Theft/Security Systems
- Power Seat System
- Power Window Systems
- Power Mirror Systems
- Chime/Buzzer Warning Systems
- Overhead Console Systems
- Engine
- Exhaust System
- Frame and Bumpers
- Fuel System
- Steering
- Transmission and Transfer Case
- Tires and Wheels
- Body
- Heating and Air Conditioning
- Emission Control Systems
- Introduction
